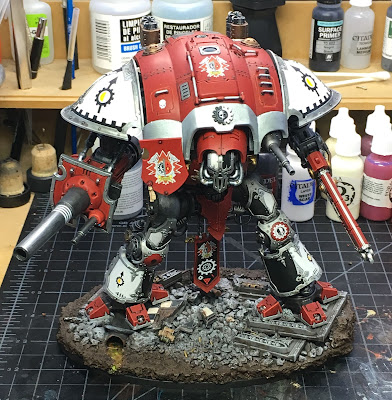
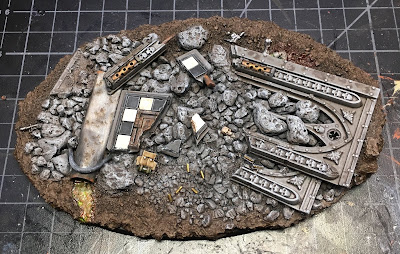
While listening to the Long War web-cast last night, I chose to geek out on the base for Custos Martis. When the Knight Paladin was built as a freeblade, I constructed a custom base from cork tile and many odds and ends from the beats lab. You can find all sorts of things on this base. I wanted it to look like the Paladin was striding through an active city battle zone.
Vallejo Black Lava was used for the fine rubble and a spattering of my usual model railroad ballast mix and larger rock rubble was glued down. I added a length of aluminium tube, which I crushed to give the Knight weight as it stands on it. Then I glued down bits of chopped City Fight terrain. As a bonus, I pulled spare bits from my Death Korps of Krieg army and littered that about as well. You can find bits of lasrifle, a laspistol, ammo clips, a back pack, and even an officers arm (his body apparently crushed under the fallen masonry).
It was a lot of fun to build and I was looking forward to finally getting some paint on it. In fact, as the evening wore on I was amused at how much fun I was having painting a pile of rubble! A scenic base like this easily becomes a project all its own, which is why I felt it deserved its own post.
I started painting with the airbrush by blocking in the brown earth, and then picking out the grey rubble. Next. I put that away and brought out the paint brush to tidy things up and add in the details. I decided to go with tiled floor sections to add some visual interest to the scene. And some spots of rust, including a rusty scummy pool oozing from the crushed pipe, will add some pop as well.
Then it was time to do some highlighting. I also decided to experiment with some Vallejo water effects that I've had on hand for quite some time, but never found an excuse to use. Several layers are patiently added to the ooze. A little green wash was applied over one of the layers, attempting to give the muck some real depth, with rust sinking and pooling beneath the greenish ooze. Some GW tin bits was added to the vents in the wall pieces.
 |
| The back of the base |
Then the remaining details were painted and more water effects layered on to bring the level of the ooze up to a point where it looks like it partially fills the crushed pipe. Some Secret Weapon Miniatures Fallout Wash was layered on the ooze as well. We want a really nice toxic soup here for the grim dark. The arm was painted and highlighted as was the backpack up by the ooze. Some GW Blood for the Blood God was added around the arm to sell the "recently squished" image. Additional highlights were dry brushed over the skulls and other bits to lighten and "dust up" the scene.
I let the base sit 24 hours to be sure the water effects cured properly. Then I masked off the sludge pool with poster-tac and sprayed the rest of the base with a heavy coat of Model Masters Lusterless Flat, my favorite dull varnish. While that dried I set about preparing the legs for pinning. The Imperial Knight feet are hollow and require some filler before they can be pinned down to a base. I mixed up some green stuff and plugged up a couple of the toes where I wanted to use pins. Two per foot should do it. ON one toe, you can see where I pressed the feet down on the base to accommodate and uneven bits.
Once the green stuff sets up, I'll drill holes in the green stuff and mount the pins. Then I will just need to drill matching holes in the base and glue the legs down using the pins. I usually use super glue for pinning a model to its base, but I think 5-minute epoxy will be a better choice here. The base is very irregular and the epoxy will do a better job of gap filling beneath the toes of the feet so I get good solid contact. I don't want this guy popping off the base unexpectedly!
I hope you've enjoyed checking out the base work in detail. The next post for this project will be the last! It's time to put a stamp of DONE on Custos Martis so I can move on to DreadTober with a clean slate.
Cheers and Happy Gaming!


Nice base work. Thematic and not too distracting from the paint job on the Knight, great job mate
ReplyDeleteHey, thanks for that! I'm looking forward to the remaining three questoris knights I have built for the House. More knights = more bases! :)
Delete