Tuesday, December 19, 2017

Taking a Break...Happy Holidays!!


I'm stepping away from the blog for a few weeks while I focus on the family and our holiday celebrations.  Over the break I'll be checking out the Dark Angels codex and considering my next projects.  Deathwatch and Grey Knights still await of course, and I'm looking forward to mixing in some Dark Angels projects in the New Year as well.  I see a decent amount of interest in the Sector Mechanicus terrain projects I posted earlier this year, So I expect I'll need to get some of that painted up as well.  Plenty of fun projects await! I am looking at how to put in more how-to content for 2018 so I'm not just showing of my work. I read so much good content out there on other blogs and its time I did my best to contribute as well.

As I close out 2017, here's a look at what I was able to accomplish.  It all got started with Squaduary 2017 when I was able to complete a squad of Deathwatch marines.

Squaduary 2017 project

The I built and painted some scatter terrain and a couple sets of the Munitorum containers.

Munitorum Armored Containers Blue

Munitorum Armored Containers Red

Munitorum Armored Containers Yellow

The Custodes I recently completed got built in the spring of this year, and the sector Mechanicus terrain came out.

Sector Mechanicus Terrain WIP
The spread of new Sector Mechanicus themed terrain on the table-top

I dabbled in Shadow Wars: Armageddon, building Orc, Space Marine, Astra Militarum and Harlequin war bands.  I even dabbled in painting Orks again.

Death Skullz Ork
"I'm a hankerin' fer yer loot!"

Death Skullz Ork WIP

And I tried out a Tempestus Scions paint scheme for my Imperial Guard war band.  I'll get these finished up one day, but they were put aside for now.  I don't get nearly enough time to play and Necromunda now looks like a more compelling rule set...and I was eager to use what little game play opportunities I had for 8th edition 40K.

29th Zetic Tigers WIP
WIP: 29th Zetic Tigers

I posted an article about my efforts adding extra shelves to my Ikea display cases. This was a great project as it doubled my display capacity without requiring any more square footage from my already cramped hobby cave.

Same ol' cabinet, twice the shelf space!

There was a good deal of modelling Deathwatch marines and the adding Grey Knight characters from the new codex.  And the Deathwatch Watch Master got painted.

Deathwatch Grand Master
Deathwatch Watch Master

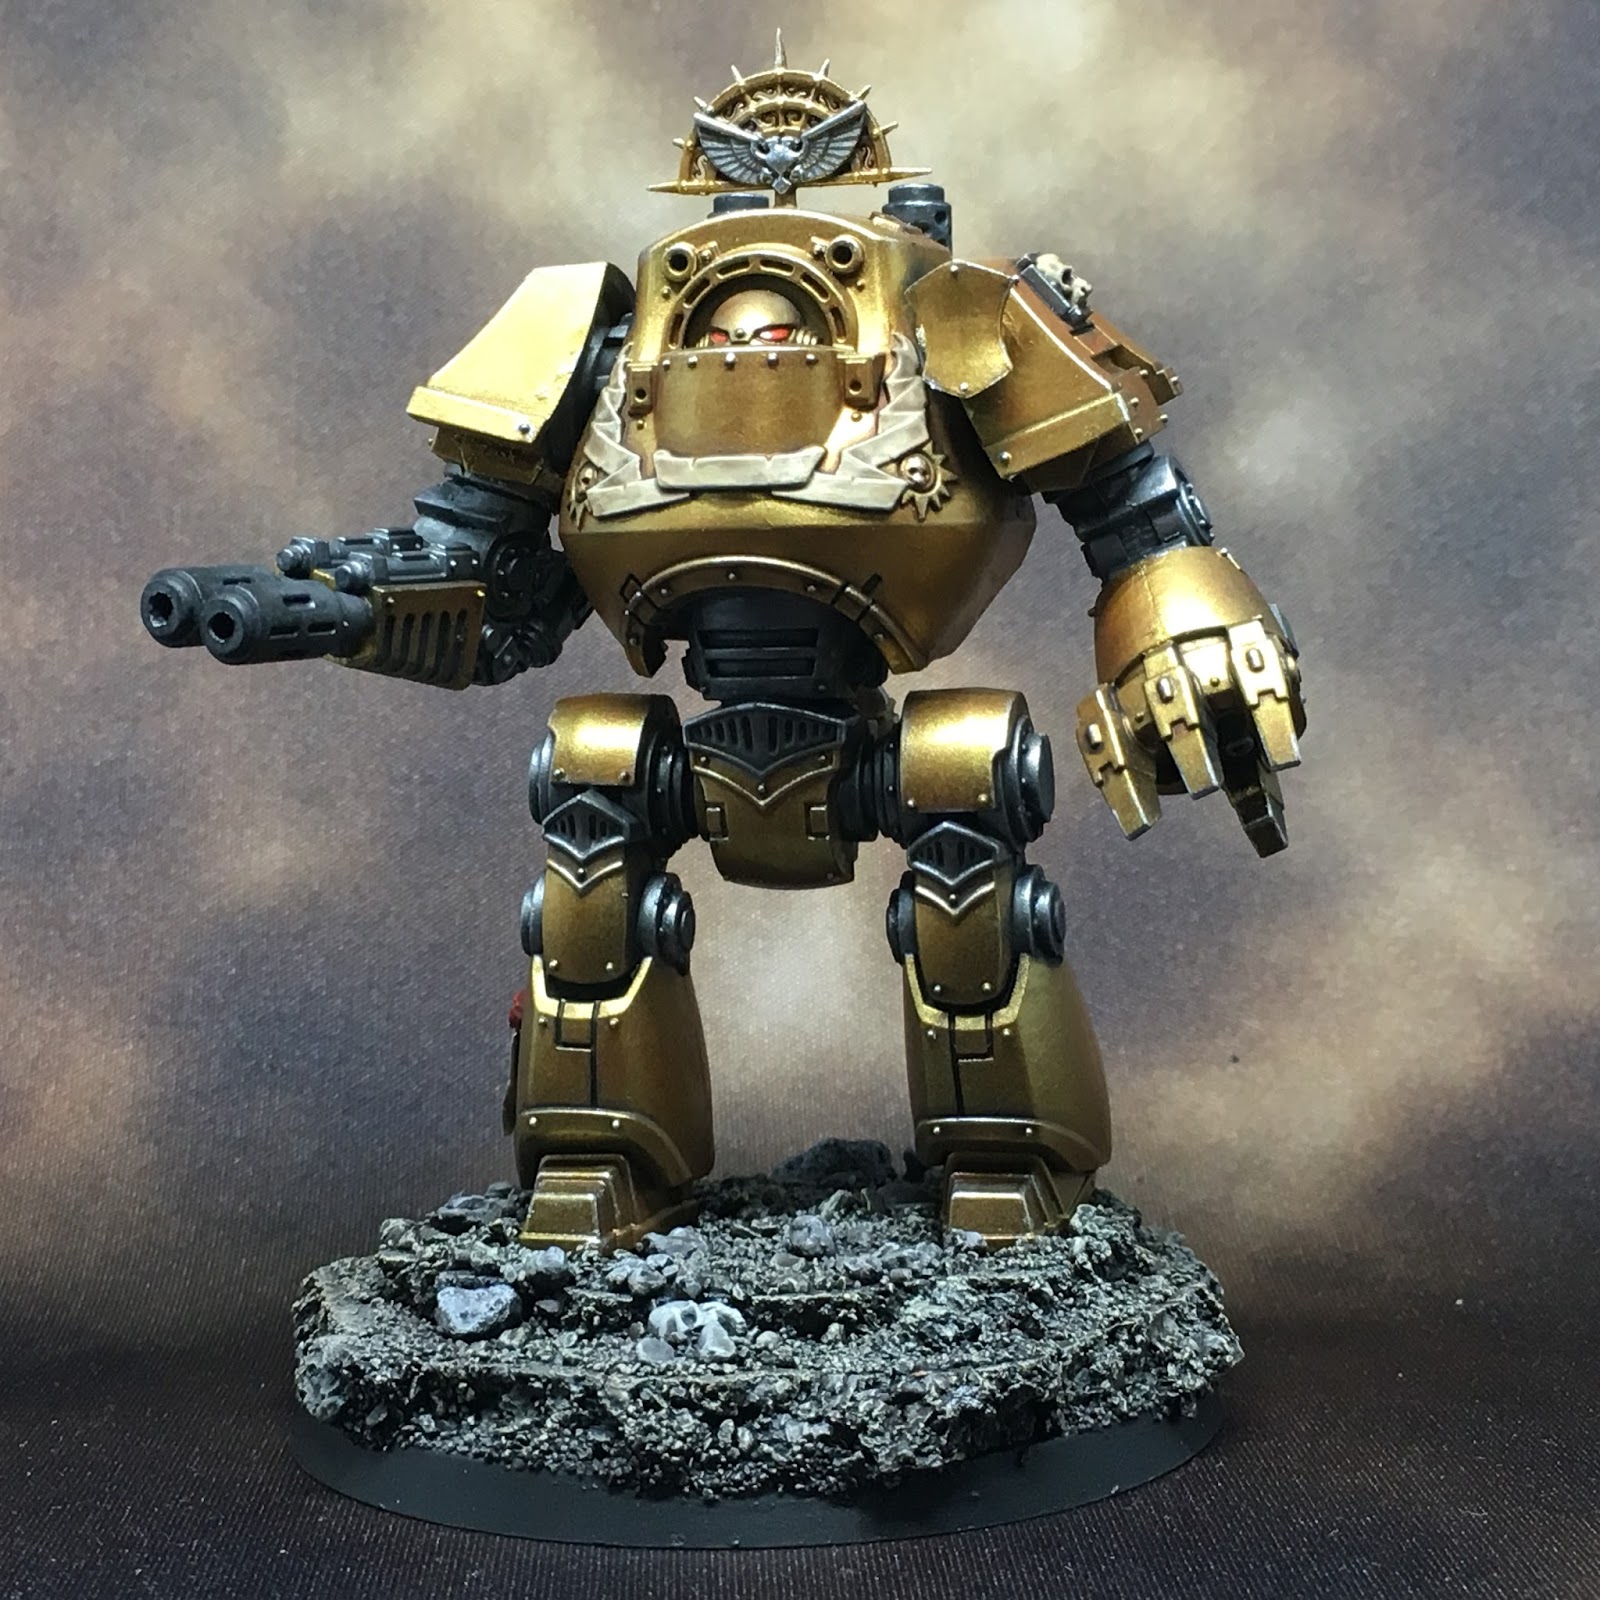
Then it was time for Dreadtober and a fully painted Grey Knight Grand Master in Nemesis Dreadknight!  This was such a fun project...modest in the customization, but ambitious (for me) int he painting!

Grey Knight Grand Master in Nemesis Dreadknight
Grey Knight Grand Master in Nemesis Dreadknight Armor

Grey Knight Grand Master in Nemesis Dreadknight

Hot on the heels of this character, I decided to paint up my Grey Knight Librarian.

Grey Knight Librarian
"Purge the Deamons!"

And I finished with my Custodes assembled earlier in the spring...

Custodian Guard
Custodian Guard

That's fourteen completed models and a handful of completed terrain (scatter pieces and containers) plus a large number of general assemblies for Deathwatch, Grey Knights, Shadow Wars: Armageddon and Sector Mechanicus Terrain. Quite a haul for one year by my previous standards.  I hope to outdo this for 2018 and keep the hobby momentum rolling forward.

I will leave you with my Best wishes for the holidays and a very Happy New Year!

Cheers and Happy Gaming!

Friday, December 15, 2017

Adeptus Custodes Contemptor Dreadnought to DONE


Today I am posting the final article on my Contemptor Dreadnought for the Custodian Guard.  This has been my final hobby project for 2017 and a great way to finish out the year.  I couldn't settle on what to do with the tilting shield so I have left it alone for now.  It occurred to me that I didn't get any of the Custodes red on this guy.  GW painted theirs with red shoulder pads, for instance.  Perhaps the red needs to go on the tilting shield with some design/transfer over top?  Hmm...feel free to comment below.


I started the session by painting in the frame or skeleton of the dreadnought using Vallejo Gunmetal.  This was washed with GW Nuln Oil then highlighted once with more Gunmetal and then a second time with Vallejo Silver, the silver going to lightly and only at various key high points.  Gunmetal was also added to the Emperor's eagle on the halo and was washed and highlighted similarly.

The remainder of the gold armor got a final highlight of silver where needed and writting was added to the scroll hanging at the rear of the armor and to the two purity seals.  The purity seals were also completed with a base coat of GW Mephiston Red, a wash of GW Agrax Earthshade and a highlight of GW Evil Sunz Scarlett. 

While the red was out, I also colored the laser sight on the assault cannon. I decided to put some heat effects on the Assault cannon as well. While this was going on, the Multimelta got a little love too.  I used GW Abaddon black as a dry brush on the barrels of both weapons and on the exhaust stacks of the dreadnought. Looking at the images this morning, I may have gone a bit heavy on the yellow in the heat effects...


So after some clean up here and there, and a coat of varnish (always use Model Master Lusterless (Flat)!), I put the bushes up and called this project done!  


Here are some gallery shots in the photo booth...


Here he is armed with the multimelta...


And a final family photo with the Custodian Guard Squad...


Best wishes for the holidays and a very Happy New Year!

Cheers and Happy Gaming.


Tuesday, December 12, 2017

WIP: Adeptus Custodes Contemptor Dreadnought

Adeptus Custodes Contemptor Dreadnought WIP title image

Greetings!

Following on heals of the Custodes squad I recently completed, I decided to keep on and get the accompanying dreadnought done as well.  He too had been waiting in the wings with his gold armor already done with first highlights. My family is travelling for the holidays soon so this will be the last project before I take a break from hobby for what little remains of 2017.

I really like the model, even though it is just the simple plastic version and not one of the more refined Forge World contemptors. I suppose this comes from spending 20 years or so with the standard boxy space marine dread.  These contemptors just seem so much more capable and menacing. :) I have three more of these based black for my Horus Heresy 1st Legion project as well.


Adeptus Custodes Contemptor Dreadnought WIP

I started the session in good order.  The base had some color blocked in and a 1st wash of GW Agrax Earthshade from my prior work on the custodes squad.  The dread and a weapon swap were ready for more paint. I have been using Vallejo Brass, Gold and Old gold for the Custodes.  Not really sure where I left off with the highlights, I decided to go over the whole thing again with a pass of highlights using Vallejo Old Gold, the lightest of the three.  This color was applied as an edge highlight to all of the sharp edges, grills and other raised detail.  

I called it quits on the armor at this point and laid down some Vallejo Gunmetal on the weapons, exhaust stacks, and join gears at the rear of the armored legs and arms.  I also put in a few highlights with the gun metal at points where I wanted some steel to show instead of the gold.  The gold itself will be highlighted with silver at a later point. Most of the bolt heads got a spot of the Gunmetal as well.

Adeptus Custodes Contemptor Dreadnought WIP

All of the scrolls and purity seals then got a coat of P3 Menoth White.  This was then washed with GW Agrax Earthshade while the gunmetal got a wash of GW Nuln Oil. While waiting for things to dry, I put some P3 Menoth White Highlight on the eye lenses (just a horizontal swipe, not filling in the whole lens).  On top of this I painted GW Spiritstone Red. 

The base got a mix of P3 Menoth White dry brushed on the brown and a Vallejo Gray drybrushed on the grey stones.  This was washed again with GW Agrax Earthshade.  Then a second, lighter, pass of the same highlights to brighten things back up a bit. Last, a pass of GW Abaddon Black around of rim of the plastic base finished things off.

Adeptus Custodes Contemptor Dreadnought WIP

By the end of the session, I had just enough time to pull the dread form the cork and super glue it to the base using the same pin through a pre-drilled hole in the base (visible in the shots above prior to basing).  Now he is standing proud, and almost ready to rid the Galaxy of the many enemies of Man. I hope to put in another session, or perhaps two, before I must be forced to put the brushes down for the remainder of the year.

In 2018 I'll get back to a mix of Grey Knights and Deathwatch as I continue progress there...and of course there will be some Dark Angels progress! I am quite excited to see the updated codex and I am ready to embrace what looks to be many new additions to the Dark Angels.  Most notably, I will definitely model my small collection of Primaris marines in Dark Angels armor. I had been waiting for official sanction from a codex and the lore before committing to a chapter for them.

Best of luck for your own projects this month.

Cheers and Happy Gaming!
 

Tuesday, December 5, 2017

Adeptus Custodes to DONE

WIP Adeptus Custodes or Custodian Guard title shot

So it is finally time to close out work on this squad of five Custodian Guard with swords. They've been hanging about the blog and my shelves for some time and it feels great to get them completed.  In the not-to-distant future, I'll complete their dreadnought companion who also waits in the wings - then it will be time to build and add in the next squad of five halberd wielding Custodes.

This is a bit of a long post for me and quite picture heavy...

DISCLAIMER: I'm embarrassed to note while putting this post together that I forgot the helmet eye lenses.  They probably aren't the only detail to go missing in such lively models so I'll have to make a last pass at some point to address this.  That said, they are still beyond table top quality and deserve their done status for this post. 

Before moving on to gallery shots, a couple parting WIP shots illustrate the bases getting some hobby love. The bases were constructed using cork pieces broken by hand from a thin sheet. I choose the thicknessa according to how much height I want.  Typically, I give characters more height than troopers.  In the cas eof Custodian Guard, they are all great heroes in their own right, so tall bases all around!

 The cork was glued down using Elmer's wood glue...a tougher sort of water soluble white glue (aka PVA glue). The wood glue is more viscous and so less runny and easier to work with and also a bit stickier than white glue in my opinion.  I find it has proven more durable than white glue for basing.

After the cork was glued down, a thin layer of wood glue was spread over to tops of the cork (to hide the inherent cork texture), anywhere that black plastic form a base still showed, or really any where that I wanted to add some more texture.  While the glue was still wet, I dunked the bases in a tub of basing mixture I keep around.  The tub is filled with various sizes of railroad ballast, but mostly fine stuff that suits the 28mm scale.  The excess is then shaken off.  A few select larger rocks (also railroad scenic stuff) were then glued down separately to add more variety and some general interest.

Here was the result prior to priming.

WIP Custom Bases for the Custodian Guard

The large base in the center is for the dreadnought, with the squad bases all around. The larger rocks are clearly visible as lighter grey and a few skulls were added to the dreadnought base for fun.  Below, is a shot of the newly painted Custodes in line with their now primed bases.  Holes have been drilled all the way through the bases with as pin vise and some rock material was removed to make room for booted feet. I tidied up with a spot of Vallejo Black Lava here and there to maintain texture where I exposed the plain cork prying off the glued down rocks.  

WIP Adeptus Custodes or Custodian Guard with bases


Normally I attach my models to their bases before gluing the gravel down so it appears around their feet naturally as if they have crunched down a bit into the terrain. As I step up my game and paint miniatures off the base on holders (Bourbon corks as seen in prior WIP posts), I don't have a consistent system for dealing with attaching models to a scenic base.  The dread feet were pressed into the basing material while the glue was still wet to leave impressions where he will later be glued down. I think I should have done that with the Custodes too prior to mounting them on the wire.

Moving on...the bases got painted first with the air brush.  I put down a dark brown around the raised edges of cork and anywhere else I wanted a deeper shadow.  Then a neutral brown was put down over the flat surfaces.  I do this by eye, just following an artistic impression I have in mind...nothing really formal or prescribed. The last step was to spray a small amount of neutral grey on the larger rocks to maintain some contrast so that not everything is the same brown. I wait to tidy the base edges because there will be a lot of dry brushing to follow and I'd just have to go back and touch things up again.

WIP Custom Bases painted

With the air brushing complete, a heavy wash of GW Nuln Oil was spread over all with particular attention to the recesses to enhance the shadows. While this was drying, some spot washes of GW Athonian Camoshade was daubed on here and there to provide a little "life" to the parched earth.  Even in the blasted wastes, nature finds a foot hold! Once this was all dry, the models were attached using a small amount super glue - you don't want this running all over the painted surfaces as it tends to dry frosty (at least my brand does) and adds more painting headaches. 

The pins in the feet are long enough to pierce through the cork and the plastic base which provides a firm attachment and even has the effect of pinning the cork to the plastic base. I will often turn the model over after pinning and drop some super glue on to the pin poking through the base which I then blast with  a quick cure spray to quickly cure the glue.  I fantasize that this may help prevent the pin from pulling free one day. It certainly doesn't hurt.  I trim any wires that are too long at this point so the model rests flat and no one gets easily poked while handling the base.


`WIP Adeptus Custodes or Custodian Guard models mounted to bases

Once the models were mounted to their bases, I dry brushed the bases heavily with Steel Legion Drab, then lightly with Ushabti Bone to create the highlights.  A light grey was carefully dry brushed on the larger grey rocks as a highlight as well. Then a wash of GW Agrax Earthshade was put down over all and left to dry.  A second pin wash of Nuln Oil was carefully added just to the darkest recesses and lowest edges to add some delineation between some areas. I even added a splash or two of GW Biel-Tan Green shade in small patches to enhance the notion of moss, fungus, or other slim vegetation clinging to the parched ground. The final touch was to run GW Abaddon Black around the edges to neaten things up and to set off the base from the table.

WIP Adeptus Custodes or Custodian Guard bases complete

And that was that!  After I run a quick pass to complete the missed eye lenses and anything else that pops up, the squad will get a good coat of Model Masters Lusterless Overcoat to seal and protect the hard work. I'm quite pleased with how the squad came out.  They are so busy looking with all the light glare off the gold armor and silver details, but they do stand out on the table in a good way. I'll give these boys a hearty seal of DONE and move on to other projects.  

WIP Adeptus Custodes or Custodian Guard 2017/18 Hobby Season to-do list

Here are some parting gallery shots of the squad in the light box...


WIP Adeptus Custodes or Custodian Guard squad gallery shot

WIP Adeptus Custodes or Custodian Guard squad leader gallery shot front

WIP Adeptus Custodes or Custodian Guard squad leader gallery shot back

WIP Adeptus Custodes or Custodian Guard squad member 1 gallery shot front

WIP Adeptus Custodes or Custodian Guard squad member 1 gallery shot back
 
WIP Adeptus Custodes or Custodian Guard banner bearer gallery shot front

WIP Adeptus Custodes or Custodian Guard banner bearer gallery shot back

WIP Adeptus Custodes or Custodian Guard squad member 2 gallery shot front

WIP Adeptus Custodes or Custodian Guard squad member 2 gallery shot back

WIP Adeptus Custodes or Custodian Guard squad member 3 gallery shot front

As these close ups show, I like to lightly dry brush a model's feet in the process of dry brushing the base to carry the illusion that dirt and dust are kicked up and collected on the boots.  I feel this roots the model in its environment and convinces the eye a bit to the authenticity of the scene a model is presented in.  However, I always to this with a light touch to avoid overdoing the effect unless I want a particularly dirty or muddy scene.  Dust and dirt also feature at the hem of the squad leader's cloak, done with the same dry brush pass, and feather upwards so the effect is most prominent at the hem and fades upwards.

Comments are always welcome.

Cheers and Happy Gaming!


Friday, December 1, 2017

WIP: Adeptus Custodes III

Adeptus Custodes WIP Intro

Glowing power blades at last!  So I set about painting the swords with some trepidation, if I'm being honest.  I wasn't concerned with layering on the blues so much as I was timid about applying the crackling energy effect that GW uses on their stock models.  Well, as can be plainly seen above, there is no crackling effect. I labored on two passes to get an effect I could live with, but in the end I repainted the test blade and settled for the effect above - at least for now.  A bonus to doing one's own painting...one can always go back and redo anything that suits at a later time if one wishes!

So...having based the blades with GW Kantor Blue during a prior session, I led off this session by applying GW Sotek Green just to the flat of the blade before it begins to rise to the center detailing. The slope and the center of the blade I left with the base color.  This approach best approximates what Duncan did in his Warhammer TV video on YouTube when painting the Custodes the halberd.  With this dry, I layered GW Temple Guard Blue on the edges, bringing it onto the edge of the blade, but NOT covering all of the Sotek Green...maybe a 1 or 2mm line all around the flat of the blade. I also chose to paint the power terminals and the center details Temple Guard Blue as well.

I then laid down a wash of Drakenhof Nightshade over all to darken the colors, sharpen the details, and enhance the color blending. With all fo the layers I did my best to thin the paints well as suggested in the video.  Then I set those aside to dry and address the banner poll scrolls with some Agrax Earthshade and a line brush...

Adeptus Custodes WIP banner close-up

While splotchier than I would like in the close ups, the effect reads as ancient written scrolls tolerably well on the table top. I used a spot of GW Mephiston Red to create an illusion of illumination on some of the scrolls and perhaps signature text at the bottom. Overall, I thought this came out pretty well.  I find pens for this work don't answer, at least for me. I have some pretty thin marker pens for fine line work, but they don't look good for these small scrolls in my opinion.

Yet, I am not satisfied with my brush work either.  I suspect I need to be using a brown paint instead of the Agrax, as the Agrax is necessarily thin and doesn't leave bold strokes. It does look pretty old and faded though which serves well for Custodes relics I'd wager!  Perhaps I'll make a last pass with some dark brown paint over the lines already applied to darken them. Anyway..I'm stalling...back to the blades...

So...the wash dried and I was ready to highlight the blades and add the crackling energy.  I came back with GW Temple Guard Blue for the highlights, running it along just the sharp blade edges this time (not on the flat of the blades) and along the raised center details, including the enclosing box and a bit down towards the point.  I touched up the power terminals as well...then came in with some GW White Scar to highlight just to top arc of the blade edges up to the point, the balls of the power terminals and a bit of the wires, and then the pint of the box enclosing the center details of the blades.

Lovely!  Now to just add the lively crackling lines of power energizing the blades.  I put some very thin Temple Guard Blue on my fine liner brush and got stuck in...but I just couldn't pull it off.  After a few tries with a couple other fine brushes, I just wasn't happy with the results at all. I could get strong even lines and everything came off too feathery and splotchy entirely. I tried again with some White Scar and it just went from bad to worse.  After staring at the blade a bit squinting my eyes this way and that to try and make the effect read true in my mind, I gave up and repainted the portions of blade I had marked up as above until everything was put back to rights.

And so here we have it...

Adeptus Custodes WIP Sword close up

I am much happier with this than I would have been trying to live with my botched crackling energy effect. It looks great on its own and does not at all preclude me from trying again at some later point when I work out how to achieve the effect I'm looking for.  I certainly did not achieve anything close to what Duncan made to look so easy, nor what the Heavy metal painters got done on the stock models. But that leaves me a challenge to work towards in the future.  I have an array of power weapons to paint on the Grey Knights so I can get ample practice over time if I stick with it.

So, enough about power blades.  Here is the squad as they now stand on the work bench...

Adeptus Custodes WIP squad

All of the shields are now attached and I'll work on the bases now.  A couple quick passes with the air brush and some washes will set the details enough for me to attach the models. Then I'll complete the bases with appropriate weathering so that everything blends together and the models look at home on the bases. Nothing more than a single session there I think. I did perhaps glue on a bit too much gravel.  Some will need to get picked off so I can attach these guys without them looking as though they are floating over a surface of coarse marbles! :) Normally I attach models to their bases before gluing down the gravel so they look more settled into it, given their power armored weight.

Once everything is put to rights and done, I'll post up some shots of each in the light box to illustrate the amazing detail these models offer.  The work bench shots are entertaining, but coarse in regard to showing anything off. Oh, and I imagine I'll address some contrast on the shields and other minor details as I get to looking around each model once they are secured to their bases.

As always, comments and commiserations are both welcomed and appreciated. Best wishes for the projects you find yourself involved with this holiday season.

Cheers and Happy Gaming!