Tuesday, March 31, 2020

Monster March 4 AT Warlord Titan - TO DONE

Legio Ignatum and Legio Tempestus Warlord Titans

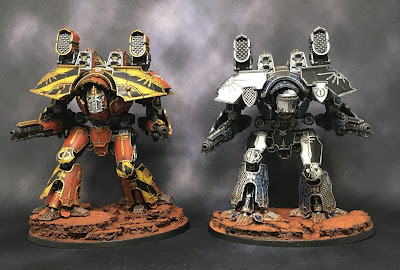
And so we come to the end of another Monster March Challenge.  Above, my completed project stands proudly next to my completed project from last year's #MonsterMarch3.  Two proud Warlords from the Triumvirate of Mars stride across the barren ground of the Red Planet.

Adeptus Titanicus Legio Ignatum Warlord Titan
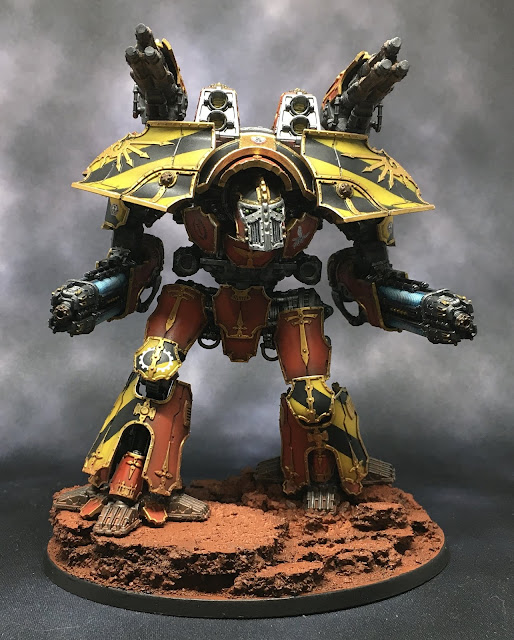
Gladius Noctis
Gladius Noctis walks! I was able to complete all of the GW plastic weapon options.  Another day, some additional Forge World resin options will be added.  I do have a complete unpainted set already, but I haven't yet decided which Legio should get them, and may indeed order a second set at some point.

Adeptus Titanicus Legio Ignatum Warlord Titan

The Bellicosa Volcano Cannons are still my favorite, due to the large gun shields.  Lots of fun things can be done here to personalize your titan.

Adeptus Titanicus Legio Ignatum Warlord Titan

Never let your enemies see the rear of your titan! Not much to see here.  I like the hint of red from the rear door. As you see in the pictures, the base was completed on time.

Adeptus Titanicus Legio Ignatum Warlord Titan

The right arm Bellicosa Volcano Cannon. These pcitures capture the original Warlord as it was released in the first box set of the game.  Next we'll look at the next run of weapon options...

Adeptus Titanicus Legio Ignatum Warlord Titan

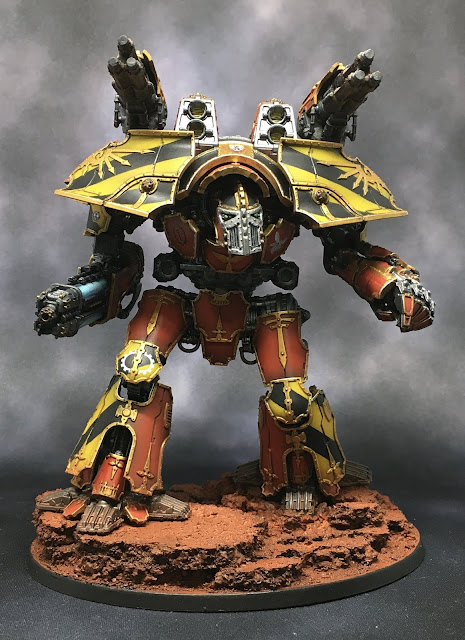
More plasma! Twin Plasma Annihilators are a fearsome sight to behold. And paired Laser Blasters help drop shields to make that plasma count.

Adeptus Titanicus Legio Ignatum Warlord Titan

 Here's a close up of the left arm Plasma Annihilator. I should probably get some kill markings on there to match the volcano cannons. I love the look though. I should also mention how well the left leg came out after all the drama I had with it during the project.

Adeptus Titanicus Legio Ignatum Warlord Titan

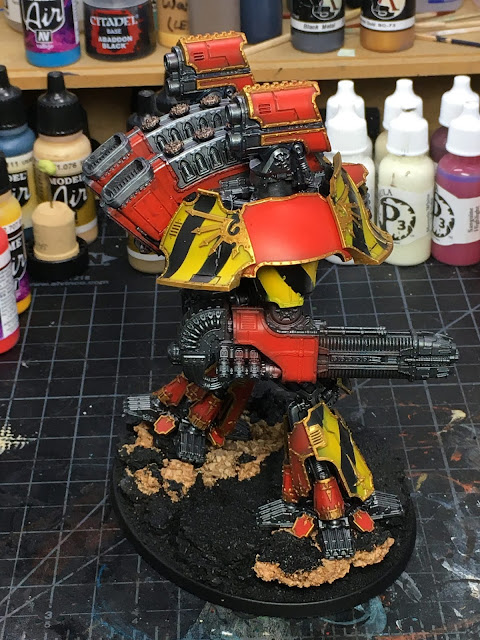
I love the profile of the Warlord with this weapon configuration, even if a bit top heavy.

Adeptus Titanicus Legio Ignatum Warlord Titan

Here's a shot with the claw attached. I'm don't see myself using this option in games, but it still looks cool.  I'm planning plasma weapons and a claw for the Tempestus Warlord too.  Maybe I'll play out a fist-to-fist match-up for fun some time.

Adeptus Titanicus Legio Ignatum Warlord Titan

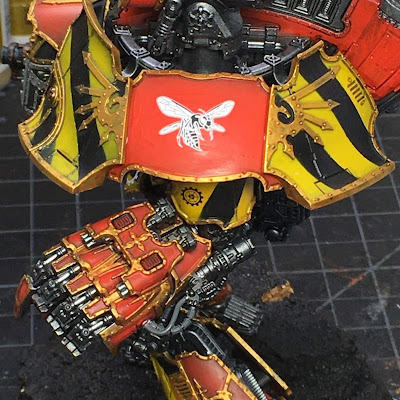
Here's a better shot of it with the stripy shoulder armor. Love to see the wasp on the chest peeking out just over the fist at this angle.

Adeptus Titanicus Legio Ignatum Warlord Titan

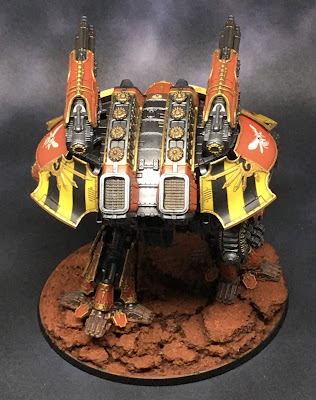
A little change of perspective here, looking down on the Titan. I almost forgot to finish painting the top of the carapace!  I was working on highlights when I realized that I never went in to paint the details on the areas where the void shield generators sit.

Adeptus Titanicus Legio Ignatum Warlord Titan

And so I will bring this post and my Monster March 4 challenge to a close. Ups and downs, but great fun was had throughout, honestly.  I love these models.  Fun to build, fun to magnetize, fun to paint.  Hopefully fun to play games with, but I wouldn't know. 😂 Anyway, I'll close with a big ol' seal of DONE for this project.


Stop by later in the week to see where I get with the bonus Warbringer Titan.  I need to finish that off while I have some titan momentum.  Then it's time to consider the next project.  Lots of 30K Dark Angels stuff is waiting...lots of Blackstone Fortress...lots more Titans...it's a target rich environment for projects right now!

Stay safe out there.

Cheers and Happy Gaming!
Friday, March 27, 2020

Monster March 4 AT Warlord Titan - Week Four Progress

Adeptus Titanicus Legio Ignatum Warlord Titan WIP
One Warlord with All the Fixin's
Greetings and welcome to the (near) end of Monster March, week four.  I have a couple days left to pull the project in before the end of the month, but here's where it is at today. All of the necessary decals have been applied (there's always room for more!) and everything but the base is painted to an above average table top standard, at least.  The base must get done before the end of the challenge!  I'd like to see final highlights as well, but we'll see.

Adeptus Titanicus Legio Ignatum Warlord Titan WIP

I am really psyched with how this project has turned out. The color scheme is so much more vibrant than what I'm used to and should look great across the table from my Legio Tempestus engines. I am fortunate to take this project on after the Legio Ignatum decals were released.  I may be one of only a few 'net examples out there with the new imagery applied. There are of course few to no official examples to base my work on, so I'm mostly making up where and how to place the iconography. I hope to honor the Titan Owner's Club with my choices. 

Adeptus Titanicus Legio Ignatum Warlord Titan WIP - upper carapace detail

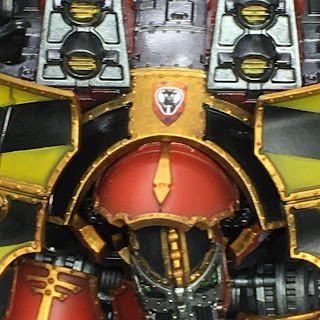
A waspish head looking shield features prominently on the upper carapace.

Adeptus Titanicus Legio Ignatum Warlord Titan WIP - chest detail

Underneath, loyalty to both the Collegia Titanicus and the Legio Ignatum (Fire Wasps) is clearly displayed.  I imagine that is what anyone on the ground is going to see looking up at the Titan for miles around. :)  Shins may be blocked more by terrain. The Mechanicum is honored on the right knee.

Adeptus Titanicus Legio Ignatum Warlord Titan WIP - right arm detail

Here's a look at the right shoulder and weapon arm. Again, Fire Wasp iconography boldly displayed, with a nod to the Collegia Titanicus on the gun shield.  A few black skull kill markers are displayed representing past engine kills with the weapon.

Adeptus Titanicus Legio Ignatum Warlord Titan WIP - left arm detail

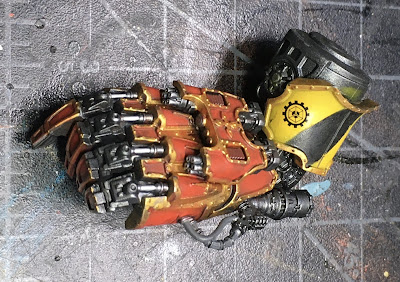
Here's a detailed look at the left shoulder with the Arioch Power Claw attached. The claw is just amazing.  I could spend a lot more time detailing it - and may once beyond Monster March 4. On the upper arm plate, we have a nod to the Cog Mechanicum in honor of the Deus Mechanicus (Omnissiah) animating this great claw.

Adeptus Titanicus Legio Ignatum Warlord Titan WIP - Arioch Power Claw

Here's a close up of the Arioch Power Claw. Just a beautiful piece of work in the molding. Great fun to paint.  I see now, while posting this, that I have some clean up to do just above the upper arm plate.

Adeptus Titanicus Legio Ignatum Warlord Titan WIP - right arm Belicosa Volcano Cannon

I love the Bellicosa Volcano Cannon with its large shield.  Great for showing off a Legio's heraldry.

Adeptus Titanicus Legio Ignatum Warlord Titan WIP - left arm Belicosa Volcano Cannon

I decided to mirror the iconography on the matching weapon arms.  Only two engine kills so far for this mighty weapon.  As I'm unlikely to play more than a handful of games with these models, I'm going to consider adding new decals for any actual kills in a game.  But that's just a thought at this point. Since these engines are expected to have long histories, I wanted to start out with some kills already logged in any case.

Adeptus Titanicus Legio Ignatum Warlord Titan WIP - right arm Plasma Annihilator

Now the mighty Plasma Annihilator arms. I haven't gotten to kill markers for these weapons yet.  I'm still thinking about it since there is less surface area for the armor shields due to the metal cross bracing, based to the size of the skull son the Legio Ignatum decal sheet.  I may look through my Decal collection for smaller skulls.

Adeptus Titanicus Legio Ignatum Warlord Titan WIP - left arm Plasma Annihilator

I chose the little hexagonal (hive imagery) wasp head symbols for the upper shoulders to match the shield on the upper torso.

Adeptus Titanicus Legio Ignatum Warlord Titan WIP - Titan Laser Blasters

And last but not least we have the other carapace weapon option.  No decals so far for the carapace weapons.  I don't want to make things any more busy looking than they already are and I figure those portions of the titan are barely visible to any but other titan crews or pilots of the Imperial Navy.

That brings me to the end of my Monster March 4 show and tell for this week.  I'm really enjoying the project.  These Titanicus models are really first rate to work with.  And after magnetizing things, its just fun to sit and swap around weapons for various looks from the titan. I can really geek out on these models!

I have seen some great finishes already.  Best wishes to the rest who are still wrapping things up like me.

Cheers and Happy Gaming!

Tuesday, March 24, 2020

Monster March 4 AT Warlord Titan - So many weapons...

Adeptus Titanicus Legio Ignatum Warlord Titan WIP

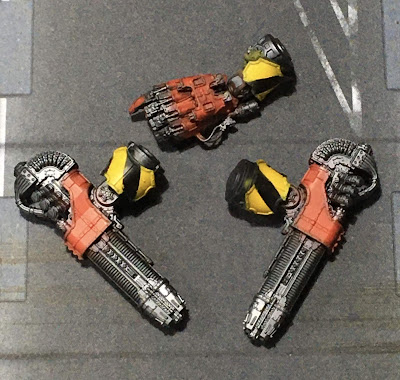
This week, I'm plowing through all the weapon options I have built for this titan.  It's turning out to be quite a lot, but I'm getting there.  Here is a shot of what I'm working on...

Adeptus Titanicus Legio Ignatum Warlord Titan WIP - weapons

A nice selection to get started.  I have all of the Forge World options as well, but I'm not sure yet what I'll keep for Tempestus and what will got to Legio Ignatum.  I know...in the end I'll just get a second set and be done with it.

Anyway - short post today...must March on! Check back later in the week to see where I get to.

Cheers and Happy Gaming!

Friday, March 20, 2020

Monster March 4 AT Warlord Titan - Week Three Progress

Adeptus Titanicus Legio Ignatum Warlord Titan WIP

Well, week three of Monster March 4 is coming to a close and it is time to reveal the week's progress. As promised, I have the model assembled and can now reveal what it will look like.  Gladius Noctis walks!

Adeptus Titanicus Legio Ignatum Warlord Titan WIP

Shown hear with missiles, plasma, and a fist, this Legio Ignatum titan looks fierce. With various mistakes managed and put aside, I continued to complete armor trim and shading so the panels could be attached to the titan's frame.

Adeptus Titanicus Legio Ignatum Warlord Titan WIP

I'm using custom washes for shading this time around and I must say that I'm digging the results.  These custom washes track to the crevasses better and really avoid staining which is a major plus. I'll admit that multiple coats are needed to get some of the darker results, but I'm fine with that.  More coats means more control over the contrast one is trying to achieve.

Adeptus Titanicus Legio Ignatum Warlord Titan WIP

Much of the body and leg detail has been completed, though it's dark and doesn't show up well in the pics. The back door can be seen above at least. Piston shafts have been picked out in Vallejo steel to be shinier that the duller metal of the rest of the titan.  There will be some bronze/brass details in the gears I think, if time permits.

Adeptus Titanicus Legio Ignatum Warlord Titan WIP

I almost stripped and repainted the rear shoulder plates.  I might have liked the stripes to be less up and down so they matched the front better in pattern.  But honestly, they are not visible from the front so the front and back having different looks is fine.

Adeptus Titanicus Legio Ignatum Warlord Titan WIP

At this point, I have to focus down on the weapons as I have another set of carapace weapons, and all the arms to complete by the end of the month. In addition, I have to complete the model's base and address all the highlights, though many basic highlights have already been achieved in the original painting and shading process.

Oh, and decals!  I have the new Legio Ignatum decal sheet so I need to get those on the model soon too before I do any final shading and weathering.  I'm excited to see how the model looks with the full livery applied (fire wasps and all).

So, despite the set backs I'm in a good place to push through to the end of the month and complete this titan.  The Warbringer bonus titan will likely have to wait - but that's why it was bonus.

I'm looking forward to seeing where everyone else is at with their projects.

Cheers and Happy Gaming!
Wednesday, March 18, 2020

Monster March 4 AT Warlord Titan - Crisis Take 2

Adeptus Titanicus Legio Ignatum Warlord Titan WIP

So this happened.  I got the repaired panel all set and decided to dry fit it to see how the colors were going to look.  This was the only panel I had cut from the sprue so it was a perfect test piece.

Adeptus Titanicus Legio Ignatum Warlord Titan WIP

Ugh.  Because I chose to leave the armor panels on the sprue during the build of this titan, I never did a dry fit while gluing and setting the pose.  It hadn't occurred to me that I could set a pose that the armor wouldn't accommodate - I completely forgot this process from the first build last year for my Legio Tempestus warlord. Well, I put things aside and slept on it for 24hrs or so...

Adeptus Titanicus Legio Ignatum Warlord Titan WIP

In the end, there was nothing to do but break off the ankle armor bits and snap the foot off.  I use Testers liquid model cement and things get fused together very well and don't separate easily, if at all, particularly when there is good coverage like with these ball joints.  I pried a bit to try and separate things, but in the end bits just had to get broke (or cut).  After much cursing and care in equal measure, I ended up with this pose for the foot.  I couldn't effect the hip or knee angle without really getting serious (and likely break more of the leg) and I wanted to avoid wrecking the whole project to fix this single foot posing issue.

Adeptus Titanicus Legio Ignatum Warlord Titan WIP

At least I now had a jaunty striding pose and simply needed a base to match.  The original pose had the Warlord striding down from a higher elevation to a lower elevation as shown in an older pic below.  This was going to be easy to correct.

Adeptus Titanicus Legio Ignatum Warlord Titan WIP

The stepping down approach was totally not going to work with the new back foot angle.  So I removed some cork and reconfigured that portion of the base so the rear foot could maintain its angle while the titan's torso would remain level. This is important since a miss balanced titan looks awful to the eye, no matter how well it is painted.

Adeptus Titanicus Legio Ignatum Warlord Titan WIP

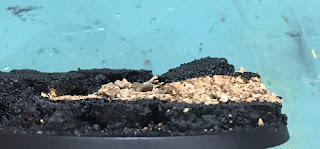
I removed some cork with the x-acto knife, reshaped it a bit then glued it back down along with some additional new bits of cork and gravel mix.  My goal was for the result to look like a high point of land that has given way under the weight of the titan as it strides forward to do great harm to the Emperor's enemies.

Adeptus Titanicus Legio Ignatum Warlord Titan WIP
Close up to illustrate new terrain angle for left foot
I reused the old cork lifted a bit as shown above to get the right angle to match the repaired left leg. Lots of wood glue and my usual ground cover along with some bits of cork helped fill things out as stated above.

Adeptus Titanicus Legio Ignatum Warlord Titan WIP

The re-balanced titan now strides across the martian landscape, crushing all beneath its heavy tread. I'm going to paint the Legio Ignatum bases to match my Legio Tempestus titans. The Warlord looks a little off balance in this photo but I think the over all pose is fine.  With the shifting rock under foot, it's actually a good element in the pose.  And in person it doesn't seem unstable at all.

Adeptus Titanicus Legio Ignatum Warlord Titan WIP


Above, we have a close up of the left leg crushing some rocky outcrop underfoot.  I'm optimistic that this will paint up well and close the loop on my second (and hopefully final) left leg armor crisis for this warlord. I can tell you with confidence that when I build the Warlord-sinister (or any future warlord), I'll stick to a more standard pose to avoid all of this foolishness.  And I'll watch more carefully when I paint the panels!

Check back Friday to see where the paint work gets to.  I've been adding trim to all the armor panels and hope to get back on track tonight and tomorrow night if all goes well.  No more redoing things for this project, I promise.  I hope this article gives hope to others when things don't go according to plan.  I find it very helpful to take a deep breath, remind myself that I'm in this for the hobby, then breathe out and get back to work hobbying.

Cheers and Happy Gaming!

Monday, March 16, 2020

Monster March 4 AT Warlord Titan - Crisis Averted

Adeptus Titanicus Legio Ignatum Warlord Titan WIP

Greetings.

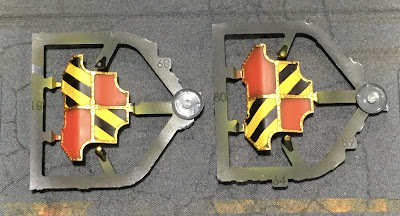
For those who read my last Monster March 4 post, I mentioned goofing up on the leg armor which was intended to be painted opposite so that the hazard stripes would be on the outside panels of both legs. Instead, I painted both panels identically. Well after considering options and taking action I can report that we're back on the rails with correct panels as shown above.

Adeptus Titanicus Legio Ignatum Warlord Titan WIP
Ah.  Back to a clean panel ready for primer once again

In the end, the panel required a bath in Simple Green. I first tried repainting the panel but that quickly went awry.  I should have primed the old hazard stripes black for one thing.  I worried about too many paint layers, and decided to spray the red directly over the old stripes instead.  This approach revealed two glaring issues.  The lines/shape of the stripes were still (faintly) visible under the red due to the masking and my likely heavy handed layer of yellow.  And second, the red came out much brighter than it did over black primer coat making the panel look obviously different than all the other panels.  Both issues combined to force me to strip the panel and start over.

Adeptus Titanicus Legio Ignatum Warlord Titan WIP
Like nothing ever happened...
In the close up above, I brought the newly painted panel back up to the level of the rest of the armor currently and the results are plain.  The panel now matches the other panels with no sign at all that anything ever happened.  I lost a little over all time on the project, but not enough to set me back.  I'll complete on schedule.  And I also won't be looking at this one panel knowing it wasn't right, or that I took short cuts with it.

Later in the week I'll post up more overall progress on the titan. To date I have cleaned up the red over-spray on the metal skeleton (legs and torso) but that's about it. I'm beginning to remember how much time is needed for the weapons and how much you can spend on the torso with all the little details, highlighting, and what not.  It's going to be a push, but I believe I'll complete on target.

Check back later to find out.

Cheers and Happy Gaming! 

Thursday, March 12, 2020

Monster March 4 AT Warlord Titan - Week Two Progress

Adeptus Titanicus Legio Ignatum Warlord Titan WIP

So we're well into week two of the Monster March 4 hobby challenge.  Despite a family trip that took me away from the hobby man cave for a few days, I was able to get some progress done this week.  With no money shot of an assembled titan at this point, I'm forced to lead with an example pic above of the Legio colors coming together.

I finished last week with the armor panels based coated - all except the yellow stripes.  So I started this week with a masking session to get the stripes laid down.

Adeptus Titanicus Legio Ignatum Warlord Titan WIP - armor plates

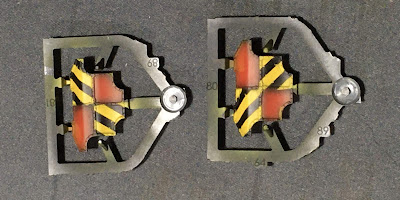
I selected some armor panels to get yellow stripes, based on what I left black during the initial base coat phase.  Some areas will stay black and I just needed to spend a little time planning things out.  Special effort was put into orienting the masking for the yellow stripes so the final assembled results will (hopefully) look great. More time should have been spent planning the lower leg armor - more on that in a bit.

I took the advice of another blogger when laying down the stripes.  If you lay identical strips of tape side-by-side across the entire surface to be striped, you can then remove just the strips that are going to get painted so all of the stripes end up identical in width (if you are careful with the taping, of course).  It's a better approach than my usual "eyeballing it" method.

Adeptus Titanicus Legio Ignatum Warlord Titan WIP - gun shields

Note the remaining red areas showing on the gun shields above.  This was a mistake as I over-sprayed these areas and had to go back in to fix the red.  Ugh.  It pays to be thorough during masking unless you have impeccable air brush skills.

Adeptus Titanicus Legio Ignatum Warlord Titan WIP - arm weapons

I wish I spent as much time masking the gun shields as I did on the guns themselves! :)  Over-spray can be cleaned up, but it slows everything down and if using a paintbrush diminishes the smooth effect you get with the air brush in the first place.
Adeptus Titanicus Legio Ignatum Warlord Titan WIP

While waiting for the yellow paint to dry, I dry-brushed some Vallejo Gungrey over the skeleton of the Warlord.  Not much to see here, but some highlights were raised.  I'll probably go over a second time with Vallejo Steel as I did on my Legio Tempestus titans before applying shading.

Adeptus Titanicus Legio Ignatum Warlord Titan WIP - armor plates

Several thin coats of Vallejo Game Air Gold Yellow were sprayed over the masking.  Once dry, the tape was removed to reveal quite passable black and yellow stripes, with only a little clean up needed on the black due to paint getting under the edges of the masking in spots.

Adeptus Titanicus Legio Ignatum Warlord Titan WIP - gun shields

Over-spray clearly visible on the shields above - ugh....was not paying enough attention while painting quickly to make progress.

Adeptus Titanicus Legio Ignatum Warlord Titan WIP - arms weapons

The volcano cannon have the gun shields pictured above, so I will leave their shoulder armor sections plain black.  I thought it would be a bit much striping both the shoulders and the shields. The remaining arms get striped as shown above.

Adeptus Titanicus Legio Ignatum Warlord Titan WIP - legs

Next, I started to get as much of the trim done as I could with the time I had left to me, starting with the legs.  There's a lot of over spray here, but maybe I saved time on the leg armor?

Adeptus Titanicus Legio Ignatum Warlord Titan WIP - gun shields

I love how the gun shields are coming out for the volcano cannon. with some shading, highlights and decals theses are going to look pretty cool.

Adeptus Titanicus Legio Ignatum Warlord Titan WIP - armor

The front shoulder/pectoral armor looks great too.  Shading and highlights should help delimit and pick out the gold eagle better as well as the trim.

Adeptus Titanicus Legio Ignatum Warlord Titan WIP - armor

Random armor bits also looking good with the trim painted. I had to take quick pics of the work before heading to bed, so lots of clean up still to do on these panels.  Normally I would have touched things up first before taking pics.

Adeptus Titanicus Legio Ignatum Warlord Titan WIP - armor

And now the major bummer for the week.  While I believe I planned out much of the masking to great effect, I really messed up these lower leg panels. I was meant to put black and yellow stripes on opposite sides so that the outsides of the legs would show the stripes.

Adeptus Titanicus Legio Ignatum Warlord Titan WIP - armor

As you can see above the second leg is NOT a mirror of the first, but looks identical.  That's full points for massed production, but no points for correctness with this project.  Looks like I'm going to have to repaint one of these...just debating stripping the old paint first or not. Regardless, this is going to set me back a bit more on my schedule.  As it is, you may note that I'm not sharing any Warbringer pictures in this post. Not enough progress on the Warlord to spare time for it this week!

regardless, great progress was made and while I don't have an assembled Warlord to show off yet, I am much closer than pics of random armor pieces may reveal.  I expect Week three's title pic will be an assembled Warlord with all of the base colors laid down and looking fierce.

Check back next week to find out...

Cheers and Happy Gaming!