Wednesday, January 31, 2018

Squaduary 2018: My Official Pledge!

Squaduary 2018 by steppingbetweengames.com
Image courtesy of steppingbetweengames.com

Following on the first ever Squaduary in 2017, its time for the 2018 Squaduary challenge. Last year I pledged (and completed!) a squad of five Deathwatch Space Marines. That was a fun challenge that taught me a lot about painting Black, particularly with regard to edge highlighting power armor!

Deathwatch Space Marines from Squaduary 2017

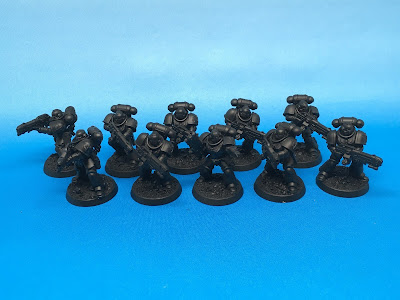
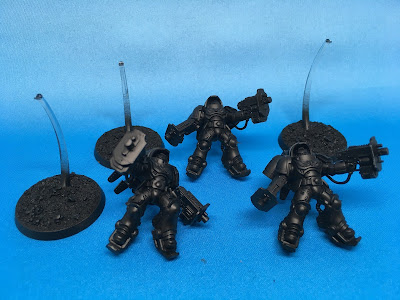
For 2018, I'm doubling the model count and pledging to paint a full squad of 10 Dark Angels Primaris Hellblaster Space Marines.  Here they are primed and standing by...

Dark Angels Primaris Hellblasters pledged for Squaduary 2018

I hope to take what I learned about edge highlighting and apply it in spades to these dark green power armored marines.  I intend to follow the GW paint recipe for Dark Angels over all, but I will be substituting in some Vallejo and P3 colors here and there for things like metallics where the color choice won't take away from the overall Dark Angels look. The models have been based on their stock GW 30mm round bases.  My proprietary mix of model railroad ballast was then glued down with Elmer's wood glue to provide the ground cover, which matches the vast collection of (primed but largely unpainted) Dark Angels that I already own. I primed the squad with Vallejo Surface Primer Black using an air brush so they would be set up and ready to go for February 1st.  

Tune in over the month of February for updates as the project continues. I'm very excited to get to work!  Many thanks to Rory over at steppingbeteengames.com for hosting this challenge. If you are reading this and haven't yet made your own commitment to paint a unit over the month of February, what are you waiting for??

Cheers and Happy Gaming!

Tuesday, January 30, 2018

WIP: Adeptus Custodes with Halberds II

Adeptus Custodes WIP Halberd Squad


I was able to make some progress on the Adeptus Custodes. Plumes, braid, leather, and some gun metal have been base coated and washed.  Already they are starting to stand out and resemble the Emperors's 10,000.

Adeptus Custodes WIP Halberd Squad
Session 2 progress, blocking in more base colors 
I had a little time remaining before setting these aside for Squaduary, so I took the time to lay down a first pass of gold highlights as well.  I also painted in the silver face masks (Vallejo Chrome 71.064) and washed them with a bit of GW Nuln Oil.

Session 3 progress, 1st pass of gold highlights
Before putting them away, I used the airbrush to lay down a base coat of browns on the bases as well. This was all I could make time for.

Adeptus Custodes WIP Halberd Squad
Session 3 progress, the bases get some love from the airbrush

With so much gold to highlight, and me being a bit slow and methodical about it, the highlighting took a good couple hours to complete on just five models. I need to pick up the pace if I'm going to be able to highlight the armor of 10 Dark Angels Primaris marines during Squaduary!

Yes, that is right.  I am pledging to paint a full squad (10 marines) of Dark Angels Primaris Hellblasters for Squaduary 2018. So we'll say good bye to the Adeptus Custodes for a month or so. I doubt I'll be away from them long though.  The new codex for the Custodes looks fun and there is the release of many great new models!

Cheers and Happy Gaming!


Monday, January 29, 2018

HowTo: Custom Bases for the Adeptus Custodes

Custom Cork Bases for the Adeptus Custodes

I have had inquiries about how I set about my bases, so I thought I'd put up a short how-to article using the Adeptus Custodes Haldberd Squad for example.  This squad comes with 40mm round bases which are great for customizing as there is lots of room for fun details while still leaving space for the model to be stuck down.  For the Custodes, I decided long back to use cork to build up some height and provide the illusion of sound ground for the emperors finest to trod.

You can find cork in all manner of forms.  Folks use old drink coasters, old bulletin boards or kitchen trivets.  I, however, turned to my trusty online source Amazon.com for 12"x12" tiles in various thicknesses.  I believe I'm using either 3/16" or 1/4" for these Custodes bases.  But really, it's just to taste, based on how much height you want and what look you are going for. If I wand to have layers, or stacks of rock, then I use a couple thinner layers...or I might se a thin piece under the edge of a thicker piece to prop up an edge and put a slant to the ground for interest.  Your imagination is the only boundary here.

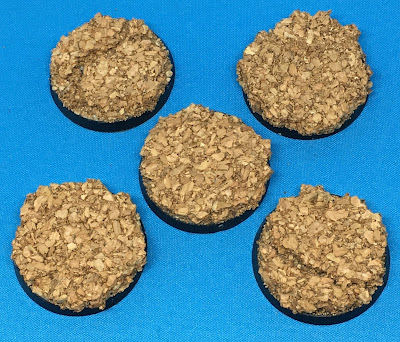
I didn't think to snap any pictures of the pieces prior to gluing.  Basically, I tear off a piece roughly the size I want, then crumble off any straight edges or extra bits that hang over until I get something the right size for the base I'm using.  Keep all these little bits that get broken/torn off as they make excellent rubble for bases or larger terrain.  Also, a couple smaller bits can be put down to illustrate broken ground to add variety to your bases.  Here's a step by step of one of the Custodes bases coming together.

Custom Cork Base WIP
The cork glued down

First, the cork is glued down using a quality wood or carpenters glue.  Wood glue, is basically a thicker version of white glue that has good tack and dries quickly.  It dries somewhat cloudier than white glue, but we don't care about that since we're painting over it all anyway.  In the example above, I've used various cast off pieces of cork to make some broke ground. Again, the sky is the limit for what you choose to do here with the cork. For important characters, I put in much more effort to generate a unique and cool looking bit of turf.
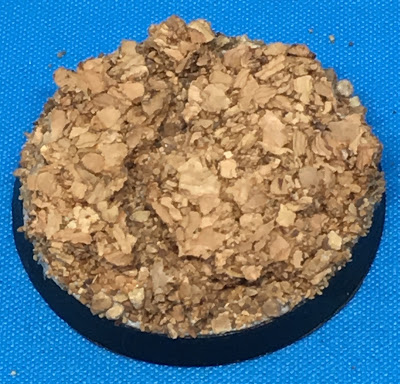
Custom Cork Base WIP
After a quick dip in the ballast tub

While the glue is still wet, I put the whole thing into my tub of railroad ballast.  The bases is thoroughly covers and I push the mix down to set it into any exposed glue.  Then the base is pulled out, tapped off, and any unsightly bits rubbed off, particularly around the rim of the base where I want a smooth finish.  This step adds some natural elements to the base and blends everything together.  At this point, the cork starts to hide a bit, except for the broad flat surfaces where its obvious pattern can still be seen.  We'll deal with that later.

Custom Cork Base WIP
Some details added

After being dipped in the tub and left to dry, a base is generally done.  However, I prefer to go further and add some additional interest and detail.  In this case, I'm putting in a few skulls here and there in the cracks where they might reasonably settle after being blasted and kicked around a battlefield in the 41st millennium. You can continue to use the wood glue here, but I generally switch to my super glue. The super glue dries much quicker so i don't have to worry about my carefully placed details becoming dislodged and ending up on the floor or in some other less desirable location on the base itself. 

Here are additional closeups of the remaining bases for the Custodes squad.

Custom Cork Base WIPCustom Cork Base WIP


Custom Cork Base WIP

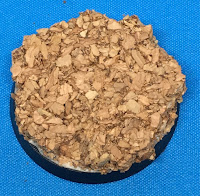
This base was done with a single sheet of cork, instead of separate pieces. An xacto knife was used to carve out a bit of a crack, into which a daemon skull from the recent GW skulls boxed set was glued.

Custom Cork Base WIPCustom Cork Base WIP

This base was made with two pieces of cork with a resin skull glued down in the crack.

Custom Cork Base WIP

Custom Cork Base WIP


These last two bases are just simple one piece cork bases.  They all could be done this way to make the whole process simpler.  But I like to vary my bases some to add interest among a squad of models, in the same manned a set of themed resin bases typically offers some variety.

Custom Cork Bases for Adeptus Custodes WIP

The last step is to lay down some Vallejo Black Lava over the flat surfaces to add a nice gritty ground texture and mask the obvious pattern of the cork.  On larger bases, or in spot application for effect, I might instead glue down more of my basing ballast as rocks and gravel strewn about...often putting it around various cork layers on a multi-layer base to illustrate material crumbling from the larger features.  This can even be added into the black lava to vary the texture.  In addition, other details like grass tufts, bits of debris, etc. could be glued down.  I choose a base theme for an army and stick to it throughout the force.  In this case, I'm going with a simple blasted/barren ground theme so that nothing on the base will distract from the glorious details of the Adeptus Custodes.

Once the base is complete, it is painted separate of the miniature.  In many cases, clear spaces are left on the base where the model will be glued down. In other cases, I may scrape away a bit with a knife to clear a flat space for boot or limb.  While a model may be simply glued down to the finished base with super glue, I find it all to easy for the new paint to lift off with the miniature which is very frustrating.  As a result, I always pin my models to cork bases. For small models, a single foot pinned down serves.  For a knight or other large model, I might pin both feet.  

When pinning, I use a pin vise to drill straight through the whole base.  I then make sure to use a length rod that penetrates all the way through once the model is glued down.  This is important since the cork is quite malleable and it will be easy for models to get bent or twisted off the base under any firm pressure otherwise. With the pin all the way through the plastic base beneath, I've never had this happen. Any extra pin can be carefully trimmed away at the bottom so the model sits flat. Be careful not to leave sharp cut ends under the base that may stick you during later handling.  I say this from experience. Lastly, I turn the model upside down and put a drop of super glue over the pin end(s).  I give this a blast with the super glue accelerator to dry it quickly.  This last step may be more superstition than science, but I fancy that it puts as stop at the back of the pin to make it less likely to pull back out later.  

So that's it! :)

I hope this simple tutorial has proved interesting.  There is a wealth of custom bases on the market and I make use of them for some of my models.  However, it is also very easy and pretty cheap to create truly unique and interesting bases like this on your own with very modest modelling skills. May you be inspired to create some custom bases of your own for future projects. If so, please come back and comment here with some links to share.

Cheers and Happy Gaming!

Thursday, January 25, 2018

WIP: Adeptus Custodes with Halberds


Last night, I found time to complete the Custodes on the work bench and so another Adeptus Custodes painting project was set in motion.  I'm am very excited by what I read of the new codex and models coming very soon.  Certainly another squad of Custodes won't go amiss! Since I modeled the first squad of five with swords, this second squad naturally required the signature halberds.  

I have avoided calling out another Shield Captain directly in this squad until I see the codex.  It may be that I run these combined with the prior squad for the full ten (or in some combination), or they may run independent.  Regardless, I'm not clear how the sergeant/captain models will be designated in these squads so I'll keep my options open.  The squad "leader" stands with his hand on a dagger. A cape is waiting in the wings to be painted up and stuck on as needed.  The cape from this kit is a pretty unique piece so I didn't want a bunch of dudes running around with the same getup unnecessarily!

Adeptus Custodes Squad with Halberds WIP Assembled
Adeptus Custodes Assembled and Ready for a Primer Coat
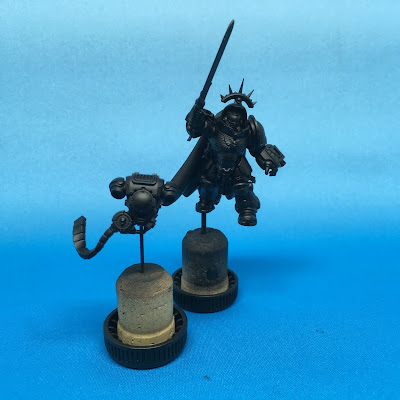
These models require some time and attention in order to achieve good results and so I treat each model as a character.  They all get mounted to my signature Bourbon cork holders using brass rod so I can paint them freely without getting grease or other muck from my hands all over them.  I also don't was to inadvertently rub any paint off while handling either. Normally, I would have just mounted the models to their bases and painted them while carefully holding the rim of each base.  I got good results the last time with the holders, so here we are.  Once I complete this squad, the wires get pulled out of the cork, holes are drilled in the custom bases and the models get mounted by pinning them to the bases using the same wire.

Adeptus Custodes Squad with Halberds WIP Primed
Adeptus Custodes Primed and Ready for Painting

Once mounted, the squad was primed with an airbrush (Iwata Eclipse) using Vallejo Black Surface Primer (74.602). I bought a big 200ml bottle through Amazon.com some while back just for this purpose.  I have been able to spray it on straight, but typically I add a few drops of Vallejo Airbrush Flow Improver (71.362).  The flow improver insures that things go on smoothly and don't spatter or get glopped up at all.

Adeptus Custodes Squad with Halberds WIP Based with Gold
Adeptus Custodes Base Coated and Ready for Shading
Once the primer was dry, I hit the squad with the airbrush again using Vallejo Brass (70.801) in a roughly 3:1 mix with the flow improver.  It might have been closer to 2:1, but I'm not very scientific in this regard.  I generally mix in the flow improver to suit until the mix flows well through the airbrush.  This approach takes some practice, but there is nothing really tricky about it.  The Brass comes out of the bottle thick, but with the flow improver added it sprayed well and left a great finish to my eye.

Adeptus Custodes Squad with Halberds WIP Shaded
Adeptus Custodes Shaded and Ready for more Base Coats.
The gold (well, brass...) laid down, I ended this session with an over all wash of GW Reikland Fleshshade.  I apply this from the top down on each model and use some care to insure there isn't too much pooling on the smooth, flat surfaces or any other place where it might look out of place or be too heavy handed. This step completes the messy bulk painting approach I used here to accelerate progress and achieve a consistent smooth armor finish over all.

That is where I left the squad at the end of the first session.  During the next session, I will block out and shade the remaining base colors and then set to the highlights if time permits.  I'm going to advance this squad as quickly as possible to done before Squaduary starts, but I'll be pleasantly surprised if they get finished.  As soon as February 1st dawns, all else will get set aside as I tackle some Dark Angels Primaris marines for Squaduary 2018. Thes lads will then wait for March to get to DONE.

Cheers and Happy Gaming!


Tuesday, January 23, 2018

On the Workbench [January] - Dark Angels Primaris Marines and Custodes

Hobby has had a slow start to the New Year and I haven't had much to post on yet this month.  However, the family is back from vacation and after settling in the hobby pace has picked up.  With the timely release of a new Dark Angels codex in December, I spent some considerable time pawing through the changes while away on vacation.  I had been holding my Primaris in the box until it became clear how they'd be received by the Dark Angels chapter.  And it seems they are received well enough, indeed.

So for the last week or so since getting back home, I've been assembling and basing what I have on hand.  Being more of a hobby collector than a core gamer in 40K, I will be assembling and painting most of the allowable new units to fill things out for show and painting experience.  Great hobby fun, of course, and I'll have options if ever I do decide to play them.  This approach must seem pure waste to some. but the Primaris line looks very well and will fit in just fine with my already shelved collection of Dark Angels which has played off and on, but otherwise languished on the shelf (or more recently in their foam trays) for close on 25 years now.

Here's to another 25; cheers!

So from the work bench today, a collection of WIP pics of what I have assembled and primed. Oh, and I simply cannot say enough what a pleasure it is to have an air brush and an outside venting spray booth for doing so much priming during the long and dreary winter months!  I picked up a large bottle of Vallejo black primer some time back and it has served me quite well for bulk priming models with the air brush.  It sprays on its own just fine, though I do tend to add a few drops of Vallejo Airbrush flow improver more out of superstition than from any true sense of science.

First up are the three masters:

Dark Angels Primaris Master in Gravis Armor WIP Primed
Dark Angels Primaris Master in Gravis Armor WIP

Dark Angels Primaris Master with Plasma Pistol and Power Fist WIP Primed
Dark Angels Primaris Master with Plasma and Power Fist WIP

Dark Angels Primaris Master WIP Primed
Dark Angels Primaris Master WIP

The bases are a simple customization using my proprietary mix of model scenic railroad ballast stuck down with a quality wood glue. This is a much more simple treatment than I would normally do these days, if you have seen my Custodes or Grey Knights.  But it is the scheme I started the army out with way back when.  So for tradition and consistency within the collection, I stick to it. 

Custom 40K Bases WIP Primed
Custom Bases WIP

For the first base, I neglected to make space for the model, so I'll pick away at the gravel by hand with a knife to make room for the model to stand comfortably. For the second, you can see that I remembered and did not glue gravel where the model will ultimately stand.  I favor this approach since it allows the heavy power armored marines to settle into the soil and perhaps lends some illusion of weight to the final painted model. The models were left off these bases to make it easier to paint the legs and undersides of the capes. The third Master's cape comes unattached so it will be easy enough to paint him up and glue down the cape after.

Next up we have a few of the usual Primaris Characters:

Dark Angels Primaris Ancient WIP Primed
Dark Angels Primaris Ancient WIP

Dark Angels Primaris Chaplain WIP Primed
Dark Angels Primaris Chaplain

Dark Angels Primaris Librarian WIP Primed
Dark Angels Primaris Librarian

Dark Angels Primaris Lieutenant WIP Primed
Dark Angels Primaris Lieutentant

The Primaris Apothecary, not shown here, is waiting in the wings to be assembled and should appear in some later post form the workbench. These characters are built pretty much stock with the exception of a Dark Angels shoulder pad for the left shoulder chosen from among my bitz box. I was pleased that the shoulder pads were left as an add-on for these models allowing for the trivial customization. This was not the case with the Masters and so they will get DA icon transfers instead.  I'm fine with transfers, but I have come to prefer how raised detail looks when painted in comparison to transfers. Thanks be to the Deathwatch and grey knights for this growing appreciation, I guess. I've become spoiled.

Where I would normally use bare heads for characters, I decided I would conspicuously go with helmeted heads for the Dark Angels Primaris characters. Only the Masters will go bare headed. This is for my own little story line with some secret anonymity among the new ranks of Primaris until they have earned the trust of the Chapter (as a Master must surely have).  It is of course conspicuous that the Primaris characters have not earned Deathwing status where their traditional chapter brethren of equal rank have (I'm looking at you in particular Chaplain and Librarian!)

Otherwise, the same custom dip of bases into the ballast tub.  I put the glue straight onto the base with no thinning using a GW plastic spatula tool.  This is gloppy at first, but allows very strong adhesion and I never have any of the ground cover falling off except for the worst abuse, or perhaps the odd large rock that doesn't get quite into glue. In addition, the glue mostly stays put (wood glue being thicker than white glue) so little of it goes running of to spoil anything else. Once the glue is slathered on (my industry term for it :P), I dip the model's base directly into the tub of ballast so that the whole base is well submerged.  I press loose ballast down firmly to get it well embedded into the glue then haul the model back out again with a bit of a shake and a tap on the base's bottom to shake off any excess.  After this, there is a brief period of wiping around the rim and poking about with the dry, narrow end of the spatula to remove anything that gets glued where it doesn't belong.  I put some particular attention into insuring that the gravel isn't all over the boots and in fact is pushed back a bit as if the heavy tramp has kicked the loose earth away.

Next up the squads built thus far:

Dark Angels Primaris Inceptor Squad WIP

Dark Angels Primaris Hellblaster Squad WIP

I built the Inceptors purely because they came in the Dark Imperium box with the rest.  Not sure they'll get played, but they look cool enough on their own and should be fun to paint. The Hellblasters, however, will certainly get played and I have decided to make them my Squaduary 2018 project. I have so far stuck to mere five man squads for a month long painting project.  So painting ten in a month should be a fun exercise. I have painted two ten man Dark Angels tactical squads previously (both some years ago now) and while I don't recall exactly how long each took, I know it to be at least two month or more! But then, I have upped my game in many ways since so we'll see.

Last from the work bench is some Custodes progress.

Adeptus Custodes Squad WIP Build in Progress
Adeptus Custodes Squad WIP

I had planned to let this last squad lay on the shelf for a bit after painting a dread and a squad last year.  But then, and quite to my surprise given all the possibilities, a new codex was announced with new models to go with it.  So having made good progress on on a small force already, I felt inclined to build this last squad I had on the shelf in preparation for the new rules.  I already assembled a Vexilla, Shield Captain and three sword/shield wielding Custodes, so I wanted the next five to be all with their traditional halberds.  I believe this will all fit in well enough with the codex, from the leaks I've seen. I won't fix on a cape to the squad leader until I read the codex.  I don't want too many shield captains wandering around, after all! :)

So that it for hobby so far this January.  A great start to my new additions for the Dark Angels and some reinforcements for the Custodes.  I'll finish building the Custodes squad this month, and hopefully lay down at least the golds for their armor if time allows.  Then they will get put aside for February while I take part in the Squaduary 2018 challenge with my Hellblasters.

Best of luck to the other Squaduary participants and best wishes for your own projects this month.

Cheers and Happy Gaming!

Wednesday, January 10, 2018

Happy New Year!

I'd like to kick off 2018 with some reflections on 2017 and some resolutions going forward. 2017 for me was the year to get things done.  This effort won't be so significant to many who regularly complete painting projects.  But for me it was a big deal, starting primarily with my commitment to the hobby year as defined by 40kaddict. Since the kickoff last September, I have completed five projects for a total of 9 models (three characters, a dread,  and a squad of 5 Custodes) in roughly 3.5 months. I can number many years where I didn't get that much fully painted.

And that wasn't all.  There was a five man squad of Deathwatch veterans for Squaduary, six containers painted and some scatter terrain also fully painted along with most of a team of Tempestus/Astra Militarum for ShadowWar; Armageddon, and a couple Orc test models as well underway.  And a lot of terrain got built.

That certainly accelerated 2016. However, I want to do more!  While watching many other hobbyists out there completing whole armies within a year, I feel inspired to crack on and see what I can accomplish in 2018. I am unlikely to take on a whole army because my love of the hobby spreads my interest in projects all over the range of Imperium models. In 2018, I'll continue to tick off my TODO list from the start of the 2017/2018 hobby season.  Some new stuff will creep in as well since GW isn't going to stand down and stop producing great new stuff to build and paint.

So there will be more Deathwatch, Grey Knights and Dark Angels (new codex, woohoo!!) to come for sure.  I would also like to go back and finish pieces that started out this blog, and which still get new views each month. So the Death Korps Baneblade will get completed for sure before the year is out.  With Necromunda here again, the Sector Mechanicus terrain must see some paint as well.  This is the most ambitious project and should likely get done over a few major stages. I'd like to get the stuff primed and properly based...there there will be a gross dry brushing stage for all pieces...then the details...etc..  So over the year I'll go form playing on loose grey plastic, to stable primed terrain, to table-top quality, to a more professions standard...and eventually to done!

It's going to be a big year for hobby.

For the blog, I'm thinking it is time to step out from simply recording my projects - where the blog started for myself.  I'm planning some new how-to articles where I can share my own hobby processes, such as how I go about custom basing models and terrain...more details on my painting process and choices, etc..  There is a rich field of hobby bloggers out there doing this already, so it is not my aim to prove I do anything better.  I think my niche will be to share what can be done beneath the pro-painting level by the veteran amateur to achieve great results.

That's how I see myself - a veteran amateur.

With 25 years or so in the hobby, yet still have so much to learn;  I routinely make rookie mistakes; and sometimes I change techniques and process seemingly at random. Most of my large collection is unpainted, if lovingly assembled and generally primed or base coated.  I can use an airbrush, but largely only for priming and base coating. I produce pieces I am proud to share like a veteran, but then take months off from painting and when I come back to it, it's as though I'm set back years and have to retrain myself to get the same results again. I have made my hobby career about perfecting the art of the veteran hobby amateur.

And I suspect I am not alone.

Hopefully I can put out some new hobby content that inspires the other veteran amateurs out there.  And while doing that, I also hope I can do my part to support the blogging community.  I draw a lot of inspiration from observing the art and lessons of other bloggers.  I want to give back. My main hobby article for 2017 was the piece about adding shelves to my display cabinets.  I plan to do much more in 2018.

So here is to 2018 and the projects yet to come.

Cheers!

And happy gaming...