Imperial Knights are tall models. While it is possible to find storage for them as is, I find it very convenient to cut them off at the waist when storing. Being able to break the models in two increases my options for storage and limits the about of vertical space they take up when stored.
There are many articles out in the 'verse for magnetizing these great models. Here's how I do it.
With the release of the new 8th edition Imperial Knights codex, I've been excited to dust off some kits I had laying around and build a household of Imperial Knights. For this article, I'm building an Imperial Knight Gallant. The model of Knight doesn't matter all that much, however, since at the waist they are the same.
During assembly, I look ahead at the instructions and determine how best to apply magnets to the build process. We want the magnets to form strong joints so parts stay together. We don't want the magnets to come loose and rattle around in our models after assembly is complete.
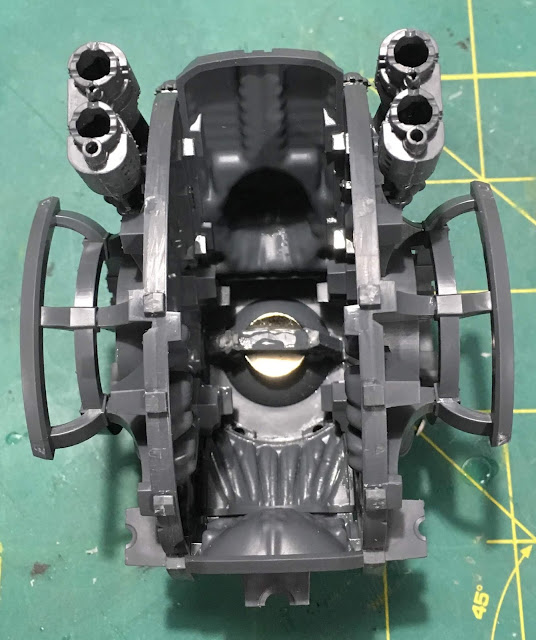
For Imperial Knights, I choose to insert magnets under the dome that forms the base for the the upper torso to rest and rotate on. There is lots of space in there, so I use large strong rare earth magnets. In this case, I build up a little ziggurat using a 1/2" x 1/8" magnet as the base with a smaller, thinner magnet at the top. The specific magnets are less important that filling the space so that there will be strong attraction from the magnets. I don't mind over doing it. I was much more conservative (and inexperienced) when I built my first Imperial Knight Freeblade, and I STILL regret how light the attraction is. While the torso stays in place on the Freeblade, it spins about easily and doesn't feel like a good string bond.
With my first projects, I would simply glue the magnets down using superglue or two part epoxy and continue assembly. After reading some other approaches, I now use some extra sprue, cut from the parts frames in the kit, to build a bracket to hold the magnets in place. Plastic cement forms a reliable bond between the bracket and the housing for the magnet and helps insure the magnet doesn't simply pop free of the glue over time. If you've worked with magnets or smooth metal and glue before, you know that it doesn't stick well or form great bonds.
In this case, I went a bit over board and squirted some Vallejo plastic putty (70.400) into the gaps to fill up the void. These magnets are NOT coming free...ever...It's overkill, but since the magnets must hang up in the top of the dome, they may be more apt to succumb to the forces of gravity over time.
 |
| Magnets installed and held in place by sprue and putty |
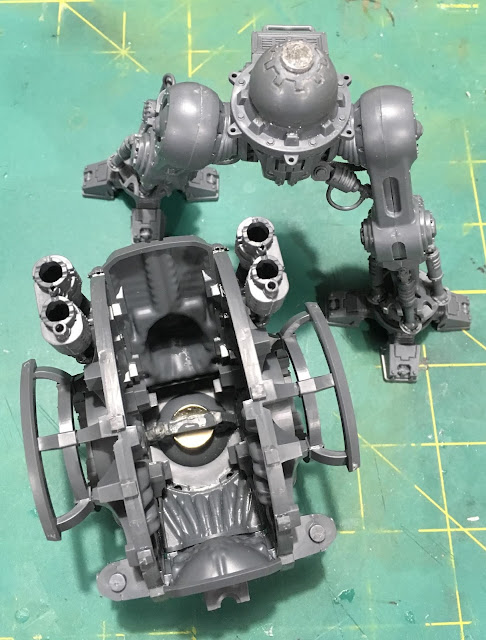
Two part epoxy works great for this as it makes a strong flexible bond that won't be as brittle as superglue. I don't want this magnet coming loose for any reason (drops, temperature/humidity changes/whatever). Once the epoxy set up (I use a 5 minute 2-part epoxy). I built a sprue frame over it to help hold it in place. The bond at this point is precarious since the magnet is perched on the top of the dome over a large hole and so doesn't have many contact points. It's worth noting that I let the epoxy dry by laying the hole thing down on the magnet so the epoxy wanted to pool on the underside of the magnet instead of running down the sides of the dome as it dried.
 |
| Torso assembled with magnet and frame showing |
 |
| Standing strong |
And here is the knight standing tall with its magnetized waist. But there was still an issue.
At the top of the dome on the legs, there is a small plastic "button" that controls how much the upper torso can roll around on the ball joint when posing the model. I initially cut this off with a hobby saw, expecting to increase the range of motion in the ball joint for even more dynamic posing!
This worked great, but I found that the weight of the upper torso caused it to slop around too freely, slumping this way and that at the waist. I could pose the model, sure, but with the remaining weight of the shell and arms would likely prevent it from holding the pose. The magnets were strong and prevented the torso from falling off just fine, but the body wouldn't reliably remain posed or even upright!
So I ended up replacing the "button". You could avoid this next step by NOT removing the original plastic "button" in the first place. But I will say that you may still get a bit of wobble since the original "button" is smaller than the socket it fits into allowing for some movement. GW clearly expected you to glue this down once you choose the pose, so this movement isn't normally a problem.
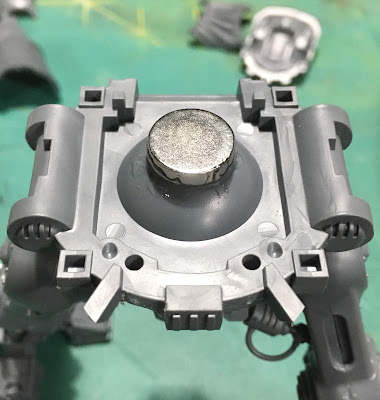
I opted for a firm base for the upper torso to rest on, which meant replacing the smaller button with a new full size one that fit exactly into the socket for it in the upper torso. Here's what that socket in the upper torso should look like. Note the slight recessed hole in the center where the "button" fits.
And here's a shot of how the new "button" came out:
 |
| A replacement "button" for the upper torso of the knight to sit on |
Once dry, this formed a very firm and stable base for the upper torso. The magnet attraction remains strong and now the knight stands erect and stable with no wobbles. Everything rotates smoothly, although I did loose further posing options since the torso no longer tilts about on the waist. This is not something I am concerned with for this project, however.
And that is how I magnetized this Imperial Knight for storage and transportation. If you are interested in House Taranis, or Imperial Knights in general, check back frequently to see more WIP posts as I complete my second Warglaive and continue to explore the process of building more knights for my collection, including this Gallant, a Paladin, a Warden, a Crusader, two Helverins, and even a Knight-Castigator from Forge World if I make it that far.
Please share your projects on Imperial Knights in the comments.
Cheers and Happy Gaming!


No comments:
Post a Comment