Thursday, March 12, 2020

Monster March 4 AT Warlord Titan - Week Two Progress

Adeptus Titanicus Legio Ignatum Warlord Titan WIP

So we're well into week two of the Monster March 4 hobby challenge.  Despite a family trip that took me away from the hobby man cave for a few days, I was able to get some progress done this week.  With no money shot of an assembled titan at this point, I'm forced to lead with an example pic above of the Legio colors coming together.

I finished last week with the armor panels based coated - all except the yellow stripes.  So I started this week with a masking session to get the stripes laid down.

Adeptus Titanicus Legio Ignatum Warlord Titan WIP - armor plates

I selected some armor panels to get yellow stripes, based on what I left black during the initial base coat phase.  Some areas will stay black and I just needed to spend a little time planning things out.  Special effort was put into orienting the masking for the yellow stripes so the final assembled results will (hopefully) look great. More time should have been spent planning the lower leg armor - more on that in a bit.

I took the advice of another blogger when laying down the stripes.  If you lay identical strips of tape side-by-side across the entire surface to be striped, you can then remove just the strips that are going to get painted so all of the stripes end up identical in width (if you are careful with the taping, of course).  It's a better approach than my usual "eyeballing it" method.

Adeptus Titanicus Legio Ignatum Warlord Titan WIP - gun shields

Note the remaining red areas showing on the gun shields above.  This was a mistake as I over-sprayed these areas and had to go back in to fix the red.  Ugh.  It pays to be thorough during masking unless you have impeccable air brush skills.

Adeptus Titanicus Legio Ignatum Warlord Titan WIP - arm weapons

I wish I spent as much time masking the gun shields as I did on the guns themselves! :)  Over-spray can be cleaned up, but it slows everything down and if using a paintbrush diminishes the smooth effect you get with the air brush in the first place.

Adeptus Titanicus Legio Ignatum Warlord Titan WIP

While waiting for the yellow paint to dry, I dry-brushed some Vallejo Gungrey over the skeleton of the Warlord.  Not much to see here, but some highlights were raised.  I'll probably go over a second time with Vallejo Steel as I did on my Legio Tempestus titans before applying shading.

Adeptus Titanicus Legio Ignatum Warlord Titan WIP - armor plates

Several thin coats of Vallejo Game Air Gold Yellow were sprayed over the masking.  Once dry, the tape was removed to reveal quite passable black and yellow stripes, with only a little clean up needed on the black due to paint getting under the edges of the masking in spots.
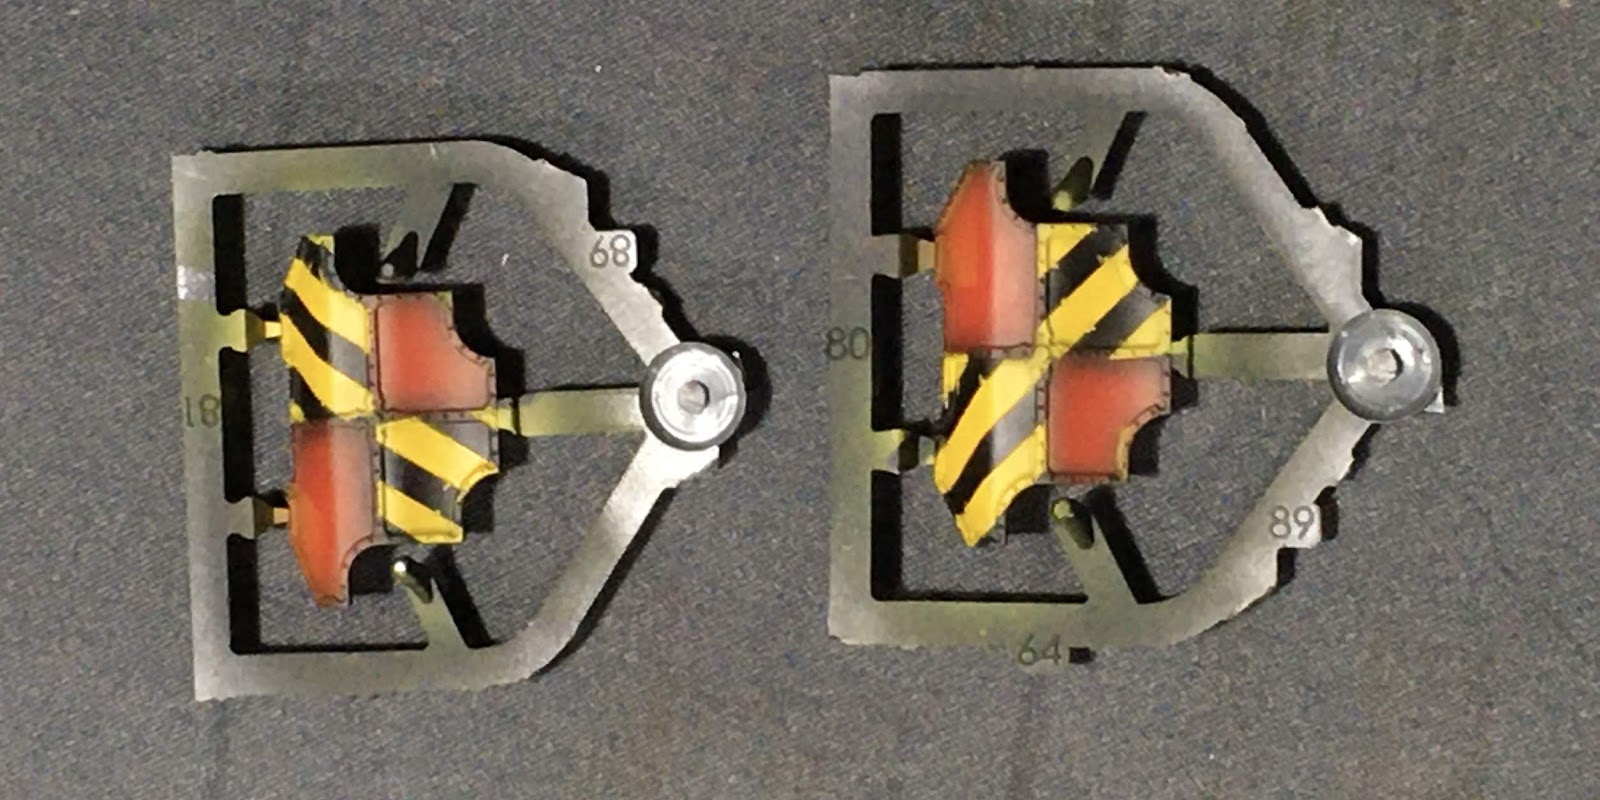
Adeptus Titanicus Legio Ignatum Warlord Titan WIP - gun shields

Over-spray clearly visible on the shields above - ugh....was not paying enough attention while painting quickly to make progress.

Adeptus Titanicus Legio Ignatum Warlord Titan WIP - arms weapons

The volcano cannon have the gun shields pictured above, so I will leave their shoulder armor sections plain black.  I thought it would be a bit much striping both the shoulders and the shields. The remaining arms get striped as shown above.

Adeptus Titanicus Legio Ignatum Warlord Titan WIP - legs

Next, I started to get as much of the trim done as I could with the time I had left to me, starting with the legs.  There's a lot of over spray here, but maybe I saved time on the leg armor?

Adeptus Titanicus Legio Ignatum Warlord Titan WIP - gun shields

I love how the gun shields are coming out for the volcano cannon. with some shading, highlights and decals theses are going to look pretty cool.

Adeptus Titanicus Legio Ignatum Warlord Titan WIP - armor

The front shoulder/pectoral armor looks great too.  Shading and highlights should help delimit and pick out the gold eagle better as well as the trim.

Adeptus Titanicus Legio Ignatum Warlord Titan WIP - armor

Random armor bits also looking good with the trim painted. I had to take quick pics of the work before heading to bed, so lots of clean up still to do on these panels.  Normally I would have touched things up first before taking pics.

Adeptus Titanicus Legio Ignatum Warlord Titan WIP - armor

And now the major bummer for the week.  While I believe I planned out much of the masking to great effect, I really messed up these lower leg panels. I was meant to put black and yellow stripes on opposite sides so that the outsides of the legs would show the stripes.

Adeptus Titanicus Legio Ignatum Warlord Titan WIP - armor

As you can see above the second leg is NOT a mirror of the first, but looks identical.  That's full points for massed production, but no points for correctness with this project.  Looks like I'm going to have to repaint one of these...just debating stripping the old paint first or not. Regardless, this is going to set me back a bit more on my schedule.  As it is, you may note that I'm not sharing any Warbringer pictures in this post. Not enough progress on the Warlord to spare time for it this week!

regardless, great progress was made and while I don't have an assembled Warlord to show off yet, I am much closer than pics of random armor pieces may reveal.  I expect Week three's title pic will be an assembled Warlord with all of the base colors laid down and looking fierce.

Check back next week to find out...

Cheers and Happy Gaming!

Thursday, March 5, 2020

Monster March 4 AT Warlord Titan - Week One Progress

AT Warlord Titan WIP

Well, we're almost a week into Monster March 4 and it's time to share my progress so far.  This week, I set out to prime the Warlord and get as much base paint as possible on it.  Any time left over was to be used to make progress on the Warbringer titan bonus project.

Adeptus Titanicus Warlord Titan for Legio Ignatum WIP

I primed the model with an airbrush using Vallejo Surface Primer Black.  Then Scale 75 Black Metal was used for pretty much anything that wasn't an armor panel.  Vallejo Game Air Bloody Red was sprayed over a base coat of Vallejo Panzer Brown.  Black panels were sprayed with GW Abaddon Black.

Adeptus Titanicus Warlord Titan for Legio Ignatum WIP - weapons

Above I have all the warlord weapon options laid out along with the head and a couple loose armor panels.  There is going to be a lot of detail painting for this project.  I am planning to try out the airbrush when painting the plasma effects. But still...a lot of brush work to go.  Oh, and the black shoulders should be sporting yellow chevrons or hazard stripes as well.

Adeptus Titanicus Warlord Titan for Legio Ignatum WIP  - armor

Most of the armor is still on sprue to make things easier during painting.  Several of the black panels will be masked off for yellow chevrons/hazard stripes. That will hopefully get done during week two.  A few of the smaller bits will remain black (the knees for instance, and one of the shields.)

Adeptus Titanicus Warbringer Titan for Legio Ignatum WIP

This was great progress for the week, so I rewarded myself by batch painting the Warbringer right along side while I had the colors in the air brush.

Adeptus Titanicus Warbringer Titan for Legio Ignatum WIP

Pretty much the same drill, just different areas to paint on the Warbringer.  I had fun thinking about what colors would go where so each titan bears the Legio colors in a unique heraldry.

Adeptus Titanicus Warbringer Titan for Legio Ignatum WIP

I have a few less weapons for the Warbringer at this point. Still a decent amount of detail work to do.  The Warlord must get finished to complete the Monster March 4 challenge, so the Warbringer is pure bonus.

Adeptus Titanicus Warbringer Titan for Legio Ignatum WIP  - weapons

But it appears to have MANY more armor panels, even if they are a bit smaller than those on the warlord. Of course, for the Warlord, I had removed the panels I'm not used and tossed them in the bitz box some time ago when it was assembled.  For the Warbringer, I decided to prime everything, even though I won't be using the redundant panel options.

Adeptus Titanicus Warbringer Titan for Legio Ignatum WIP  - armor

So that's where week one has brought me.  The family will be off for a five day trip, so I will only have one post next week at the end to share any progress I make once I'm back in the hobby man cave. I look forward to seeing where the rest of the challengers have got to.
image courtesy of swordmasterofhoeth.blogspot.com

Best of luck to all of the Monster March 4 challengers.

Cheers and Happy Gaming!

Wednesday, March 4, 2020

HowTo: Magnetizing the AT Warbringer Battle Titan

Adeptus Titanicus Warbringer Battle Titan WIP

I wanted to post up a little show and tell this month.  I recently built the Adeptus Titanicus Warbringer battle titan and thought folks might be interested in what I did to magnetize it.  At this point, magnetizing models is getting pretty routine and articles on the web abound, but why not toss in my two cents.

The Adeptus Titanicus titans come pre-molded with magnet sockets in most cases, which is a really big help.  In the case of the Warbringer there are two places where this wasn't done and I'll discuss those first.

The waist joint is perhaps an obvious one since none of the titans so far come designed for a magnet there. I have chosen to glue all of my titans for durability and stability on the game table.  They are dreadnought size for the most part, and I don't magnetize my Dreadnoughts at the waist.  Should you wish to magnetize the waist, it should be an easy matter of building up the inside of the titan halves with sprue or putty, and then gluing in the magnets.

Adeptus Titanicus Warbringer Battle Titan WIP - magnets

The second area omitted for magnets is the main weapon on the titan's back. The rules provide a second weapon option which one assumes will arrive on some future sprue.  Also, a big gun like that just needs to swivel as you menace your enemy on the table top.  Am I right?!  But you don't want it coming off or getting lost or broken between games.

Adeptus Titanicus Warbringer Battle Titan WIP - magnets

As you can see in the images above, I glued a bracket made from sprue across the top of the magnet for strength.  I added green stuff for good measure, then epoxied the whole assembly. What's missing from these images is the extra epoxy I glopped over the whole mess as a final note of structural integrity. Once assembled, you can't get back in to fix the magnet if it comes loose...so make sure it can't/doesn't.  When using sprue, I look for a box shape that I can cut down to make a simple one-piece bracket.

Adeptus Titanicus Warbringer Battle Titan WIP - magnets

The weapon mount then had to be cut down so a magnet could be fitted in place.  You'll note this piece has a conical center than fits down into the body so no magnets are technically required.  As stated above, however, I wanted the weapon securely in place.  I used a hobby saw to cut the tip off the cone at a carefully measured point accounting for the depth of the magnet so everything would sit flush once assembled.

Adeptus Titanicus Warbringer Battle Titan WIP - magnets
The assembled cannon
I should pause at this point to point out I went a little overboard and used a very strong pair of magnets.  The result is quite secure, but a bit of a pain to separate without bending/breaking something...anyway, moving on...the 3/8" magnet is fine, but I could have used a thinner one with less pull. This one is probably 3mm (sorry to mix units here...).

Adeptus Titanicus Warbringer Battle Titan WIP - magnets

Above, you can see the main weapon magnet in place along with those for the anti-air side mounts.  The remaining weapons are all magnetized with the same small 5mm x 1mm magnets that are used for many of the other AT Titans.  No customization needed here, just glue in the magnets and use good discipline when matching polarity.

Adeptus Titanicus Warbringer Battle Titan WIP - magnets

For the arm weapons, I maintained matching polarity with my existing Reavers so I could swap weapons. The Warbringer kit has been updated to account for magnets at the ends of the arms and on the weapons themselves.  This was not the case with the Reavers and poses minor challenges for weapon swapping.

Adeptus Titanicus Warbringer Battle Titan WIP - magnets

In a separate article, you can see how I drilled out the Reaver weapons to insert magnets.  That is no longer necessary.  Another big change is in how the weapon power cables are designed.  No longer separate pieces, they now hang down form the main body and will socket into the weapons when attached, provided you don't choose to clip the alignment pegs and change the pose.  For the Reaver and Warhound models, I chose to just ignore the power cables and left them off so I could swap the weapons easily with no fuss. As a result, the Reaver weapons don't really attach well to the Warbringer at least as far as the dangly power cables are concerned.  This is an issue of little matter during a game however, and one that may be resolved by future sprues.

Adeptus Titanicus Warbringer Battle Titan WIP - magnets

Note the notches around the magnets above.  These position the weapon on either the left or right arms, aligning the small hollows or sockets along the backs of the weapons perfectly with the dangly power cables.

well, that wraps my efforts to magnetize this titan.  Aside from the main cannon, this is a very easy model to magnetize with the correct size magnets.  It's very cool to see GW dedicate design time to this for hobbyists. One can easily imagine a second weapon sprue with additional arm weapons and the missing volcano cannon option. At the cost of these kits, you want to be ready for that and not having to buy a new titan just to use different weapons.

I hope this article proves helpful to the 'verse.

Cheers and Happy Gaming!

Monday, March 2, 2020

Monster March 4 Pledge and Kick-off

image courtesy of swordmasterofhoeth.blogspot.com

Welcome to Monster March!  Last year, during #MonsterMarch3, I painted up a Legio Tempestus Warlord titan for Adeptus Titanicus.  Since that time, I realized that I was not going to find a gaming friend to join in this game with me - at least not at the level of collecting and painting models.  Undaunted, I decided that I was just going to have to build a second Legio so I could field both sides in a regular game of Adeptus Titanicus.  That way I could invite folks to play and try the game out without any commitment on their part other than time.

Adeptus Titanicus Warlord Titan WIP


So I begin #MonsterMarch4 with my second Warlord titan with all the trappings (well, with many trapping, anyway...).  This monster will be painted in the livery of Legio Ignatum. The Legio Ignatum were part of the Triad Ferrum Morgulus, the three original Titan Legions founded during the Age of Strife, along with Legio Tempestus and Legio Mortis.  This gives me a strong Mars theme for the models and allows me to play them either allied or opposed since Legio Tempestus split their loyalties during the Horus Heresy. The AT game appears to be pushing Tempestus as a traitor legio now too, so be it.

Full disclosure: the model was assembled, fully magnetized, last year.  To make up for that, I built a Warbringer which will serve as a stretch goal for the challenge. I don't want anyone to think I'm getting off easy!


Adeptus Titanicus Warbringer Titan WIP
A Naked Warbringer Titan - brrrrrrrrr
Now on with the painting!  This week I'll be priming both models and then hitting the base colors on the armor and skeleton of the Warlord.  Any leftover time will be used to make bonus progress on the Warbringer.  Check back towards the end of the week to see where I get.

Best of luck to the other #MonsterMarch4 challengers. There is some great projects going on out there.

Cheers and Happy Gaming!

Wednesday, February 19, 2020

Squaduary 2020 Week 3 Progress - TO DONE

Blackstone Fortress Hostiles

Coming to the end of Squaduary 2020 week three and it's time to reveal my progress.  I was able to complete the twelve models I set out to paint, pretty much right on schedule.  As mentioned in earlier posts, I'm away for business all next week so it was important that I wrapped things up this year in three weeks instead of four.  I'm very happy with the results and it was truly great fun to paint something completely different this time around.  All models were finished off with a generous coat of Model Masters Lusterless Flat lacquer.

Blackstone Fortress Spindle Drones

The spindle drones were completed first.  A pretty simple paint job and an easy win. Here they are posed on a Blackstone Fortress tile for comparison.  I love the look.  I'll offer a final shout out to White Metal Games for the base design inspiration.

Blackstone Fortress Spindle Drone - front

During week three I tweaked the drone lenses with a drop of orange to brighten up the center a bit.

Blackstone Fortress Spindle Drones - back

These models are identical so I'll spare you a full set of close ups. This post is already pretty picture heavy.

Blackstone Fortress Ur-Ghuls

The Ur-Ghuls were painted next. I had a lot of fun with the colorful shading. These guys have been complete since the end of week one and no more work was done on them in week three.

Blackstone Fortress Ur-Ghul - front

A bit over exposed still here, but I think you get the idea.

Blackstone Fortress Ur-Ghul - back

Fun and simple to paint. I enjoy these models and only wish there were four unique poses, instead of just two.

Blackstone Fortress Ur-Ghul - front

I'm not showing all four Ur-Ghul as a result, just examples of the two poses and how they came out.

Blackstone Fortress Ur-Ghul - back

Last up were the Choas Beastmen.  More work, of course, but still very fun to paint.  Lots of detail on these goat men.

Blackstone Fortress Chaos Beastmen

I put a bit more time into these models; they deserve it. During week three, I added additional highlights, some shading and color around the faces, and tidied up all the little details (skull trinkets, etc.).  I won't discuss each pic below, but I included front and back pics of all four models since they are individual enough to warrant the attention.

Blackstone Fortress Chaos Beastman - front

Blackstone Fortress Chaos Beastman - back

Blackstone Fortress Chaos Beastman - front

Blackstone Fortress Chaos Beastman - back

Blackstone Fortress Chaos Beastman - front

Blackstone Fortress Chaos Beastman - back

Blackstone Fortress Chaos Beastman - front

Blackstone Fortress Chaos Beastman - back

So that's going to earn me another big seal o' DONE for Squaduary 2020.


Best of luck to my fellow challengers during week four as they draw their own projects to completion.  This has been another great challenge and I look forward to sharing in many more to come.  Many, many thanks to thousandeyes and steppingbetweengames for hosting Squaduary 2020.  It's been a blast!

When I get back it'll be time for tiny titans and #MonsterMarch4!

Cheers and Happy Gaming!