Greetings!
#MonsterMarch3 is coming to a close...only a couple days left and it's not clear that I will manage more time for this project before the end. The Engine is coming along very well, but is not complete. I missed two of the expected sessions for this week, which meant I got about half the time I expected to work on it. That said, I think you'll like what you see and I'm very pleased with how this Warlord is coming out.
After some trim work and Nuln Oil shading, I completed the build of all the parts.
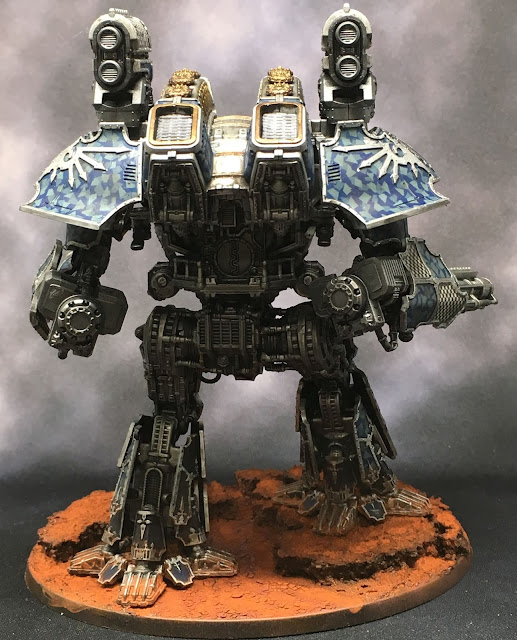
Ahhh...regal and menacing all in the same stride, just how I imagined it! The waist and the base are the only things not glued at this point. This allows me some freedom to get into all the parts of the model as I paint in details. The next step was to paint the base so that I could finally glue the feet down. I broke out the air brush and followed the steps from my paint recipe (see tabs above). Always a good idea to record the colors and steps used on a model so when you come back to add more, you get a consistent look to everything.
And I was rewarded for the effort with a base easily matching the two Reavers. Scroll to the end for a family shot that illustrates just how well the three titans match. I used Vallejo pigments (primarily Dark Red Ochre) and pigment fixer, being sure to add some to the feet and leg armor to tie the model to the base and add to the illusion that this engine has been striding the surface of Mars for some time.
I pinned the legs to the base using brass rod to prevent it being torn from the base in the future and glued them down using 5-minute two part epoxy. I am MUCH preferring epoxy to super glue and in fact epoxy was used to attach all the armor plates and adhere anything painted where plastic cement couldn't be used. I used to mask areas to be glued to keep paint off areas I wanted to use plastic cement on. But this project was labor intensive enough as it was. We'll see if the paint chips later, releasing parts and defeating the epoxy. So far this beast is rock solid.
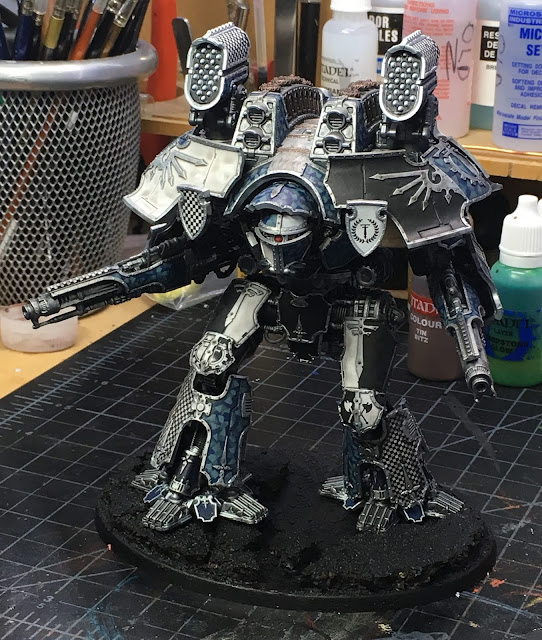
Following the base work and final assembly, I spent some time cleaning up trim and adding a few details. The Warlord has reached a level above a good table top standard and I'm proud of it already. But it's not done yet! I will keep at it as we roll into April, finishing the highlights and cleaning up the armor, esp. the white panels. My shading game is off and the murky staining here is obvious, if fixable. If I'm being honest, I rushed the shading as I moved to get things assembled to complete the challenge.
I hope you enjoyed following along with my entry for #MonsterMarch3. While not a monster in the truest sense, this engine is still a BEAST! ;-) I have had a great journey working on it and I look forward to completing the Warhounds, knights and at some point the second Warlord already waiting on the shelf. Having recently picked up the new Reaver weapon sprue, there will be a couple new weapons assembled and painted for the Reavers too. Lots of Titan goodness to come!
I'll close with a photo shoot from the light box.
 |
| Come and get some! |
 |
| Yay, though I walk through the shadow of death... |
 |
| Looking for its next kill... |
 |
| A look at the details on the top...void shield generators! |
 |
| Battle Titans of the Legio Tempestus |
 |
| The Maniple so far (missing knights) |
Cheers and Happy Gaming!


They look great together. Do you scrape the surface you wish to Glue? Otherwise your epoxy is just adhering to a layer of paint rather than a roughened surface for more surface area adhesion.
ReplyDeleteright. Here, with this relatively small model and plenty of gluing surface, I chose not to scrape the surface. We'll see what snaps off. :) With a heavier resin piece or something I'd expect to get high torque regularly, I'd scrape (and possibly pin).
DeleteI'm thinking of using epoxy too on my models so that I can do last minute posing as it dries. You could easily call this done already and it really comes together as an army. Great work!
ReplyDeleteExactly! 5-min epoxy gives enough time to set a pose without taking too long and its tacky enough to hold light stuff. I’m not giving up on superglue, but finding value in another tool. Thank you for the complement!
DeleteCongratulations! Well done indeed! If you did not say that your have not yet completed painting the Titan I would have not noticed! :)
ReplyDeleteI don't see any rushed parts either. Really, really great project and I am grateful for often and very detailed progress updates.
I will probably wait a day or two into April so that people can send in their final photos.
Cheers!
Thank you. And many thanks for running the event! I had a great time joining in the challenge.
Delete