A journal of my efforts towards completing various and sundry Warhammer 40K projects involving the many Armies of the Imperium of Mankind.
Enjoy and feel free to comment...
- Home
- Adeptus Custodes Paint Recipe
- Adeptus Mechanicus Paint Recipe
- Aeronautica Imperialis Paint Recipes
- Blades of Vengeance Paint Recipe
- Dark Angels (Pre-Heresy) Paint Recipe
- Dark Angels Paint Recipe
- Death Korps of Krieg Paint Recipe
- Deathwatch Paint Recipe
- Grey Knight Paint Recipe
- House Taranis Paint Recipe
- Legio Ignatum Paint Recipe
- Legio Tempestus Paint Recipe
- About
Thursday, March 14, 2019
#MonsterMarch3 Week Two Status (painting Legio Tempestus camouflage!)
On to week two of #MonsterMarch3. #ithinkibitofftoomuch, #suckitup, #getonwithit.
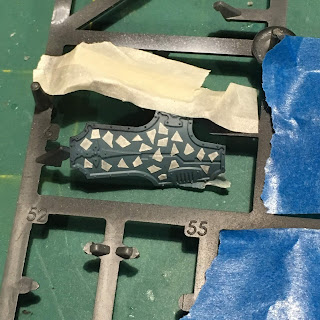
Lots happened this week but the results don't necessarily reflect the work involved. It's time to get the armor painted. And for Legio Tempestus, that means lots and lots of urban camouflage. When I painted the two Reavers, I felt I used a pattern that was too sparse and too large making the resulting camo a bit chunky in my mind, at such a large scale (relatively speaking). To that end, I'm working with smaller shapes this time, and more of them which means a lot more masking...and the Warlord has a LOT more armor panels!
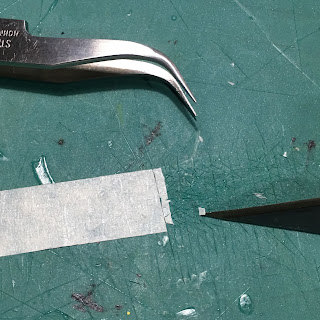
To mask out the shapes, I use simple masking tape (an artist's/drafting variety that won't lift the paint when removed) and a sharp X-acto blade to cut the shapes. Then either the knife blade or tweezers are used to lift and put the pieces in place. Here's a a bit of what that looks like. I stick a strip of tape to my cutting mat and then start cutting the shapes off and applying them to the armor.
The shapes are varied using irregular triangles, trapezoids, squares, etc.. Here's how the pattern looks once applied to all the various panels...
I may look ridiculous to some, but no worries. I think it's petty neat, but wait...there's more...
Ok, that should do it. This took me roughly five hours over two evening painting sessions. Granted, I was not trying to win any races so I could have got it done a bit more quickly with proper incentives. As you'll see at the end, I also put some work in on the base.
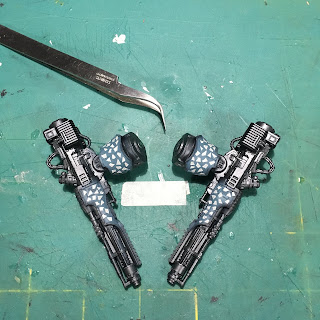
Next, I laid down a thin (I hope!) coat of Vallejo Air USAF Light Blue with the air brush. Last time, I laid the paint down a bit too think both in terms of the paint in the pot and the amount on the Reavers' armor. This time I thinned the paint more and lowered the pressure on the airbrush and tried to lay down a light coat of paint over the masking. Here are some examples.
Now it's back to masking the second layer of shapes for the camouflage pattern over all the armor panels again. Once I have the new color masked, I'll do all the dry brushing for the metal so that any over brushing on the armor will get painted over by the last layer of color.
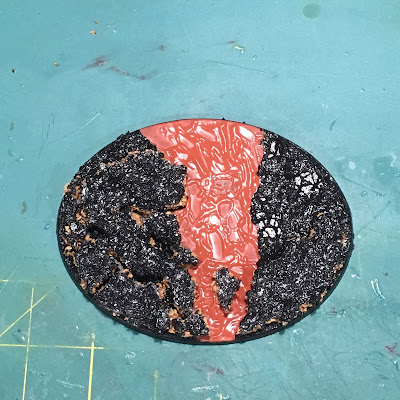
Is mentioned above, I did take short breaks to work on the Warlord's base while masking the armor. I used my usual Vallejo Black Lava to grit the flat surfaces of the base and then applied GW Martian Ironearth to an area I designated as a long dead river bed. This breaks the terrain up a bit and will match similar work on the Warhounds, I hope.
The Martian Ironearth dries well on the base, but is pretty fragile and flakes of easily. You can see a couple missing flakes of color near the top rim of the base. To stop this, I sealed everything with some flat lacquer spray prior to priming. I could simply have primed over everything to seal it, but I felt the lacquer would be a bit tougher to dislodge in the future.
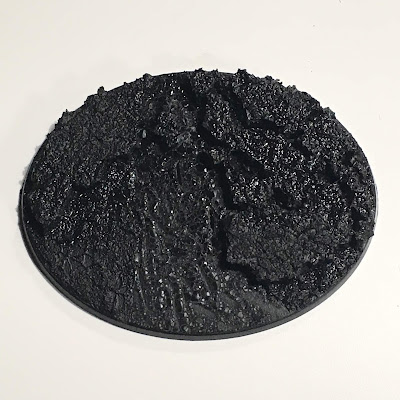
Here's the primed result. As with the Reaver bases, I'm painting the black primer overall, but will bring back the red martian soil in the end. I chose the ironearth for it's ability to vary the texture of the base, not for its color. The shot below is flipped 180 degrees as it would be seen from the rear of the titan.
And that's where I am today. I have one more painting session this week to get cracking on the second layer of masking for the camouflage, but I felt that wasn't interesting enough to make the post - once you've seen the first layer, you've got the point, I'm certain. Check back next week to see where things get as I finish the camouflage layers and get to work on the metal skeleton.
At some point there must be checkers as well, so I need to print up my decals for that soon too!
Best of luck to all the other #MonsterMarch3 challengers out there.
Cheers and Happy Gaming!
Labels:
30K,
Airbrush,
Legio Tempestus,
MonsterMarch,
Painting,
Titanicus,
Warlord
Subscribe to:
Post Comments (Atom)





It’s so odd looking at Warlord in mini scale, I’ve been looking at the Torso in great hefty detail these past weeks getting it finished and here is yours done super fast lol
ReplyDeleteYes, it almost feels like cheating. It is pretty cool how the digital data world these days lets them basically make the same model in smaller scale with all the same detail to it. I get myself confused when searching for inspiration through google images...I have to look at the bases some times to tell which type of titan I'm looking at, unless something else is in the pic for scale.
DeleteI look forwards to seeing how this turns out as it looks very interesting so far. (and far more in depth than my warlord scheme that I settled on)
ReplyDeleteThanks! I blame Forge World for their depiction of the Legio Tempestus titans before they were a thing in the rest of the GW hobby space.
Delete