Welcome back to #MonsterMarch3. It's nearing the end of week three and while I'm very happy with how things are coming out. I had expected to be at this point by the end of week 2. However, things have taken longer to get right, than I hoped. The taping took up a lot of time as did the transfers this week. Still, I'm loving the results so far. So without further ado, lets talk...
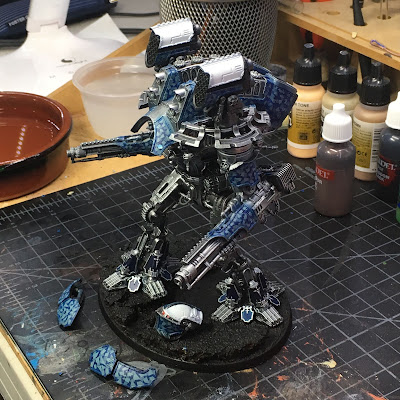
This week it was time finish up the camouflage and get the decals laid down. I wanted to get the trim done on all the armor too so I could get it all assembled, but that was not to be. I still have another night to work, though, so we'll see. I had a great time removing all the masking tape to get at the design underneath. It's sorta like opening a present on Christmas. You might have a pretty good idea what it will be, but there's still no being certain until its opened (or uncovered in this case). You can see some of it in the title pic above, now here's the rest...
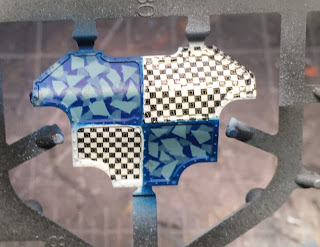
The gun shields are really looking good, pretty much what I hoped for.
The camouflage effect has come out pretty consistent across all the various panels (love it or hate it). I learned a lot more from this effort to add to what I learned doing the Reavers. It is pretty important to seal the first layer of paint with a lacquer to prevent damage while removing the tape, for instance. This tape is good, and not real sticky on purpose, but the pieces are small and covered in paint so at times I scraped up the base coat while lifting the tape off. No matter as it will become battle damage or get touched up as I go along.
You can see some more of the work on the arms and carapace, as well as the head. Pretty solid outcome I think. I learned that it is important to keep the first later of masking tape pieces small and a bit more spread out. The second layer of shapes should be just a bit larger and more numerous than the first pieces. This process must be viewed up side down to get the best effect. The first color being masked is the "top of the camouflage" which covers the shapes underneath, and you want those shapes to stand out too. I like what I have here, but it's very heavy on the top shape color - in fact it's tough to even make out the second layer of color at all.
Anyway, moving on - it was time to put on decals. First some Collegia Titanica iconography. We don't have proper Legio Tempestus iconography, but the generic Titanicus stuff is still appropriate.
I suppose I could overdue the black/white checkerboard/split color motif at some point, but I decided early on that the livery of this Warlord would be so marked by it. The right knee got the Collegia Titanicus emblem and the left knee the axes. With the trim painted, I think these are going to look excellent. As a cautionary tale, I placed all the knee transfers upside down on the first pass. Ugh. Fortunately, I recognized this before they dried and was able to carefully scrape them off and start over. I keep seeing the thigh armor as shin armor, no matter the obvious T in the trim helping to call out the correct orientation. Fortunately, there are plenty of extra decals on the sheet.
Painted up, I don't expect this to be noticeable at all. Four coats of the Decal Bonder might have been a bit much, but I've not worked with the Bonder before. The decals were pretty tough, surviving A LOT of handling and re-positioning, but the extra thickness did make them tougher to seat when compared to GW's production decals, which are a dream to position and adhere to pretty much anything. So more practice here is needed.
With a project to complete, I plowed on with what I had to hand. Checkers on the gun shields were easier since the shapes were more straight forward. I used wet palette paper to trace and form the pattern for the initial shapes. As with the shield, I expect to be able to paint in the trim and clean up all the bits of transfer overlapping the edges.
Then I worked on the lower leg armor...for like two hours. There was the expected fussy pattern making, of course. But I had a heck of a time getting the decals positioned right and then stuck down. I would get things mostly right, the mess it up with just "one more pass" of Micro Sol with the brush; or "one more slight nudge" to re-position things better. In the end, I wrecked one transfer entirely and had to start over. It was quite a fun experience as midnight crept ever closer and my eye sight ever more bleary.
In the end, I got both greaves "good enough" and called it a night. I'll check back on them and possibly add some more Micro Sol if necessary. The tough bit is getting the decal to really hug down over the T in the trim that sits in the middle of the pattern. There was no way I was cutting the decal around that...no way...my expectation is to paint the trim over the decal and clean everything up nicely. Here's how they looked at the end of the night...
Oh, there's no going to bed for you. Oh no. You forgot the missile launchers!
At 11:30, I hunkered down and completed the checkers on the launchers. A somewhat easier shape thank goodness. One thing became clear after working on the Reavers and the First Legion checkers for my 30K Dark Angels: the Decal Bonder really does protect the ink. With all the abuse these custom transfers took, the black ink is pretty much as it was when printed. Now, the printing on the decal paper isn't perfect at all, but I didn't lose any ink to the process of applying the transfers either which is very cool. My prior attempts would NOT have survived the evening, I assure you. These checkers ended up on the model sharper than the the prior attempts on the Reavers with little to no need for any touch up.
So there we have it. The camouflage is painted and the checkers and other decals applied. Now I'm on to the brush work. I am really excited to get the trim and other basic paintwork done so I can finish the assembly and take in the final appearance of the heraldry. This is a Warlord Battle Titan after all, one of the grandest of the Emperor's God Machines. It needs to look the part.
I hope you'll check back with me next week to see how it come out. Best of luck with your own projects and I hope some of my anecdotes, description, and pics help another hobbyist out there chart a clearer course though the immaterium of our hobby.
Cheers and Happy Gaming!


Beautiful mate. Great job. I’m a bit slower with my full sized one :)
ReplyDeleteUnderstandably...I look forward to checking out you results!
DeleteThanks for the feedback!