A journal of my efforts towards completing various and sundry Warhammer 40K projects involving the many Armies of the Imperium of Mankind.
Enjoy and feel free to comment...
- Home
- Adeptus Custodes Paint Recipe
- Adeptus Mechanicus Paint Recipe
- Aeronautica Imperialis Paint Recipes
- Blades of Vengeance Paint Recipe
- Dark Angels (Pre-Heresy) Paint Recipe
- Dark Angels Paint Recipe
- Death Korps of Krieg Paint Recipe
- Deathwatch Paint Recipe
- Grey Knight Paint Recipe
- House Taranis Paint Recipe
- Legio Ignatum Paint Recipe
- Legio Tempestus Paint Recipe
- About
Thursday, July 12, 2018
WIP: Armiger Warglaives from House Taranis - Part 9
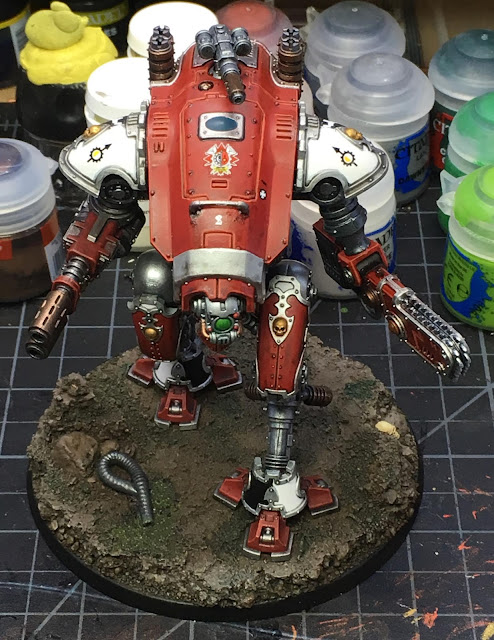
In today's post, I reveal the progress made on the second of my two Armiger Warglaives for House Taranis. I had taken a break from painting the second Warglaive while building the three Questoris knights I had laying about for the House. This week it was time to put those back in the case and go back to painting.
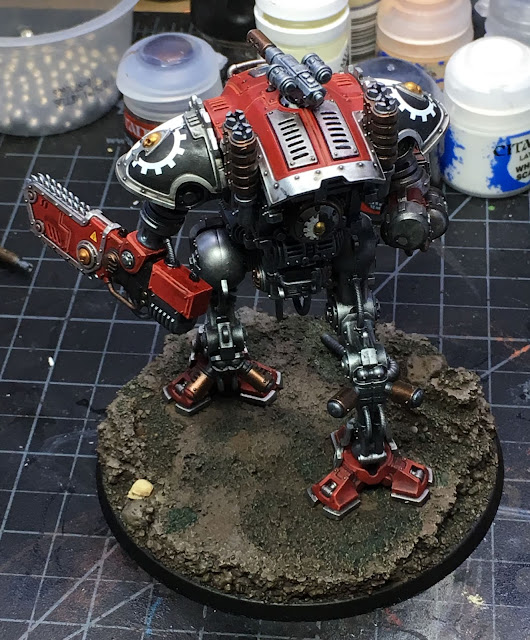
Since I have already posted quite a bit about painting the Warglaives, I'll not go into a lot of detail here. In short, I made a pass at the red highlights and put time into the arm weapons and cleaning up details on the model such as the gold skulls and interesting pipe-work. Then I hit a point where it was time to fix the legs to the base and apply decals so I could wrap up the paint job, at least for now. There is another level of highlighting and weathering that could be done on both models, but I'm coming close to the finish point for now on these.
Here's a quick look around the second Warglaive as it stands today.
I decided to give the Warglaives unit numbers below the house crest on the carapace. I also added honor markings along the left side of the cockpit hatch.
Shoulder plates are glued down now with decals applied.
I painted up the Mechanicum seal on the rear of the Warglaive.
One more session to complete the basic highlights, touch up anything I missed and then get everything sealed with the Model Masters Lusterless Flat Lacquer. I've been very pleased with this project and I look forward to reproducing the results at larger scale on the three new Questoris knights that I built. I'll also feel good when I can put a seal of DONE one these bad boys.
Painting this week was made a little more fun by using my new Everlasting Wet Palette which came in the mail recently.
I have enjoyed this palette better than my prior one. Some of the paint here is three days on the palette, and while some paint dried out where it was thin, it didn't separate and run everywhere which is what I am used to. This made it very easy to just sit down and get stuck in painting right away without resting the palette with new paper each night. Also, paint that wasn't spread out too thin stayed moist and was totally re-usable. So far, a great Kickstarter project! You can see a review from Spikey Bits here.
If you don't use a wet palette for your painting, what are you waiting for? I highly recommend this useful tool. It makes a great difference to maintaining consistency throughout a painting session. Also, mixed paint stays fluid on the palette and doesn't dry out making it easy to go back and do any touch ups without having to remix and possibly get the wrong color. Even if you don't choose this product, give a wet palette a try! There are ample examples on the web for making your own as well.
That's it for today.
Cheers and Happy Gaming!
Subscribe to:
Post Comments (Atom)


No comments:
Post a Comment