A journal of my efforts towards completing various and sundry Warhammer 40K projects involving the many Armies of the Imperium of Mankind.
Enjoy and feel free to comment...
- Home
- Adeptus Custodes Paint Recipe
- Adeptus Mechanicus Paint Recipe
- Aeronautica Imperialis Paint Recipes
- Blades of Vengeance Paint Recipe
- Dark Angels (Pre-Heresy) Paint Recipe
- Dark Angels Paint Recipe
- Death Korps of Krieg Paint Recipe
- Deathwatch Paint Recipe
- Grey Knight Paint Recipe
- House Taranis Paint Recipe
- Legio Ignatum Paint Recipe
- Legio Tempestus Paint Recipe
- About
Friday, March 9, 2018
WIP: Adeptus Custodes with Halberds III
I'm showcasing more progress on my Custodian Guard today. I was able to get the models and the bases to a point there I felt comfortable mounting them in their final positions. The remaining highlighting and weathering should be complimentary and will bind the models into their scene on the base, hopefully.
It all started with some more work on the models themselves. The gloves were highlighted and the weapon blades painted with a power blade effect that I took from Duncan's YouTube video (starting around 10:05) minus the crackling energy, at least for now. The front left custodian also has a pass of Vallejo Gold (70.996) highlights as well.
I liked the power weapon effect on the sentinel blades, and I very much like it on the halberds as well. The effect is bold enough to stand out on the models without over powering the rest of the paint job in my opinion.
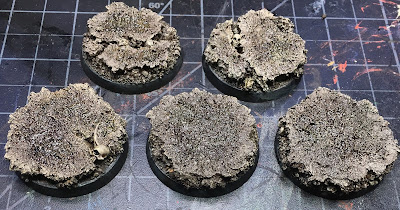
Next the bases got some love. First they were heavily dry brushed with Vallejo Khaki Brown (71.024) and P3 Menoth White Base. The a heavy wash of GW Agrax Earthshade was applied. As the washed dried, they looked like this...
After the wash dried, the bases were given another dry brush of P3 Menoth White Base. The skulls were then painted, washed anew with GW Agrax Earthshade and given their own highlights. At this stage I was ready to mount the models.
To build on other posts with regard to custom bases, I thought I'd toss in some detail of the pinning process, specifically what things look like under the bases after everything is glued down. To prepare for mounting, the models were pulled from their corks with care so the pins did not come out of the feet. Each model was then placed over a base where they looked and fit best, and then pressed down hard so the pin would pierce down through the cork leaving a pilot hole for drilling. The pin vise then came out as I drilled a hole straight through each base where the pin would get inserted. The pins are long and go straight through everything.
Super glue (I always use ZAP-A-GAP Medium CA+) was then liberally applied to the soles of both boots and the pin itself. I then quickly push the model onto the base, forcing the pin right through and position the model quickly and carefully. You don't want to spoil the base painting with glue and you don't want things to set before you get the the pin all the way through the base. Some days this is harder than others as anyone who works with super glue knows all to well. This can be especially challenging when a fussy pin goes through the cork but refuses to find the same hole in the plastic base. I want a tight fit here so I use a drill bit that matches the diameter of the pin exactly.
Ass seen above, the pins are then cut off once the glue has dried. I cut the pin close to the underside of the base so the model stands flat and I don't get stabbed by the pins during handling. But enough pin is left so that I can apply a last generous dollop of glue over the end. I use ZAP Zip Kicker to hasten this drying process. The result is a hard blob that helps cover and soften the sharpness of the cut pin, and "may" act as a bit of a bolt or head on the pin to prevent it from easily pulling back through the base. Probably pointless, but makes me feel cool. :)
Here's a second base to further illustrate the point. Here the pin passed by coincidence into one of the old-school Pin holes where metal miniatures were to be mounted. All the more room to hold sticky glue!
In the end, my models feel solidly mounted and have never come loose. even after a full fall from the table. The pinning process also helps secure the cork which might otherwise lift of the base. Though I'll say a good wood glue doesn't let go easily, even from plastic base material. Pinning both feet, where possible, would really double down on the security, but I mostly pin only one leg. It can be fussy lining up two pins and getting the exact position you want. I like being able to pivot on the one pinned leg during final gluing for an easy last minute adjustment.
Any visible super glue on the painted base is easily touched up with the base color and a careful dry brush around the feet. I will often dry brush the bases again in any case with an eye towards dirtying up the feet a bit.
I hope this proves a useful method for someone else out there. I think the photo of the mounted squad speaks for itself. Custom basing can easily add great character to your army at a fraction of the price of resin bases. And I don't knock on resin bases when I say this. My entire DKoK army is mounted on them. But it's nice to have options for all budgets and occasions, right?
Cheers and Happy Gaming!
Subscribe to:
Post Comments (Atom)


No comments:
Post a Comment