Friday, October 25, 2024

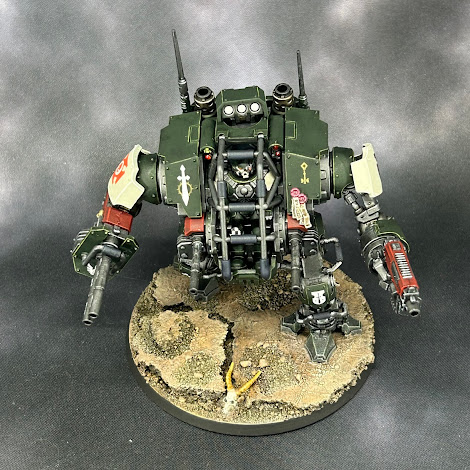
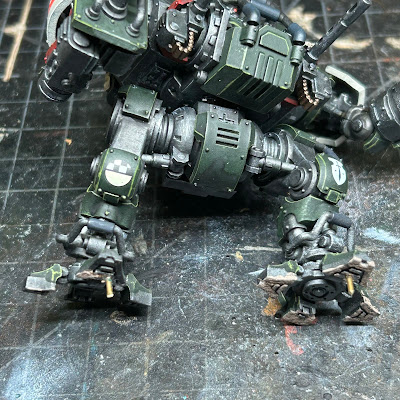
DreadTober - week 4 progress!


Blades of Vengeance Invictor Tactical Warsuit WIP

Greetings and welcome back for week four of DreadTober.  I added a few more details, like purity seals, to the dread this week.  But the main task was building the base.  Nothing too fancy, mind, but something with more lift and interest than a simple plastic circle with some gravel on it...

Blades of Vengeance Invictor Tactical Warsuit WIP

Here, I have used my typical approach of gluing down cork pieces in (hopefully) interesting patterns. Then I used wood glue with my model railroad ballast mix to add some bits of rock here and there. In this picture, the glue is still drying. Later I go back and add Vallejo Black Lava to the rest of the exposed cork surface to hide the remaining 'corkiness'. A couple GW deamon skulls were added for good measure. I may use that as a theme for my larger Blades of Vengeance chapter models to distinguish them a bit form the Dark Angels chapter. Probably for some of the characters too?

Blades of Vengeance Invictor Tactical Warsuit WIP

Here's a close up of the driver in his seat.  I owe him some armor highlights and other fiddly bits to add interest. I'm happy the moving bits still move after painting, though, and the magnets are working great for attaching the driver.

Blades of Vengeance Invictor Tactical Warsuit WIP

Here he is all locked in for a fight.  Progress could have moved a long a bit more this week. However I'm still in great shape for finishing by the end of the month. Everything that is going to be glued has been, with the exception of the base.  I'm going to paint that prior to fixing the model to it permanently.

So that's me so far. A couple three day weekends away and a minor cold this week have slowed the pace, but not wrecked the goal.  I'll be there at the finish with y'all!

Cheers and Happy Gaming!


Friday, October 18, 2024

DreadTober - week 3 progress!

 Blades of Vengeance Invictor Tactical Warsuit WIP

Greetings and welcome back.  It was a short week for hobby this week, with only three short painting sessions. But as you can see, things are coming along well.  This week I focused on highlights and the space marine operator as well as base coating a few more details.

Blades of Vengeance Invictor Tactical Warsuit WIP

The green armor has been highlighted all around, along with the red weapon casings and the white shoulders.

 Blades of Vengeance Invictor Tactical Warsuit WIP

Some of that shows up in the pics and some does not. I took these pretty quick and they are a bit washed out.

Blades of Vengeance Invictor Tactical Warsuit WIP

Oh, I busted the original purity seal, and lost the broken off paper part.  So above, you can see the new grey plastic purity seal. I popped off the old bit and glued on this new one. Annoying, but at least I hadn't painted it yet?

Blades of Vengeance Invictor Tactical Warsuit WIP
Here's the pilot tucked away in the cockpit. I put a little time in on the head details.  However I haven't added any highlights to the operator yet. I'm away from the painting desk for a few days, so next week will be a bit of a rush to get things finished up...then in week five I'll complete the base.
The finish line is definitely in reach, but I have some work to do to get there!

That's it for this week.  Check back next week when things should be much further along.

Cheers and Happy Gaming!


Tuesday, October 15, 2024

On the Workbench [October] - First Legion Terminators!


Horus Heresy Dark Angels Cataphractii Terminators WIP
Greetings and welcome back.  Today I'm sharing some recent work from the workbench.  Regular readers will know that I take great pleasure from building models. So it is, that even during DreadTober, I cannot resist building something!

Horus Heresy Dark Angels Cataphractii Terminators WIP

I have been sitting on these Cataphractii from the Age of Darkness boxed set because I already had 15 built and frankly didn't have room for more in the case where I keep my HH Dark Angels. However, I recently ran across my extra plexiglass shelves and brackets.  Looking at the collection, I had room in the cabinet for another shelf and so it was added.  Having more room meant it had to be filled of course!

Horus Heresy Dark Angels Cataphractii Terminators WIP

I built these termies pretty stock, with a few exceptions.  I added two combi-meltaguns and a plasma blaster from the Forge World resin upgrades.  And then I decided to do something kinda silly.  I like the reaper autocannon even with its ridiculous proportions.  However, the arms are always built in and the resin Cataphractii arms just don't sit well with the plastic armor, at least in my eyes.  Where is the plastic Cataphractii reaper autocannon?!

Horus Heresy Dark Angels Cataphractii Terminators WIP

Well.  There IS a plastic reaper autocannon, but it's only in the Tartaros pattern terminator kit. And THAT arm, just won't do at all...so what does a hobby maniac do you ask?  He cuts the flamer off a Cataphractii arm and the autocannon off a Tartaros arm, mumbles a few choice words about the whole mess, then sets to with some green stuff and a hobby knife until things sorta look like they belong together...

Horus Heresy Dark Angels Cataphractii Terminators WIP

 Not that terrible! And after some trimming and shaping of the cured green stuff...

Horus Heresy Dark Angels Cataphractii Terminators WIP

Honestly, I'm not sure I could recommend this approach to anyone.  And the reaper autocannon is probably a poor choice in a game of Horus Heresy.  but I roll with the rule of cool...and in the Warhammer universe what is more iconic than a terminator with an oversized cannon?! Seriously...

Horus Heresy Dark Angels Cataphractii Terminators WIP
With some paint, I'm guessing I will forget I ever created this plastic abomination.  At least Cataphractii are slow, so maybe standing back blazing away with an autocannon is good stuff?? I dunno... but it does look cool. 😂

Anyway, I record the conversion here for the record, because I'm seriously going to forget this ever happened. Perhaps at some point I'll share a pic of the Detolf cabinet overflowing with First Legion warriors and war machines.

I hope I haven't inspired you to chop up your heavy weapons on a whim...but it did sorta, kinda work, right? Anyway check back by end of week when we return with week three of DreadTober!!

Until then...

Cheers and Happy Gaming!


Friday, October 11, 2024

DreadTober - week 2 progress!


Blades of Vengeance Invictor Tactical Warsuit WIP
Week two is in the books (at least as far as I can make time to paint)!  Additional details have been painted and an early coat of shade laid down over all. In addition, I've applied transfers so they can get weathered  along with the rest of the model.

Blades of Vengeance Invictor Tactical Warsuit WIP

I used a custom transfers I had printed back a couple years when I started my Blades of Vengeance project. I think this model will end up being the first that I complete for that chapter. Kinda random, but whatever.

Blades of Vengeance Invictor Tactical Warsuit WIP
Still lots of details to go, but it's coming along.  I have a couple long weekends in a row with trips so next week will be light on progress, probably. But there's still ample time to complete this walker.

Blades of Vengeance Invictor Tactical Warsuit WIP

I decided this fine armored walker should bear an elite rank, although his pilot is drawn form the tactical squad ranks. Speaking of which...

Blades of Vengeance Invictor Tactical Warsuit WIP

Here he is!  He hails from the 4th company, Blades of Vengeance chapter.

Blades of Vengeance Invictor Tactical Warsuit WIP
Still lots to do here, but I figured I'd at least set the transfers all at the same time while I had them out on the desk. I randomly chose to pull him from the 2nd Tactical Squad (see below).

Blades of Vengeance Invictor Tactical Warsuit WIP
And that's where the project stands at the end of week two. It's good progress, and I think I jumped out in front enough that a few days away with the family isn't going to cause me to slip the date here. It's fall here, so time to get in some hiking in the mountains. Best wishes for my fellow DreadTober-teers.

Cheers and Happy Gaming!


Tuesday, October 8, 2024

On the Workbench [September] - Just Move! and other tiny stuff...


Just Move! WIP
Yes, I joined the movement! OK, truth be told, I'm not much of a joiner...and my background in Software and Network Security keeps me off most social media channels.  But when I saw Just Move from Miniwargammer Dave pop up on Instagram, I had to get involved...sort of.  I love the message, and I will paint this mini after DreadTober and share the results on Instagram. I won't likely join the Discord and other social stuff.  But I WILL move...and I am moving.  You should too! It's really easy...Just Move!

Dark Angels Sabre Strike Tanks WIP

I also built Sabre Strike Tanks - so tiny and so fun!!

Solar Auxilia Leman Russ Annihilators for Legions Imperialis WIP

And more Leman Russ battle tanks.  Four Annihilators are pictured here, but I also built four Exterminators, four Executioners and four Demolishers. Somewhere along the line I stopped taking pictures of the builds...I guess because there have just been so many tiny armor kits! I also built two Sicaran Arcus and two Sicaran Punisher variants.  I have a least one of every kit now except for Termite Assault Drills.  I don't love them on the table top, and there are just SO many Astartes transport options. I have more transports than models to put in them!! OK, if I'm being honest, I will of course pick up that kit at some point..but right now I'm standing firm...NO TERMITES! 😁

Solar Auxilia Stormswords for Legions Imperialis WIP

Ah!  And I almost forgot the Stormsword variants.  I did get pictures of these, mostly because I magnetized the options.

Solar Auxilia Stormswords for Legions Imperialis WIP

You just *have* to magnetize these tiny tanks.  You get all the weapon hardware for each variant, so it's a shame *not* to. I used green stuff in the weapons to simply hold the magnets in place using the existing void areas there which were already big enough (mostly) to hold the magnets.  I might have drilled out a bit here and there to enlarge the space. Then I drilled holes in the tanks for the other magnets...keep your polarity straight here! If I ever play this game, it'll no doubt be with the volcano cannons, but I love the look of the plasma (and, Dark Angels!)...so then why leave out the Demolisher's older brother?

So it's been a busy month of builds...no wonder I struggled to complete ten Deathwing Terminators!

But now we're in DreadTober, so time to get back to the Invictor Tactical Warsuit...

Cheers and Happy Gaming!


Friday, October 4, 2024

DreadTober - week 1 progress!


Blades of Vengeance Invictor Tactical Warsuit WIP
Greetings and welcome to DreadTober, that time of year when a group of Warhammer hobbyists rally around to paint up something dreadnought sized. This year I'm painting a Primaris Invictor Tactical Warsuit for the Blades of Vengeance, a successor chapter to the Dark Angels.  I wanted to add a successor to my Dark Angels collection and decided all of the new Primaris vanguard models would fit perfectly into a small force that I could ally into my main collection of Dark Angels space marines.

Blades of Vengeance Invictor Tactical Warsuit WIP

Week one is about the build, priming and getting stuck in with the project.  The Invictor Warsuit naturally builds in these sub assemblies, without effort. The Warsuit cockpit is designed to open in a manner similar to the other Primaris dreadnoughts. So I decided magnets would be the way to go here so I could remove the marine and not be concerned that he'd randomly fall out while handling the model.

Blades of Vengeance Invictor Tactical Warsuit WIP
A simple 2mm x 1.5mm cylinder magnet did the trick nicely. Sure it damages the suit connection point for display purposes, but I expect to keep my marine in the cockpit most of the time.  I could have glued a larger powerful magnet inside behind the seat, perhaps, to hide it.  But this approach provides a firm bond and was quick and easy to do.

Blades of Vengeance Invictor Tactical Warsuit WIP

The same size magnet fit in the cavity at the back of the marine's torso...maybe I drilled it out a little bit?  I should have taken notes...anyway, it does nestle in nicely. I used extra five-minute epoxy to fill the whole space and ultimately secure the magnet in place.

Blades of Vengeance Invictor Tactical Warsuit WIP

Here the drive is seen securely seated in the cockpit. Other than this simple tweak, the remaining model was assembled stock with no further customization. I did look into the bits box for some bling, but I felt my choices were all too specifically Dark Angels, and I don't want the Blades of Vengeance models to look just like Dark Angels with a slightly different paint job.  The Blades are an all Primaris chapter formed from Adept Cawls machinations (Praise be to the Omnissiah), and so they lack the ancient traditions and rituals of the Dark Angels.  This leaves them a little...plain...I guess, in my imagination.

Blades of Vengeance Invictor Tactical Warsuit WIP

Speaking of plain, here are the parts after a coat of matte black primer.  I went with a rattle can, because I have a spray booth vented to the outside; and why not. It let me down this time though, and I got some texture and fuzzing, or dusting, in places. This bummed me out, and I almost switched projects for DreadTober.  But thinking it through, I didn't mind the texture for a war machine.  After paint and weathering, I don't expect it to ruin anything.  it may actually add to the rugged feel of the machine when all is said and done.


In the title pic at the top, you can see much of the main colors blocked in.  I used an air brush to first lay down the dark silver, then the other colors carefully (sort of) over top. Then I went back with the brush and touched up the over spray; that is something I really haven't mastered with the air brush. But practice makes better?  Anyway, as I head into week two the remaining details will be completed, transfers added, and I'll shade everything.  Then I'm guessing I'll be highlighting and cleaning things up during week three.  I may find time to build out the base too, so that I can paint it during week four to complete the project.

That's the rough plan anyway. Any we all know plans seldom survive contact with the enemy, in this case Life(tm); so we'll see how it goes. Thanks for stopping by, and do check out the link at the top for more DreadTober goodness. 

Cheers and Happy Gaming!

Sunday, September 29, 2024

Deathwing Terminator Squad 2 WIP


Dark Angels Deathwing Termninators WIP

Greetings and welcome back. 

Today, I'm (finally) showing progress on the second 10-marine squad of Deathwing Terminators that I have been working on. I managed to space out last week and skip posting.  But I've been working regularly on these marines.

Dark Angels Deathwing Termninators WIP

I likely shared this squad in a Workbench post earlier this year.  I hadn't planned on painting them, but after working on the first five marine squad, I realized I was in the groove for this paint scheme and needed to rock on in order for these 15 marines to turn out looking remotely like they were part of the same force.

Dark Angels Deathwing Termninators WIP

And so the primers were applied - these 10 were actually sprayed at the same time as the other five.  I had set them aside - but I did have the foresight to base them at the same time so the colors would match (I had done a lighter zenith layer over a darker base coat, if you recall from the earlier WIP post on the other five marines).

Dark Angels Deathwing Termninators WIP

And then some shading. I'm not sure I made the right call on the order here.  It was a pain working the first five because every mistake had to be carefully repainted and cleaned up to maintain the armor color. This time I wanted to try putting down all the base colors BEFORE shading and highlighting...but I spaced again and laid down the shade without thinking.

Dark Angels Deathwing Termninators WIP

So then came the dry brushing...in for a penny, in for a pound as the saying goes. What followed was more struggling as I tried to carefully paint and shade the many other details without causing me to repaint the base armor over an over...and over.

Dark Angels Deathwing Termninators WIP

Here is what things started to look like before any additional shading. Most colors are blocked in. 

Dark Angels Deathwing Termninators WIP

And here we are after the different base colors were shaded.  If you click through to the original and zoom about you can see where I've started fixing all the issues where shade pooled out a bit onto the armor around various details.  After all the corrections, I will go back and lightly shade the fixed areas again with the original Sepia. That and some other corrections led me to where things stand today. 

Dark Angels Deathwing Termninators WIP

I have the previously painted squad at the back as a reference to keep me honest. I would like all fifteen terminators to appear as though they are wearing armor maintained by the same armorer. 😂

There will be more work to get the armor looking less touched up.  It's a process...one change I made this time around, was to not fix everything the moment I made a mistake.  Instead I batch painted the fixes after the details were done so that I could at least make progress. I have to imagine this is a little how White Scars and Imperial Fists painters struggle.

Dark Angels Deathwing Termninators WIP

Most recently, I completed the power sword blade and plasma cannon coils. As you can see from the Sergeant's belt, there are still a few details to go. So much to paint on these Terminators! I'm also considering what to do with the feathers.  There are a simple shaded light grey currently.  But I may add black and/or red stripes, tips, etc.  Not sure...oh, and then the bases of course to finish things off.  No sense painting them now, since it would be just one more area with errors to correct. Getting a little of the base color and shades on the boots can easily be passed off as weathering! Heh.

That's it for now...trying to cram on these guys to complete the squad of ten before DreadTober kicks off...not much time left!

Cheers and Happy Gaming!


Thursday, September 12, 2024

Deathwing Terminator Squad - TO DONE


Dark Angels Deathwing Termintor Squad
Hello!  Today I'm sharing the final results from my Deathwing Terminator project. These iconic models from the 40K universe really come alive for me. It's great seeing them rise from their previously diminutive status with these new sculpts. This puts paid to my first project of the 2024/25 hobby season. Here's my first big wooden stamp of TO DONE.

Check out the closeup pics of each terminator after the break if you're curious. I've already moved on to the next squad of ten terminators.  It'll take the rest of the month to complete those; then we're on to DreadTober 2024!

Cheers and Happy Gaming!
Monday, September 9, 2024

Deathwing Terminator Squad WIP


Dark Angels Deathwing Termintor Squad WIP
Greetings and welcome back.  Today I'm sharing progress on my first project of the 2024/25 hobby season.  While putting together my TODO list for the season, I was inspired to get started on my Deathwing terminators.  I made great progress last season with my 40k Dark Angels and I thought it would be great to put more progress in this season before I inevitably get distracted by legions Imperialis once again!

Dark Angels Deathwing Termintor Squad WIP

To recap, I built this squad from the Warhammer 40K Leviathan box set shortly after it came out. It was great to see some right-sized terminators, especially since the modern Primaris marines were towering over the original sculpts.  But they were a bit plain...so when Deathwing Assault was released, I worked with extras from that kit and my bits box to produce a squad that had a better Dark Angels Deathwing feel.

Dark Angels Deathwing Termintor Squad WIP
Now that is more like it - but that was last season.  Now it was time to put paint on these terminators!

Dark Angels Deathwing Termintor Squad WIP

Looking back as I write this post, I realize I didn't dig out the teleport homer or the watcher for this project.  I'll probably take on all the watchers and teleport homers as a single project later this season. 

I tried something new here, and primed the terminators with brown instead of the usual black. You can get an idea of the color by zooming in on the bases. I hoped this would provide shadows the lent themselves to the overall ivory/bone look I was going for. 

Over the primer, I first sprayed Pro Acryl 'Ninjon' Dark Ivory as a base coat.  I then sprayed Pro Acryl Ivory as a zenithal highlight straight down over the top of the minis.  This looked great at the start....but by the end of the project, I'm still not convinced it did anything to affect the final outcome.

Dark Angels Deathwing Termintor Squad WIP

I then thinned GW Seraphim Sepia with a custom shade medium and brushed that over all of the minis.  You have to take care with this over all shading approach to manage the shade and prevent pooling that will later dry as yellow/brown blobs. Once the shade had dried thoroughly, I used an over all dry brush to lay down some Pro Acryl Ivory highlights. Then I got started on details, starting with the weapons.

Dark Angels Deathwing Termintor Squad WIP

At this point, I departed from any sort of formal process and just started picking up all the various details as the mood suited.  One thing that challenged me was neatness.  As I hit up various details, I would occasionally paint outside the lines or catch an armor panel randomly with a brush stroke.  This is a pain with all the layers of color forming the overall bone look of the Deathwing armor. Not only is it tough to paint the ivory over darker 'mistake' colors, I had to restore first the sepia tone, then the ivory dry brushed look. This made each painting mistake a bit of a chore (and time consuming) to fix.

Dark Angels Deathwing Termintor Squad WIP
But I stuck with it and soon it was time for my favorite part of any project - Transfers!! I thought at this point that the terminators really came alive with their traditional heraldry. These veterans have not yet achieved the status of Deathwing Knights, and so have not earned the right to display personal heraldry on their tilting shields. So they get the simple Deathwing icon instead.This squad also got veteran skulls on their power fists.  Little details like this not only help tell a story, but make it easier to recall who goes with what squad.  I have 15 terminators in all and I want to be able to keep the squads clear.

Dark Angels Deathwing Termintor Squad WIP

At this point it was time to clean up and finish the bases.  My armies get a signature black rim to help the surface of the base and model stand out from whatever surface they are on. Now they were ready for the table, but I still had some fussing to do before I sprayed them with lacquer and called the project done.  Check back later in the week to see the final light box pics. There are purity seals and oaths of moment scrolls to tidy up and detail, among other bits of cleanup. I spent a bit just staring at each model trying to decide what done should look like.  Do you ever get caught here with a project?

Cheers and Happy Gaming!