A journal of my efforts towards completing various and sundry Warhammer 40K projects involving the many Armies of the Imperium of Mankind.
Enjoy and feel free to comment...
- Home
- Adeptus Custodes Paint Recipe
- Adeptus Mechanicus Paint Recipe
- Aeronautica Imperialis Paint Recipes
- Blades of Vengeance Paint Recipe
- Dark Angels (Pre-Heresy) Paint Recipe
- Dark Angels Paint Recipe
- Death Korps of Krieg Paint Recipe
- Deathwatch Paint Recipe
- Grey Knight Paint Recipe
- House Taranis Paint Recipe
- Legio Ignatum Paint Recipe
- Legio Tempestus Paint Recipe
- About
Wednesday, December 12, 2018
On the Workbench [December] - Cerastus Knight-Castigator
Greetings! Well December and the holidays are a busy, busy time for my family and this year we've thrown in a good dose of illness to go with. So it is, that I put up my first post for December 12 days in. Yikes. Anyway, although busy and sick, I haven't been idle.
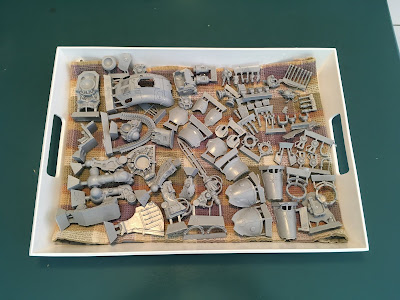
While busily plugging away at my Adeptus Titanicus Maniple, I got inspired to take on a Forge Wold kit languishing on my hobby shelves. The Knight-Castigator will serve as the lead knight for my House Taranis collection, a suitable ride for a Baron, I thought.
It all started like this...
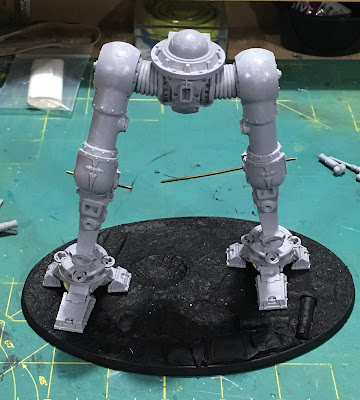
I decided to build this knight literally from the ground up. He'll be mounted on a Secret Weapon Miniatures base that I got a while back in a "Bag O Crap" and recently primed for the occasion. The legs have been pinned in key places to provide additional support for the super glue. I also now make a habit of scratching up the surfaces to be joined to give the glue more to adhere to. This cross-hatching can be seen below on the ball of the waist joint.
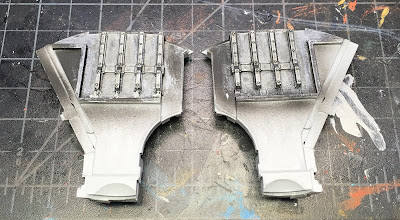
The brass rods seen above not only serve as pins, they are also quite helpful for assisting with the final pose. These legs are very pose-able, but can also be VERY fiddly to keep in place while the glue sets up. The pic below shows the completed legs with the armor temporarily attached, not glued down. The large rectangular mounting sockets are great for this, since the armor is just about press-fit tight.
So I was ripping along with the assembly, and having a great time, when I suddenly realized that this knight has a fully detailed cockpit and knight scion within. This can of course be ignored since it is invisible unless you leave the top hatch unglued. But for the cost of this kit, and respect for all the detail work that goes into it, I simply couldn't take the short cut!
So assembly came to a grinding halt while I primed the interior pieces and driver for painting. Then that had to dry so I could get to work on the paint. I did compromise somewhat with a very simple paint job. After all, it will be only barely visible through the raised top hatch on the model. I want the first glance into the knight suit to be intriguing and deliver some pop. But I don't need to spend an additional week painting for a Crystal Brush here (yeah, I know...as if...).
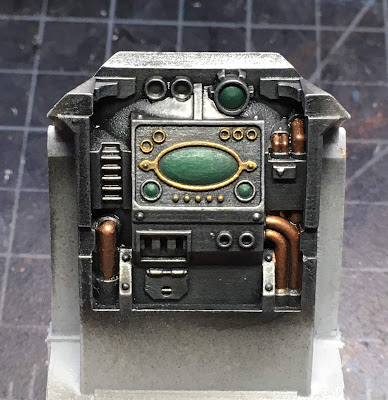
So a straight forward metal dry brush with various Vallejo metals followed by a GW Nuln Oil shade for the side panels. Then some additional detail for the controls.
Army Painter Copper and Vallejo Brass were used for the details completed with Vallejo Green Taillight for the screens. The whole thing was then shaded with GW Nuln Oil. There's a lot more that could be done here, but remember that with the scion seated before it and the whole thing only visible at an angle looking down into the top hatch, most good detail would be lost to a viewer. But it's a BIG screen you say...
Yeah, I thought so too. So I put some details in. Green dots for good guys, red for bad guys....simple, right? Then the upper screen got the targeter treatment with the two bad guys lit up and ready to get got. My hope is that these simple bright details will look cool and convincing on first glance down into the cockpit.
Then, of course, the throne got paint too. Another simple job to pick out details and convince the eye towards its mechanical nature. The seated scion will cover up most of the detail, with both arms completely covering the armrests and controls. So no extra effort there. Other projects await! Not sure if I'm convincing myself or you that I didn't totally cheap out here...
In a follow up post, I hope to show the completed Knight Scion who today sits primed black and pinned to a cork for painting, along with his standing self. Writing this, I realize that I bought the scions and throne as additional components for this kit. The base kit does have the detailed interior panels and roof/hatch, but the throne and scions come extra. I didn't plan on additional knights (and still don't) from Forge World, so I wanted this one to have all the bells and whistles!
Thanks for reading this far and indulging me in a bit of the Hobby Butterfly syndrome lately. Rest assured that I will plow on with my Titanicus projects and should even get back to my Mechanicum Kill Team before long. Then of course the Rogue Traitor minis await...and those form Blackstone Fortress...and...well...all the rest!
I hope your projects are going well, too.
Cheers and Happy Gaming!
Subscribe to:
Post Comments (Atom)


Great work so far! Looking forward to seeing him finished! :)
ReplyDeleteThanks so much! It has been fun work so far.
ReplyDelete