A journal of my efforts towards completing various and sundry Warhammer 40K projects involving the many Armies of the Imperium of Mankind.
Enjoy and feel free to comment...
- Home
- Adeptus Custodes Paint Recipe
- Adeptus Mechanicus Paint Recipe
- Aeronautica Imperialis Paint Recipes
- Blades of Vengeance Paint Recipe
- Dark Angels (Pre-Heresy) Paint Recipe
- Dark Angels Paint Recipe
- Death Korps of Krieg Paint Recipe
- Deathwatch Paint Recipe
- Grey Knight Paint Recipe
- House Taranis Paint Recipe
- Legio Ignatum Paint Recipe
- Legio Tempestus Paint Recipe
- About
Friday, December 14, 2018
On the Workbench [December] - Cerastus Knight-Castigator Part 2
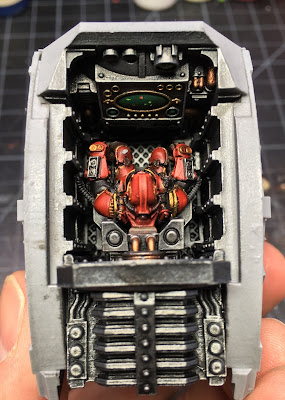
I was able to put more work into the Castigator this week and now the build is complete. Before reaching this point, I needed to complete the pilot so the body could be assembled since there is no way to get him settled in his seat through the top hatch.
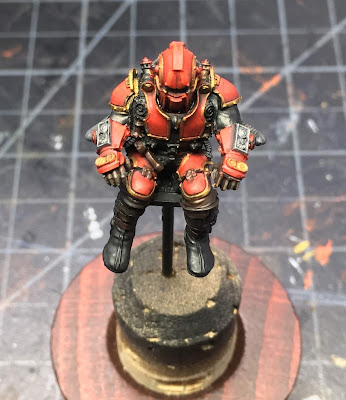
Nothing fancy here, but enough detail and care to look great when viewed through the hatch. If I had really wanted to go over the top, I could have sorted out the installation of a green LED out of sight with the light defused enough to enhance the model and provide a convincing glow for the cockpit when the hatch is opened. As it is, this pilot will sit in darkness and can only be decently viewed with a strong light shining in through the open hatch. Still, I know he's there, and I know the work that went into him.
The armor was painted using GW Mephiston Red and highlighted with GW Wild Rider Red. The gold is Vallejo Brass. I did not highlight it with silver since there aren't and sharp bright lights hitting the model from inside the cockpit. I used GW Doombull Brown on the leather, same as the throne seat cushions. The whole model was shaded with GW Agrax Earthshade, then the silver was painted using Vallejo Steel shaded with GW Nuln Oil. The hoses were painted with Vallejo Dark Rubber and also shaded using GW Nuln Oil. GW Abbadon Black was painted across the eye slit to darken it as I wasn't looking to paint OSL for a glowing visor.
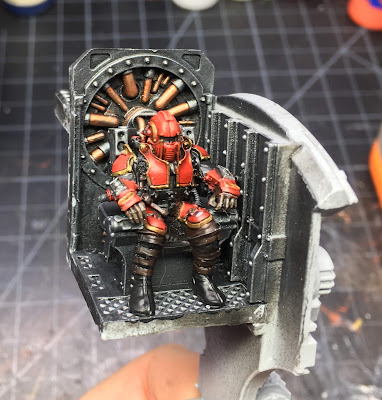
After sealing the model with a coat of Model Masters Lusterless Flat coat, I returned to the assembly line. I glued the throne to one side of the knight's body while completing the pilot. Once the flat coat dried, the pilot was glued in place as well.
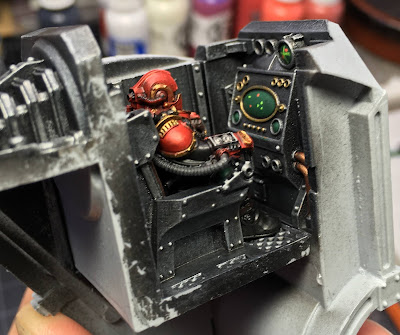
Next the front panel of the body was glued in place. Now the Scion pilot can be seen facing the knight's command console. For short work, the interior is really coming together!
The other side was then glued in place as well. Here's the last best view of the pilot and interior before the carapace armor is eventually glued down.
I am quite pleased with the results. Perhaps a bit dark, and I didn't go the distance with LEDs or any OSL form the screens lighting the front of the Scion's armor, but heck, it's the Grim "Dark" after all.
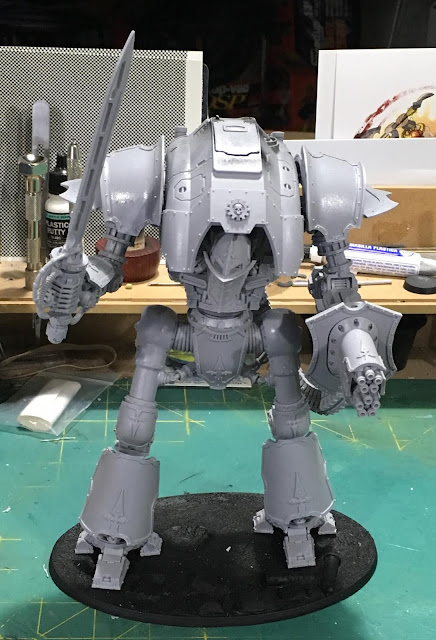
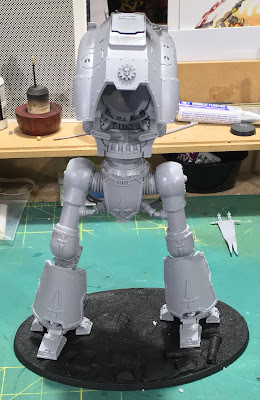
With the body assembled I could finally complete the build. The top carapace armor rests in place and is not glued down yet to help with final painting of the model. Honestly, it sits tight enough that I could leave it unglued so I could see the full interior in the future. I'll have to see about that once painting is complete. It's also easy to forget and lift the model by the carapace and have it come loose, allowing the model to drop back onto the table, and no doubt breaking something...so that has to be considered.
The body is pinned to the legs with a length of brass rod, tightly fitted. This approach should allow me to take it apart for painting and future storage. Magnets could work if done well, but I didn't feel it was worth the extra effort in this case. The resin here is MUCH heaver than the plastic knights. The body with arms attached would require the best from my magnets. A long, tightly fitted rod is secure with no risk of knocking the top off inadvertently.
And the knight is now standing tall and looking fierce; ready to cleave an enemy war machine in half with its mighty sword. This was a great model to build. It went together much easier than anticipated with all parts fitting accurately together with little to no warping. I used a heat gun only to adjust the shape of the ammo belt so it wouldn't interfere with the position of the arm, and this step is even called out in the instructions. Reshaping the belt is unavoidable with the pose-ability of the arm. The elbow joints were pinned like the knees to make it easier to pose the arms while the glue dried. Everything is glued in place now and the arms and legs are rigid. The pins remain to reinforce the glue joins.
All armor is temporarily attached, or not attached at all (chest plates). These parts will only get permanently attached once the body is fully painted. I'm looking forward to breaking out the air brush and laying down a cool House Taranis paint scheme on this beast. I'll follow up with some comparison shots along side the Questoris and Armiger knights. This dude is tall! Not Titan tall, but head and shoulders above the Questoris Knights. It'll make a good ride for my House Taranis baron, and a strong centerpiece for the Imperial Knight force in general.
Thanks for reading.
Cheers and Happy Gaming!
Subscribe to:
Post Comments (Atom)


Built and painted my own Castigator this year and it was a fantastic project. Such a great kit to own and enjoy.
ReplyDeleteLook forward to seeing the finished version of yours.
Be sure to check back for more then! If you have pics posted up somewhere pass me a link.
DeleteDAMN DAM, great job. Imposing static pose suits a Baron. Nice. Love the ammo feeds on this one. Make sure you scrub the shoulder, it’s looking well shiny like mould release agent still present ;)
ReplyDeleteWill do...24 hrs in simple green followed by a scrub with a tooth brush and grease cutting dish soap just didn't cut it...
Delete