Greetings. In this post I'll describe my process for applying Legio Tempestus heraldry to my two Adeptus Titanicus Reaver titans. After priming everything with Vallejo Surface Primer Black, I got to work base coating the panels bearing heraldry with GW Air White Scar. Some panels will have unique heraldry applied others will get the Tempestus black and white checkers.
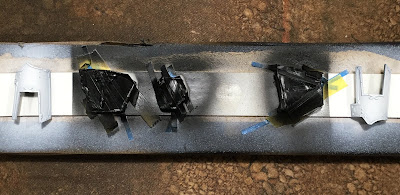
I'll start with masking off the panels that will have individual heraldry using patterns of black lines. One Reaver will use a single black chevron, the other will use a series of diagonal lines, chosen mostly at random and not through any greater understanding of proper Legio heraldry. :)
I used some blue masking tape that I acquired through Amazon.com. I forget the specifics but it was a pack of six roles in varying thickness. Some Tamiya 6mm masking tape was also used just because it was thicker and covered more area for less work.
Next, some GW Abbadon Black was sprayed over the masked pieces. I used sticky notes to shield the white pieces to either side from any stray over-spray. The center knee pad I jut removed since it needed no further spraying at this point.
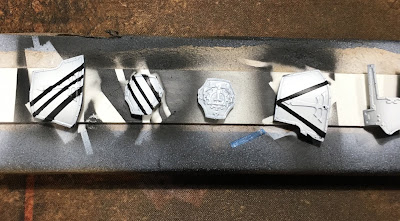
I let the paint dry 24 hours (possible overkill, but better safe than sorry, right?), then peeled off the tape to see how things came out.
Pretty good? Some minor touch up is needed, but definitely better than anything I'd free hand. The knee pad was stuck back on so I wouldn't lose it. At this point, I realized I'd put the chevron on the wrong shoulder panel...its a left shoulder panel and the livery will go on the right shoulder. Ugh. This was easily fixed by spraying the correct panel and I didn't bother taking photos of the rework. I mention it here for those with significant attention to detail who will no doubt catch the issue.
The only down side is that the second Reaver will use shoulder pads without the embossed Collegia Titanica symbol. I could have avoided this by simply repainting the shoulder pads, but at this point one has dazzle camo while (three layers of paint plus primer) and I did not want to add another layer (or two) of white and black. Not to mention going through the whole dazzle thing again on the left shoulder plate. In the end, I'm likely the only one to notice or care about the difference between the two titans. I'll use the opportunity to designate seniority between the two titans (the one with more ornate armor clearly being the more senior engine!).
With the individual livery done I moved on to the checkers. Now there are many ways to achieve checkers and many more sites and videos out there teaching us how. Having little patience for mastering checkers with a paint brush on such a small scale, I opted for custom decals. I'm slowly improving my freehand, but there is simply no way I'm going to achieve even, ordered checks that don't look like they were dabbed on by tiny children with tiny crayons.
So after purchasing some Testors clear decal paper and downloading the latest copy of Gimp for Windows, I set to work printing two sheets of black and white checkers at a scale pleasing to these fine titans. That roughly equates to somewhere between 1mm and 2mm per check, I think, but I'm no checker scientist. It's annoying enough that I spent over an hour sorting this out before arriving at two A5 sheets of custom decals. I didn't print individual shaped decals for each piece (I'm also NOT a graphic artist), I just printed a single A5 sized rectangle filled with a black and white checker pattern.
After printing, I sprayed the sheets with Model Masters Lusterless Flat Coat to seal the ink, which is otherwise soluble to water when applied to decals sheets. I forgot this step until applying the first decal and watching my thumb smear away checks as pressed things into place. I had LOTS of fun with this, let me tell you! ;-)
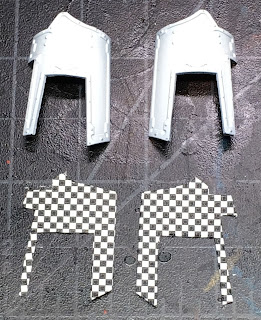
While the flat coat dried, I set about making patterns using tracing paper (spare sheets of wet palette paper in this case). Once I had the shapes for the decals, I used them as patterns to cut out the actual custom decals form the sheet. I used some care lining up the patters with the actual checker pattern so that I would get pleasing results on the model. It's worth pointing out that the some pieces like the leg armor are mirror images so it was easy to make one pattern for the left side and then just flip it over to cut out decals for the right.
 |
| Printed Decal sheets showing what I cut out for the Reavers |
You may notice six leg decals cut out instead of four. This accounts for my mistakes. The first due to a lack of sealer for the ink and the second due to just plain messing up and getting the fiddly "legs" of the leg decal tangled up enough that I ruined the decal trying to straighten it out. All in a day's work when working with decals, in my experience. So no stress. Just soldier on...
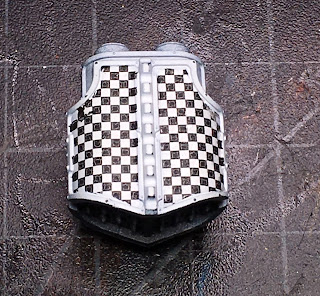
Here's how things turned out:
Here my pattern didn't quite fill the space and I couldn't muster the will to start over and make a new pattern. I've carefully inked in the missing black squares (lower right corner) and will paint things in better later.
Looking sharp! If you don't think so, you just have to trust me that my own free hand would have looked like it was painted during an earthquake with one eye closed...so this is a MAJOR improvement.
The underside of the second launcher. Very cool. At this point I was excited with the rewarding results of my labor. Then I started on the legs...
Here I show the leg decals before they were applied. These were the most tricky due to the very thin strip down one side of each panel. These strips want to twist and tangle so it took some care to get them onto the armor panel and correctly in place. In the end it all worked out. Despite a variety of results across the panels, I can clean up anything unsightly. I'll just tidy up the worst with a pen or fine detail paint brush.
Taken in all, I think this worked well and is pretty convincing. What is most important to the project? It is a repeatable process. I have plenty of sheet left for the remaining titans and can print more if needed. I will get consistent checkered patterns on all the titans as a result, for better or worse. I'm confident it will all be for the better! :) I couldn't paint this cleanly, or with this level of consistency across the five (maybe more) engines that I have planned for my Axiom Maniple.
Here's a look at the Reaver titans with the new heraldry (temporarily) attached.
 |
| Reaver 1 Legs |
 |
| Reaver 1 Body |
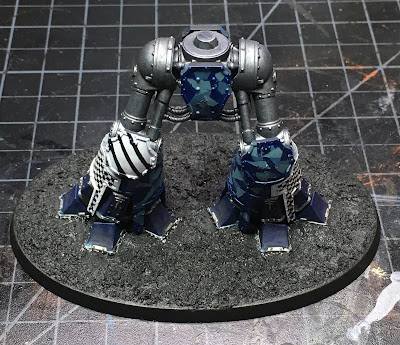 |
| Reaver 2 Legs |
 |
| Reaver 2 Body |
If you would like more specifics on the custom decal process I used, please leave me a comment below and I'll do my best to answer any questions.
Cheers and Happy Gaming!





Love those chequers!
ReplyDeleteThanks! I hope to get better at producing and using the custom decals with practice.
DeleteWhen I saw the previous post, I had been wondering how you'd managed such amazingly even checks. Decals to the rescue!
ReplyDeleteYes indeedy! There is something statisfying about creating your own that I enjoy too.
Delete