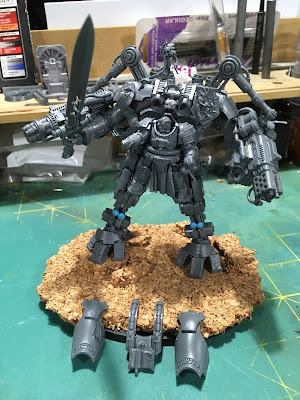
With no time to lose, I got started assembling my project. I chose the Grey Knight Grand Master in Nemesis Dreadknight this year. I had recently purchased the kit following the release of Code Grey Knights. This challenge would be the perfect excuse to get it done right and further inspire me to get on with my mostly assembled and primed Grey Knight force.
The GW conversion that was showed off in the August White Dwarf was very cool. However, I already had an assembled Grand Master Voldus, so I didn't want to use his torso or head in my conversion. And although I very much liked the sword stuck down in the earth (In fact, I had begun to look at that specific conversion with my own parts), I chose to stick with a straight forward fighting pose for the challenge. I enjoy conversions, but I am slow at them and would easily have spent a good part of the month setting everything to rights, leaving me very little time for painting (at my speed and relatively few hours of hobby time allotted).
So it was I set to with a few bits of custom kit to bling out the armor and hopefully make it stand out with a suitable paint job against a standard dreadknight from the codex. I have two of those already assembled and primed and they'll make good body guards once they are also painted up to join this Grand Master.
The initial pose was done with blue mounting putty to hold the bits in place. The arms of a dreadknight can be quite fiddly to get into position without glue, I find. I am attempting a pose that is either "En Garde" against an incoming attack, or blasting away with the gattling psi-lencer...maybe both! A little cork in place at this point to rough out the custom base and experiment with posing. More blue mounting putty holds the feet on so I can still rock this guy around a bit to try different things. I enjoy this pose, though I recognize that as the knight is rocking back, and doesn't look 'set', he'd very likely get bowled over if he is receiving some charge. Hmmm...
The Grand Master borrows his chest armor and loin cloth from the terminator/paladin kit with a bare head from the nemesis dreadknight kit. Here, I wanted to keep with something suitably aged and gnarly that still maintained the suit hook-ups one might expect for a pilot. This limited my otherwise vast choices for space marine heads. My other dreadknights use helmeted heads so he'll easily stand out among them. An iron halo mounted above a laurel wreath should mark this knight out as a ranking hero and I chose the embossed knight shield to further make him stand out. My other two knights used the plain shields so again I have a simple choice to distinguish the Grand Master. I topped off the conversion with a servo skull to record the Master's triumphs, pass on addition targeting information, etc.. A definite sign of rank, I thought!
 |
| The parts settled for priming |
Still noodling on the feet and the stance. Nothing glued there yet, so I have options. Once I'm sure of things, I'll glue the cork and finish the base which is still just a rough look at the moment. The armor restraint (aka "baby carrier") has been modified by removing the icon and replacing it with a hanging book, open, no doubt, so some critical spell or other holy words of banishing. I guess I could leave it off as GW did in their conversion, but then the guy looks even odder held in only at the waist.
There will be some additional seals and scrolls added, no doubt, prior to the primer coat. More blue mounting putty is applied to protect the attachments points for the shin armor, both on the legs as shown and behind the armor panels themselves. This allows me to use plastic cement and still get a good bond after painting, once the putty is pulled off. The sword hand is also held on with putty at this point. I'm thinking of using the air brush to experiment with the power weapon effects and this will be easier if the hand is off the model.
No magnets on this model. I typically magnetize weapons against rule changes and the specific requirements of various battles. For this show piece model, I decided to stick with the sword and a solid weapon loadout fitting of a commander of high standing. Below is a shot from the perspective of this Lord's quarry...
I'm looking forward to finalizing the build so I can get on with the primer and paint. With only a couple hours a week that can be committed to this project, I dare not waste a moment.
Cheers and Happy Gaming!


Looking great! I keep forgetting about Dreadtober every year, I really need to try something for next year.
ReplyDeleteThanks, Mike. It's a fun challenge...perhaps Squaduary will happen again this February...
DeleteHoly cow, I’m just opening my bag-o-Resin and you have a basecoat on already!
ReplyDeleteHa! No, no base coat yet, just setting up for it in the next day or so. The last picture was a bit dark for some reason, but it's all still bare plastic so no worries. :)
Deletenice work on the conversion and the pose looks nice with him blasting away
ReplyDeleteCool, thanks for the encouragement! In the end, I stuck to the pose and he's glued to it now! My last issue is whether or not to stick with the restraints...once attach, his sideways look is a bit awkward since the bionic eye is blocked by the right restraint arm coming down...
Delete