 |
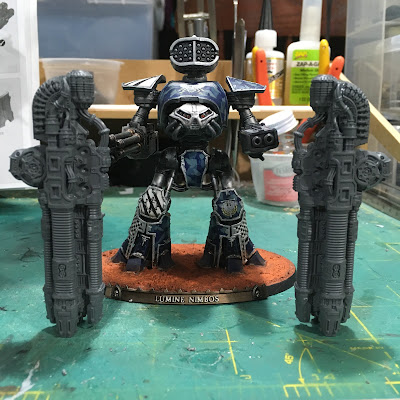
| A naked Warmaster Titan Waiting for Primer |
The Rites of Construction for Superbia Martis have finally concluded. I thought I'd take some time today to share what I magnetized and how/why. This process will be consistent with the approach I've taken with the other mini-titan projects that I have completed. The larger AT kits are expensive and take up enough space that it's worth magnetizing a few options rather than building up an even larger collection of titans, which will then need to be painted, just to represent the various weapon load outs you may wish to play with.
Games Workshop appears to have embraced this reality in their Titanicus models by providing sockets for magnets in many of the expected places. They also provide many options in a kit so you have something to magnetize. The Warmaster Titan kit is no exception. In fact, with this kit, you are magnetizing things that don't even have options yet (arm weapons) or for which there are no current rules (the "small arms" on the upper carapace, similar to the Warbringer Nemesis Titan's anti-air guns).
So I'm going to start out with the caveat that some of the Magnetization here is purely for the hobby love and not something that is currently necessary for game play (though who knows where things will turn out down the road). I'll call this out as I go. So let's get started with the obvious arm weapons...
Those are BIG guns...and they never tire! Yes, that isn't an optical illusion - the Warmaster's arm weapons are as long as a Reaver Titan is tall. We have the Warmaster Iconoclast titan with a different pair of arm weapons, but there is otherwise no optional armaments for the Warmaster at this time. However, the magnet sockets are there, so why not future proof against the possibility of a future weapons sprue or new resin from Forge World?
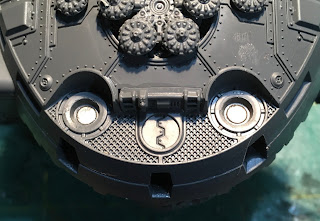
There's nothing novel to discus with the arm weapons. The arms and shoulders have the expected 5mm x 2mm round sockets ready to go, same as the Warlord Titan. Just glue the magnets in (watch that polarity!) and you are good to go. Here's what things look like under the "shoulders".
But now let's look at the Warmaster's shoulder mounted weapons. These weapons DO have a profile in the game, and the kit comes with all of the options - six in total. Five of the weapons use the same shoulder socket, the sixth, missile launchers, attach INSTEAD of the other weapon socket piece which is a pain. I chose to ignore the missile option for now - but may look into a scratch modification that allows me to attach the missiles to the same socket used by the other weapons. If I sort that out, I'll post about it here. I imagine others out there in the blog-o-sphere may have already showed off their solution to that problem as well.
 |
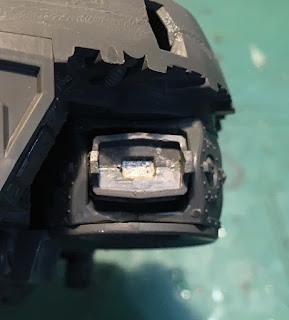
| the weapons socket with internal magnet installed |
The socket in question looks like this after assembly. The two halves that form the rectangular weapon mount include enough space inside for a rectangular magnet, 6mm x 4mm x 2mm. This size magnet was not easy to find, but a little web research landed me here. They shipped promptly and the magnets are quite strong. I expect I'll find other uses since I only needed two but had to buy 50. 😂 An all too typical hobby story for me...
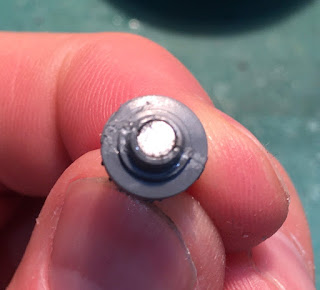
Unfortunately the weapons themselves are not so easy to magnetize. You might consider getting away with some blu-tac or other mounting putty. But if like me you have a passion for magnets, then there are options. The male portion of the socket, shown above, is a bit small for a typicall 3mm diameter disc or rod magnet. I could have saved some time, maybe, by using a 2mm diameter rod magnet, but I had concerns over the strength of the attraction I'd end up with. So here's what I did.
I carefully sliced off the male portion of the weapon the fits in the shoulder socket, and then drill out two holes for 3mm x 2mm disc magnets underneath it. After the magnets were glued in place (a pain since they want to fight each other due to polarity issues), I glued the male portion that I sliced off back in place over the magnets. This isn't strictly necessary, but helps the stability of the whole assembly when the weapons are locked in place. This worked well, despite the fidgety work involved, and I was content with the resulting strength of the magnet pull.
However, each weapon is different, so I've only bothered with two options out of the five so far. I'll come back to that at some point. It didn't' seem worth holding up the rest of the project for at this time. Suffice to say that you might find yourself working out five different solutions to get each pair of weapons prepared. But in the end it's cool to have the weapon swaps since these weapons have stats in the game.
The "small arms" on the carapace (only in the 40K universe could demolisher cannon be considered small arms) have pre-molded sockets, so that was back to easy mode. One word of caution though. The magnets in the shoulder underneath these can mess with your polarity, so try to think ahead and align everything in the same direction to avoid unneeded hassles later. In this case, I ignored that advice and arbitrarily put magnets in the weapons first before realizing that I chose an orientation opposite what I had used for the arm weapon socket in the shoulder. Between that and the shoulder weapon socket which is strong and at a 90 degree angle of pull to the rest, the little magnets on the carapace want to flip over without another thought. Had I used the same polarity as the arm weapon mount, I should not have had this issue. It was no big deal in the end, just a bit more patience with the gluing to be sure the magnet doesn't flip in the socket before the glue sets enough to hold it. And the one socket out of four I had to dig the magnet out of and re-glue when I realized it had somehow gotten away from me and flipped anyway.
Otherwise this is a trivial magnet project if you have 12 3mm x 2mm (measure - they might have been 3mm x 1mm sockets, I honestly forget) disc magnets. The carapace weapons have no rules currently, so you wouldn't be wrong to just pick four and glue them down, skipping the extra magnet project. You can choose between what look like demolisher cannon or the same AA guns used by the Warbringer. With the sockets provided, and the magnets already in my inventory, it was a no-brainer for me to just go ahead and magnetize the lot. I'll be smiling if rules come out later that cause me to care what's up there in a game. At least the Warmaster comes with two options unlike the Warbringer which I magnetized for literally no reason in the current model line. 😆
So that's my beta on the whole Warmaster magnetization project. You can magnetize the waist joint as well with BIG disc magnets. But I am not doing that with any of my AT titans. I have a floppy, spinny 40K Knight Errant that proved to me why this isn't worth it for gaming. Best case you use strong magnets and the model holds together but spins about randomly when bumped. Worst case, you pick up the top and the bottom falls off with the slightest bump. You'll have enough issues with the arm weapons coming off when you grab the model wrong. It just leaves a fragile/vulnerable point on the model that isn't beneficial unless you have real space constraints for storage. I'm content to store these models on their back using Battlefoam Adeptus Titanicus trays.
So that's way to much to say about magnetizing Warmaster Titans. I learned most of my hobby skills from many similar accounts on other blogs in the past, so I hope I've provided something useful to you here in return. Next up will be the first in a series of painting articles on this beast. The primer is already dry and by the time you are reading this, I will no doubt have already put the air brush to work.
Stay safe out there.
Cheers and Happy Gaming!


Wow a lot of work and a lot of effort, I Maggie the arms but just glued the tertiary weapons and will probably just stick to one set of armpit weapons, like plasma or VMB for shield stripping. Great job
ReplyDeleteRight? I’ll probably not end up using the flexibility; but I find it hard to avoid the hobby challenge. Thanks!
Delete