I wanted to post up a little show and tell this month. I recently built the Adeptus Titanicus Warbringer battle titan and thought folks might be interested in what I did to magnetize it. At this point, magnetizing models is getting pretty routine and articles on the web abound, but why not toss in my two cents.
The Adeptus Titanicus titans come pre-molded with magnet sockets in most cases, which is a really big help. In the case of the Warbringer there are two places where this wasn't done and I'll discuss those first.
The waist joint is perhaps an obvious one since none of the titans so far come designed for a magnet there. I have chosen to glue all of my titans for durability and stability on the game table. They are dreadnought size for the most part, and I don't magnetize my Dreadnoughts at the waist. Should you wish to magnetize the waist, it should be an easy matter of building up the inside of the titan halves with sprue or putty, and then gluing in the magnets.
The second area omitted for magnets is the main weapon on the titan's back. The rules provide a second weapon option which one assumes will arrive on some future sprue. Also, a big gun like that just needs to swivel as you menace your enemy on the table top. Am I right?! But you don't want it coming off or getting lost or broken between games.
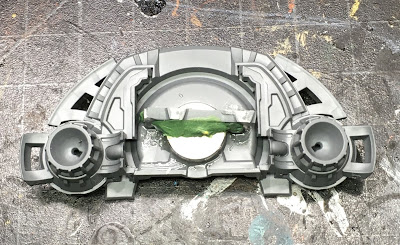
As you can see in the images above, I glued a bracket made from sprue across the top of the magnet for strength. I added green stuff for good measure, then epoxied the whole assembly. What's missing from these images is the extra epoxy I glopped over the whole mess as a final note of structural integrity. Once assembled, you can't get back in to fix the magnet if it comes loose...so make sure it can't/doesn't. When using sprue, I look for a box shape that I can cut down to make a simple one-piece bracket.
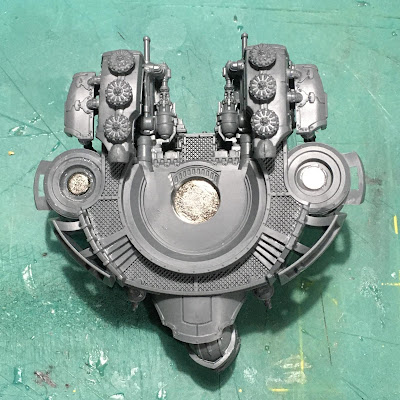
The weapon mount then had to be cut down so a magnet could be fitted in place. You'll note this piece has a conical center than fits down into the body so no magnets are technically required. As stated above, however, I wanted the weapon securely in place. I used a hobby saw to cut the tip off the cone at a carefully measured point accounting for the depth of the magnet so everything would sit flush once assembled.
 |
| The assembled cannon |
Above, you can see the main weapon magnet in place along with those for the anti-air side mounts. The remaining weapons are all magnetized with the same small 5mm x 1mm magnets that are used for many of the other AT Titans. No customization needed here, just glue in the magnets and use good discipline when matching polarity.
For the arm weapons, I maintained matching polarity with my existing Reavers so I could swap weapons. The Warbringer kit has been updated to account for magnets at the ends of the arms and on the weapons themselves. This was not the case with the Reavers and poses minor challenges for weapon swapping.
In a separate article, you can see how I drilled out the Reaver weapons to insert magnets. That is no longer necessary. Another big change is in how the weapon power cables are designed. No longer separate pieces, they now hang down form the main body and will socket into the weapons when attached, provided you don't choose to clip the alignment pegs and change the pose. For the Reaver and Warhound models, I chose to just ignore the power cables and left them off so I could swap the weapons easily with no fuss. As a result, the Reaver weapons don't really attach well to the Warbringer at least as far as the dangly power cables are concerned. This is an issue of little matter during a game however, and one that may be resolved by future sprues.
Note the notches around the magnets above. These position the weapon on either the left or right arms, aligning the small hollows or sockets along the backs of the weapons perfectly with the dangly power cables.
well, that wraps my efforts to magnetize this titan. Aside from the main cannon, this is a very easy model to magnetize with the correct size magnets. It's very cool to see GW dedicate design time to this for hobbyists. One can easily imagine a second weapon sprue with additional arm weapons and the missing volcano cannon option. At the cost of these kits, you want to be ready for that and not having to buy a new titan just to use different weapons.
I hope this article proves helpful to the 'verse.
Cheers and Happy Gaming!


Got to admit I was worried you were talking about the 28mm version and how big the magnets were going to be.
ReplyDeleteHa! That would be awesome. No, only baby titans for me. I have two young ones and would find myself sleeping on the street if I bought 28mm titans. Heh.
Delete