A journal of my efforts towards completing various and sundry Warhammer 40K projects involving the many Armies of the Imperium of Mankind.
Enjoy and feel free to comment...
- Home
- Adeptus Custodes Paint Recipe
- Adeptus Mechanicus Paint Recipe
- Aeronautica Imperialis Paint Recipes
- Blades of Vengeance Paint Recipe
- Dark Angels (Pre-Heresy) Paint Recipe
- Dark Angels Paint Recipe
- Death Korps of Krieg Paint Recipe
- Deathwatch Paint Recipe
- Grey Knight Paint Recipe
- House Taranis Paint Recipe
- Legio Ignatum Paint Recipe
- Legio Tempestus Paint Recipe
- About
Thursday, March 12, 2020
Monster March 4 AT Warlord Titan - Week Two Progress
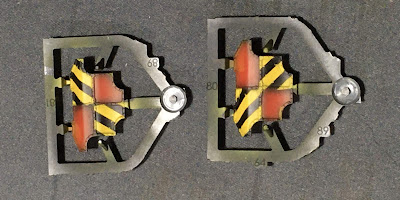
So we're well into week two of the Monster March 4 hobby challenge. Despite a family trip that took me away from the hobby man cave for a few days, I was able to get some progress done this week. With no money shot of an assembled titan at this point, I'm forced to lead with an example pic above of the Legio colors coming together.
I finished last week with the armor panels based coated - all except the yellow stripes. So I started this week with a masking session to get the stripes laid down.
I selected some armor panels to get yellow stripes, based on what I left black during the initial base coat phase. Some areas will stay black and I just needed to spend a little time planning things out. Special effort was put into orienting the masking for the yellow stripes so the final assembled results will (hopefully) look great. More time should have been spent planning the lower leg armor - more on that in a bit.
I took the advice of another blogger when laying down the stripes. If you lay identical strips of tape side-by-side across the entire surface to be striped, you can then remove just the strips that are going to get painted so all of the stripes end up identical in width (if you are careful with the taping, of course). It's a better approach than my usual "eyeballing it" method.
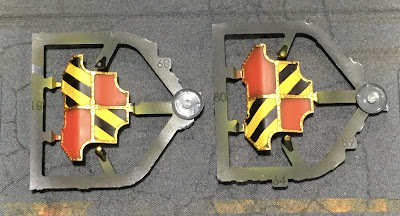
Note the remaining red areas showing on the gun shields above. This was a mistake as I over-sprayed these areas and had to go back in to fix the red. Ugh. It pays to be thorough during masking unless you have impeccable air brush skills.
I wish I spent as much time masking the gun shields as I did on the guns themselves! :) Over-spray can be cleaned up, but it slows everything down and if using a paintbrush diminishes the smooth effect you get with the air brush in the first place.
While waiting for the yellow paint to dry, I dry-brushed some Vallejo Gungrey over the skeleton of the Warlord. Not much to see here, but some highlights were raised. I'll probably go over a second time with Vallejo Steel as I did on my Legio Tempestus titans before applying shading.
Several thin coats of Vallejo Game Air Gold Yellow were sprayed over the masking. Once dry, the tape was removed to reveal quite passable black and yellow stripes, with only a little clean up needed on the black due to paint getting under the edges of the masking in spots.
Over-spray clearly visible on the shields above - ugh....was not paying enough attention while painting quickly to make progress.
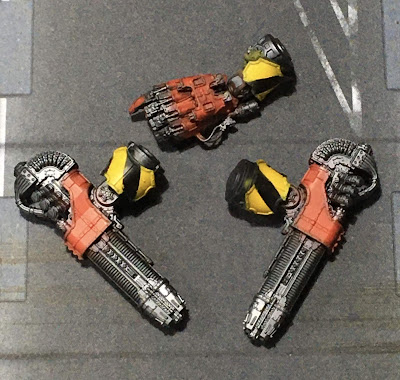
The volcano cannon have the gun shields pictured above, so I will leave their shoulder armor sections plain black. I thought it would be a bit much striping both the shoulders and the shields. The remaining arms get striped as shown above.
Next, I started to get as much of the trim done as I could with the time I had left to me, starting with the legs. There's a lot of over spray here, but maybe I saved time on the leg armor?
I love how the gun shields are coming out for the volcano cannon. with some shading, highlights and decals theses are going to look pretty cool.
The front shoulder/pectoral armor looks great too. Shading and highlights should help delimit and pick out the gold eagle better as well as the trim.
Random armor bits also looking good with the trim painted. I had to take quick pics of the work before heading to bed, so lots of clean up still to do on these panels. Normally I would have touched things up first before taking pics.
And now the major bummer for the week. While I believe I planned out much of the masking to great effect, I really messed up these lower leg panels. I was meant to put black and yellow stripes on opposite sides so that the outsides of the legs would show the stripes.
As you can see above the second leg is NOT a mirror of the first, but looks identical. That's full points for massed production, but no points for correctness with this project. Looks like I'm going to have to repaint one of these...just debating stripping the old paint first or not. Regardless, this is going to set me back a bit more on my schedule. As it is, you may note that I'm not sharing any Warbringer pictures in this post. Not enough progress on the Warlord to spare time for it this week!
regardless, great progress was made and while I don't have an assembled Warlord to show off yet, I am much closer than pics of random armor pieces may reveal. I expect Week three's title pic will be an assembled Warlord with all of the base colors laid down and looking fierce.
Check back next week to find out...
Cheers and Happy Gaming!
Labels:
30K,
Legio Ignatum,
MonsterMarch,
Painting,
Titanicus,
Warlord
Subscribe to:
Post Comments (Atom)


Looks like it's coming along nicely. Shame about the lower leg plate, I suspect repainting it should work. You only have a single line of detail and it can take a bit more (airbrushed) paint without clogging up (and it'll save you time). Good luck on the rest of the project!
ReplyDeleteI did exactly that - but the red over the black/yellow area came out too bright vs the rest of the panels that were over just the black primer coat. So I stripped everything and started over.
DeleteIf you plan on a second Warlord, no need to strip that shin, get a fresh one from a second Engine?
ReplyDeleteFunny you should suggest that. The Warlord-Sinister waiting in the wings almost lost his...but he is his own legio/livery so I'd have to get another warlord to replace that. No matter, I took a deep breath and got the Simple Green out.
DeleteAn excellent progress DAM! I can see how much you enjoy painting this model and can't wait to see it assembled and presented in full glory!
ReplyDeleteThank you, sir!
Delete