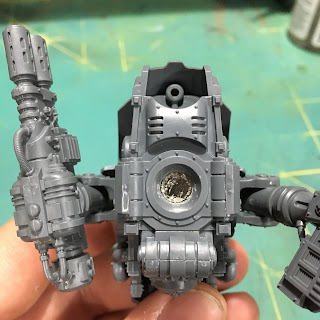
While building my second Armiger Warglaive, I thought I'd share details on magnetizing the waist joint. When I built the first Warglaive, I neglected to take any pics of the process, only the final result. The design of the Warglaive makes magnetizing this joint quite simple. Here is how I went about it.
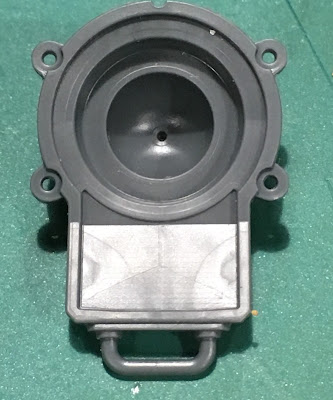
1) dry fit the base of the joint (the part with the dome) with the bottom plate of the body. The dome will poke up though the bottom plate by a good amount. This gets in the way of seating a magnet in the bottom plate. So, make a mark on the dome where it sticks up inside the bottom plate. Then cut off the top of the dome at the mark you made. I used a razor saw...any fine tooth hobby saw could work. I wouldn't use a knife for this. It's a lot of plastic to cut through and only disaster will come from it. When you are done sawing and smoothing out the cut with knife and file it should look like this:
You may uncover the small hole in the dome, but the cut should NOT go so deep as to remove the whole top of the dome. The underside of the dome for the waist joint still looks like this. Lots of room for magnets in there!
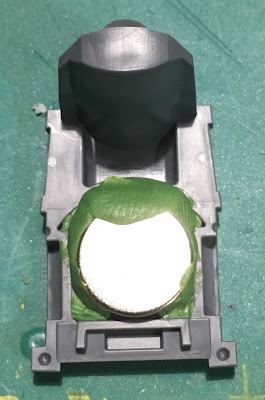
2) add the magnets. Because the dome tapers, I chose to make a pyramid of three small magnets to more or less fill the dome. There's too much room around the magnets to effectively use super glue here. In my first Warglaive, I used Vallejo plastic putty. It worked, but the drying time is loooong. And since I wasn't willing to wait, things slopped around and it was generally a pain to work with.
This time, I decided to use some go ol' green stuff. I just mixed it according to the package and packed it in around the magnets like this:
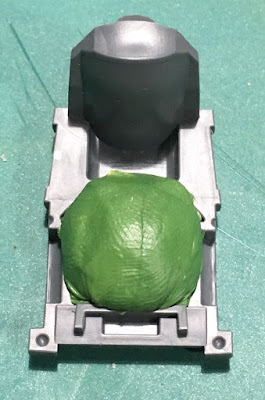
I folded the extra green stuff over the magnets and made sure it would not interfere with where the rest of the waste get attached to this piece. The end result is a little dome as show here:
3) While that cures a bit, time to put a magnet in the bottom plate of the torso. I wanted a strong pull so I used the largest thick magnet I had that would fit - 1/8" x 1/2" or 3mm x 13mm. I used left over green stuff from step two to seal it into the bottom plate.
I always make sure to cover the magnet to reduce the chance of it loosening and popping out over time, then rattling around in the body of the knight. Here, superglue should work just as well. At least I hope so, because that's what I used for the first knight! The end result should look something like this:
Word to the wise, be sure to clean out any glue or green stuff that squirts into the cup where the dome of the waist is going to connect, otherwise you won't get the best seat of the magnets when you connect the two pieces. You can see where I scraped away extra super glue in the title pic above.
4) Allow for some curing time before connecting the two halves and keep them separated so they don't try to come together and unseat things before it cures. It won't take all that long. What works well is the tackiness of green stuff, which allows everything to stick together well and not come loose even before it sets if you treat things well. I took this time to continue assembly.
After curing enough that things won't come apart, fit the two pieces together and enjoy the satisfying 'click' as the magnets take hold. Hopefully you ended up with something like this:
That's all there is to it! I didn't magnetize any weapons. At the moment there aren't options for the arms anyway. The carapace weapons have a long enough post to attach securely on their own so I didn't bother there either. Magnetizing the waist will give me storage options down the road when a full height Warglaive may prove a nuisance.
I hope you find this short tutorial useful. If it could have been more useful, please share your thoughts in the comments.
Cheers and Happy Gaming!


No comments:
Post a Comment