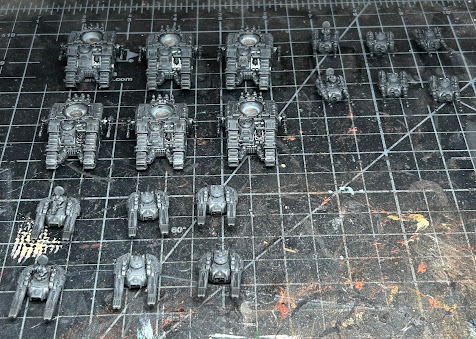
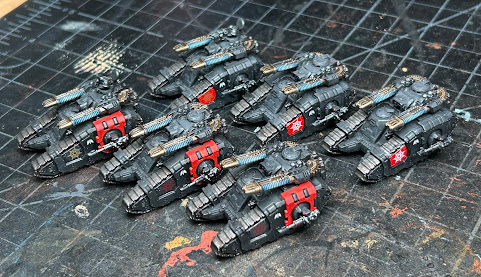
Greetings and welcome back. I thought I'd make an opportunity today to walk through my process for painting these tiny tanks. They have lots of sharp detail and can be really fun to paint. The scale can change how we approach the models in a way that makes them in some ways easier to paint than the 28mm models. But one thing is for certain; it all starts with a good primer coat...
I like to use Vallejo Surface Primer Black, sprayed through an air brush. However be warned, this approach isn't for the faint of heart. Primer paints contain compounds that make them 'gloppy' in a way that easily clogs the airbrush. I use a mix of Vallejo acrylic thinner and flow improver to make this work. And even then, I have to pause often to clean out the air brush. But I think it is worth it - especially at this scale. Rattle cans are cheaper and easier, but you'll almost certainly clog and obscure some of the sharp details with them. With the airbrush, I have more control of how much paint I'm laying down.
After the primer has dried (I wait ~24 hours to be sure the primer set firmly - but this is generally because I spray late at night before bed), I hit the models with a heavy dry brushing of Proacryl Dark Warm Grey. This always ends up looking MUCH lighter than I want - but I trust in the process and stay the course. At the end of the evening, after drybrushing, I then lay on a heavy all-over coat of GW Nuln Oil, straight from the pot. You can see the wash drying in the pic above. If the first coat doesn't darken things enough, I'll add a second.
Then I come back the next day and get to work on the metals. This is generally Proacryl Dark Silver on tracks, weapons, shoulder trim and maybe a few other details with the tanks. For the plasma cannons on the Sicarans, I went further to show their technological age and 'special-ness'. Yeah, I think that's a thing. Anyway, they got some Proacryl Bronze along with the Dark Silver details. I also shaded the tracks and exhaust with GW Reikland Fleshshade.
Unique to the plasma weapons, I had more weapon work to do than normal. I followed my usual paint recipe for plasma effects (see my 30K Dark Angels recipe in the tabs above), perhaps with a bit of a lighter hand than I would on 28mm weapons. I'm typically going for a 'charged up and ready to fire' look vs. a 'peak power - firing!' look anyway.
With metals painted, it's usually time to select the parts that will carry the legion red - in this case Proacryl Bold Pyrrole Red. With the tanks, I choose locations in a way that marks out one squadron from another of the same tanks. With my collection here, I'm aiming to be able to run all the vehicles in a single squad (rules permitting, of course) if I want. But I also want to be able to run smaller squads, and have it be clear on the table which tanks go with which squads. So here I have three tanks with front quarters red, and three with side armor red. It helps here that the Dark Angels have a complex and hard to discern heraldry at the best of times. So we can't really say that anything is 'wrong' with our schemes, so long as there is black and silver and red.
I actually tried to get cute with some red and black checkers on the front panels. But it was just painful to paint and looked pretty mediocre with my skills...well, really bad actually, if I'm being honest. So...straight red it is! With larger tanks and larger panels, like the Spartans, I could play with transfers to get the effect. Here things are small and the shapes fiddly, so I didn't attempt it.
Oh, and I chose to paint in the targeting lenses and lasers while I had the red out. I'll need to go back to the earlier painted tanks and do that at some point. I had thought these areas too small, but it is really no worse than painting in eyes!
On the right flanks, I put the usual vehicle numbers to make picking out specific models during games easier and the 1st legion icons. And that was it for these tanks. There aren't many flat spaces large enough for the transfers I have, but it's fine if some vehicles carry less bling than others. :)
I think I started this with the Predators, but I figured out that the small laurels from the Legions Imperialis vehicle transfer sheet fit on the marine shoulder pads. Win! So I'm dropping them on all my command models - squadron leaders in this case. Fun!! The small Dark Angels icon (seen on the side of these tanks) seems *just* too big, so I haven't tried that. I wish they'd print an infantry sheet with tiny legion transfers for the shoulder pads...The last step is applying weathering powders to the tracks and bottom of the tanks. I typically spoon out a bit of powder with the GW plastic texture tool (or whatever they call that plastic tool used for applying texture paints...) into a small cup, then add pigment fixer liquid, enough to make a thin soup...? It's a "feel/experience" thing that I don't know how to accurately describe. Reminds me of my grandmother who'd describe recipes like, "Put some flour and sugar in a bowl, then a bit of butter and mix it together..."
Anyway, after applying the weathering powder soup to the tracks, fronts, bottoms, etc. of the tanks, I let them dry over night. When applying the weathering mixture, I try to consider how mud, dirt and dust might accumulate on the tanks...then I back off a little because I want to enjoy the paint job some. I imagine the paint on a real tank is barely recognizable after a short time operating in a dirty, muddy environment. Anyway, I got carried away on the front of a few of the Sicarans, but I like it. Seems like the slopped fronts, and their increased speed over other armor might make them scoop up a bit more grime on the go.
Somewhere in all that I also applied more GW Nuln Oil to the remaining metals bits. I used GW Agrax Earthshade on the plasma weapons, prior to painting on the plasma effects. At any rate that's pretty much it; painted tiny tanks! I always finish with a good coat of matte lacquer. That sort of dampens down the weathering powder effect. When it dampens the effect too much, I re-apply the powders.
I'll post up some completed pics from the light box next and take my big ol' stamp of done then too. So check back in a few days to see how these came out, in more detail.
Cheers and Happy Gaming!


Some great looking tanks, and a solid process
ReplyDeleteThanks!
DeleteYour tank collection must be quite substantial by now! I really enjoy these splashes of red to break up the mainly black colour of the vehicles.
ReplyDeleteAlso, great to hear how you do the pigment work - I will have to try that out! I usually start the "soup" of with pigment and water and only add the fixer after that has dried. It works, but I'm not 100% happy with it - this might change that!
pigments for me are definitely an experimental thing. In the case of tiny tanks, I wanted some level of caked on grit, not just a dusty look...so the "soup" made sense. With tiny titans, I originally brushed on the powder and then applied fixer, but I think I saw a YouTube thing back along that showed mixing pigment with fixer and applying it directly.
DeleteThey look awesome, bravo!
ReplyDeleteThank you!
Delete