 |
| credit: swordmasterofhoeth.blogspot.com |
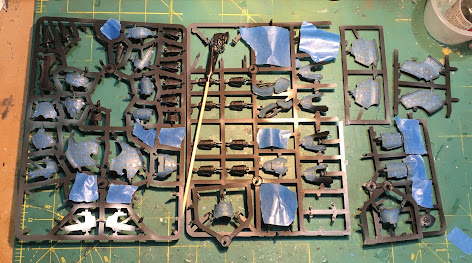
So we're into #MonsterMarch6 with both feet now. This first week was all about priming and setting the base colors for the armor and infrastructure of the titans. The end results aren't much to look at, despite the progress involved. Before laying down colors, I spent some time noodling on how I wanted the livery of the titans to come out. The key decisions for the Tempestus were what was going to be camouflage, and what was going to becheckers, and what was going to be black and/or white. So just a few things to consider. This led ultimately to piles of sprue with various colors across them...
These bits are either dark steel/silver or black/white in color. The Legio Tempestus transfer sheet has some white and blue checkers for certain specific components, so those are painted white, along with the things that were going to be white anyway. I'll have to manage more custom transfers for the leg armor, and possible a couple more bits, but it's a little less than before at least.
Then, of course, there is those bits that need camouflage. In the image above, certain bits are totally masked off against the risk of any over spray from painting the camouflage colors. Other bits are far enough away that I should be able to miss them, so no masking there. If you click through, you'll see all the various bits of blue painter's tape masking off the first layer of camo shapes. This is where most of the week went. It's a lot of individually cut flecks of tape, lovingly applied in a random, pleasing pattern on each tiny piece. Oh, and lets not forget the titan bodies...
Getting the tiny pieces of tape into all the little areas of the model is super fun. Honestly, you really must give it a go some time.
No, really. Just try it out. You'll be amazed at how therapeutic it can be. You'll save lots on needless counseling costs - well you would if the models weren't so damn pricey. But let's get back to the therapy.
It was so fun, I'm including a simple step by step guide here so you can join me in the journey from little tape fleck to mighty completed Titan. It all starts with blue painters tape and just enough enthusiasm (insanity?) to make the first cut. And while we're on the topic of cutting, this is the time to replace that nappy dull blade from scraping sprue with a shiny new one. The process to follow will go MUCH easier if you have a sharp blade...
Ok, so you've cut a strip of tape and stuck it down to a cutting mat (if you chose the dinning room table, I'm not responsible for the consequences...). Now start with a couple long cuts to divide the tape into small strips, this is going to ultimately determine the size of your flecks, so plan ahead. I've started using 2" wide tape so I can spend more time cutting flecks and less time setting up the tape. Next you begin slicing off little triangles, trapezoids, rhomboids, parallelograms, or whatever suits your particular condition. You'll destroy the cutting mat surface so plan ahead and don't use your favorite mat or any other cherished surface. I think the pic above makes the results clear, so 'nuff said there.
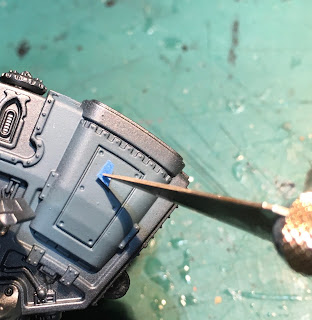
Now, I used to use tweezers, but it's fiddly and I scratched a lot of paint. So now, I gently stick my craft knife into the fleck and lift it up as shown above. The painters tape isn't that sticky so this generally works. When you inevitably pierce, tear, fold, crumple or drop a fleck, simply curse appropriately and cut a new one. You're going to make hundreds if not thousands of these so a few in the bin is hardly a concern.
Now carefully stick the fleck to the model, being careful not to scratch the paint with the tip of the knife. This mostly works, and pressing down with a finger or other device (not the sharp point of the knife!!) is recommended for a good seal. If you want sharp crisp shapes, you don't want spray getting under the tape much. Now keep at it until it looks like the pic below. If you've found a better method, please don't share it. I have wasted far to much of my life doing it this way to hear about any better methods now.
If you made it this far, congratulations! You only have 2645 more flecks to go. Keep at it, champ! Note the somewhat irregular shapes and the random placement. If there is any art here, it is in the placing of each shape to fill the space with interest. I try to avoid all the lines and angles going in one direction. Also, there will be two layers of tape, so you need to leave room for the next round of shapes or you won't get much of an overlapping pattern. Oh, didn't I mention that at the top? Yes, that's right. After a coat of the second camo color dries thoroughly, you'll go back and DO IT ALL AGAIN. Remember, service is its own reward. If you stuck with the process above, your panels will look something like this.
I applied tape to 27 panels/parts and two titan bodies. It's a lot. Leave plenty of time, and have a generous amount of your favorite libation on hand. And yes, you're using a sharp knife so hobby responsibly, or accept the consequences.
This camouflage approach is painted "inside-out" in the sense that the first layer of paint is the top image that appears in the camo pattern. The last layer of paint is the color that appears to be "under" all the camouflage flecks. The full recipe is in the Legio Tempestus tab above and a longer tutorial on painting dazzle camouflage is here. Note that after the first two Reavers, I determined that I liked the pattern better with smaller flecks of tape. Takes MUCH longer, but the look is less jarring (to me at least), with less dark blue showing.
So...into week two, I'm painting the second camouflage layer, re-taping everything and making some progress on the other panels. I'm interested in how the checker transfers from the GW transfer sheet will work on the panels and looking forward to hand cutting my own custom transfers for the rest. My scheme for these titans is so much more a hobby project than a painting project, compared to the Legio Ignatum engines.
Best of luck for your projects. Stay safe out there.
Cheers and Happy Gaming!


Definitely a labour of love but I'm sure it will be worth it in the end! On a side note, I've never bought painter's tape and just use masking tape which is pretty awful. Do you still use that Tamiya special stuff or will any old painter's tape from a DIY store do?
ReplyDeleteAny decent brand of Painter's Tape should do - I only use Tamiya tape for their very thin rolls when hazard stripes are called for; it's just simpler than hand cutting my own thin strips. I'm using scotch brand here in the US, otherwise. For extra care, one could seal the paint with a lacquer prior to taping,but I haven'
Deletet bothered with that, mostly due to all the layers I'm already putting on - I don't need two more layers on top of that! Also, i advocate for good drying time. I always wait at least a day before masking over new paint. Maybe overkill, but I have definitely had issues masking over new paint that had only dried an hour or less.
I _hate_ masking stuff, but it definitely has a great payoff for the effort.
ReplyDeleteYes, me too. But I hate painting (and layering) hundreds of little shapes free hand more. :) So as you say, there is payoff for the effort.
DeleteComing along well, looking forward to seeing the results.
ReplyDeleteThank you!
Delete