Greetings!
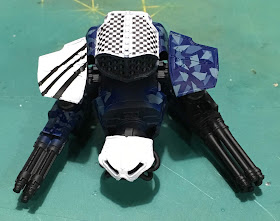
In this post I describe my process for painting the dazzle camouflage pattern on my two Legio Tempestus Reaver titans for Adeptus Titanicus. In researching canon for the Legio Tempestus livery, I noticed the camo and how others have painted it. I'll be using this method from the Titan Owner's Club.
While painting with the airbrush, I used double-sided tape to hold down the various loose armor panels. All parts were primed with Vallejo Surface Primer Black. Once everything was primed and dry, I got out the Vallejo Air Medium Gray(71.114).
In addition, I painted the body panels on the Reavers and armor panels on the weapons. Some white was sprayed on the missile launchers to accommodate the Legio's checker heraldry, but more on that in another post. Here we're focused on the camouflage. Before I moved on to masking the camouflage pattern, I let the Medium Gray dry thoroughly (roughly 24 hours in this case).
To mask the camouflage, I picked up some 6mm Tamiya masking tape from Amazon.com.
It is pretty cheap and comes with a couple refills. Probably more tape than I will use for quite some time. Next, I moved on to the challenge of cutting small shapes to fix onto the panels to make the camouflage pattern. I can imagine this was MUCH easier when applied to the full sized Forge World Reaver's armor panels! I have a lot of pictures of the various stages and it's really too much to share here so I'll focus on the missile launchers as I describe the process I went through.
One launcher will have the top camouflaged, and the other will have the bottom. This allowed me to vary the black and white checkers so the two titans will look distinct from one another.
I laid strips of tape across a clean cutting mat and cut out random shapes with a new (sharp!) x-acto knife blade. I then carefully peeled the pieces up and stuck them down to the model using a mix of tweezers and my old fat fingers. :) Here's a quick shot of the armor panels after the first pass of masking was complete.
Next I used the airbrush again to spray a layer of Vallejo Air USAF Light Blue (71.111) over everything. This was also left to dry 24 hours.
Then it was time for another pass of with the masking tape. The original tape is left in place and new shapes are taped over the old ones. For this stage, new shapes can cover old shapes as long as they overlap to provide layers to the camouflage colors. I had reviewed the steps from the Titan Owner's Club how-to page first to plan my strategy. That said, i really didn't have any idea what I was doing.
Once the second layer of tapes was stuck on, it was time for another pass with the air brush using Vallejo Air Deep Sky (71.090).
After another wait period to be sure everything was good and dry, I carefully began removing all the tape. This process was far more tedious than I expected due to the many, many small bits of tape layered over each other and thoroughly covered in paint. But with patience, the effect came through in the end. There were some places where I inadvertently scratched the paint through to bare plastic while removing the tape. The damage basically fades in with the camouflage, however, and should be easy to touch up with a brush later.
So...on to the grand reveal!
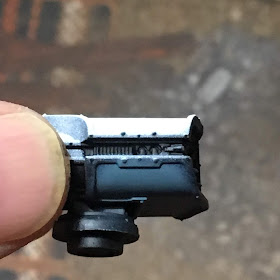
Dazzle Camouflage...mostly. As I move on to the two Warhound Titans and the Warlord I have planned, I will add more shapes and take more care with the layers and how they interact in the design. The shapes turned out to be a bit sparse and the pattern is much less dazzling that it could be. That said, once everything is painted up in its entirety, I don't expect to be disappointed by the over all look of the titans. What we're seeing here is in extreme close up after all.
Here's how the remaining parts turned out.
 |
| Armor Panels |
 |
| Reaver 1 Top |
 |
| Reaver 1 Bottom |
 |
| Reaver 2 Top |
 |
| Reaver 2 Bottom |
 |
| Laser Blasters |
 |
| Gatling Blasters |
With that done, the camouflage base coat is complete on all parts. Next up, everything will get touched up and shaded. Then the balance of the base coating on the rest of the components will commence. I'm pretty excited to move on and complete these (mini) Titans. I'll close with a view into the future to show how these panels look on the (mostly) assembled titan bodies along side the Legio heraldry...
 |
| Reaver 1 Torso and Weapons |
 |
| Reaver 2 Torso and Weapons |
Special thanks to Col.Hertford and the Titan Owners Club for the how-to post that enabled me to complete a similar project in miniature for Adeptus Titanicus!
Cheers and Happy Gaming!


They look great! As does Col H ones
ReplyDeleteThank you! Col H gets most of the credit. I'll reserve a smidgen for myself to cover all the time cutting and tacking down tiny masking tape shapes. heh. I think the scheme will fade back nicely with the trim painted, shading done, etc.
DeleteOoh, that is cool! It could use maybe one more colour (or ~50% more of the two lighter ones), but the technique is awesome. I've done some vaguely similar "patches of various colours all over the place" types of things, and I found I always need more than I thought at first. At this point, I generally go with two passes with each colour, but that might not be so viable with the masking tape. I'm sure with more experience you'll get better at figuring how much to put in each layer. It looks really cool even as is, and thanks for introducing me to the technique!
ReplyDeleteYou're welcome - and thank Col H and the Titan Owner's Club too. :) I completely agree that the pattern needs more density. I'm too chicken to just try and lay more over what there though. I'll do things a bit different on the warlord and the two warhounds coming up next and see how that goes.
Delete