A journal of my efforts towards completing various and sundry Warhammer 40K projects involving the many Armies of the Imperium of Mankind.
Enjoy and feel free to comment...
▼
Monday, June 4, 2018
Armiger Warglaive from House Taranis to DONE
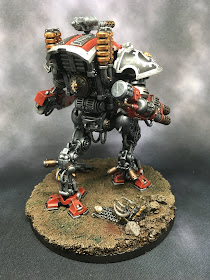
With some focused effort, I completed my first Armiger Warglaive over the weekend. The experience was rewarding and I look forward to completing the second Warglaive soon. I'm planning on adding two of the new Armiger Helverins as well. Fun kits to build and paint!
I like the House Taranis scheme and believe this first attempt to be a faithful enough reproduction of a House Taranis knight. The reds will tie in nicely with the same reds I use in the Custodes and Deathwatch for plumes, cloaks and the like. Should I ever uncork the Mechanium army project I have still in boxes, they'll all look good on the table to since I plan to go with the Mars scheme.
I completed the detail work on the base, choosing to paint the blasted apart terminator in Black Legion colors.
A test fitting of the knight on the painted base looks good!
With that done, I painted the base rim black and attached the knights legs permanently using superglue. I didn't pin this time as I felt there was a lot of contact points for the super glue and this smaller knight isn't very heavy nor does it seem prone to any torque that might snap him from the base.
And with that, the model was complete! I glued down the shoulder armor and left the arms free to pivot in the joints as far as the armor will allow. I also left the chain arm pivoting at the "elbow". Unlike my freeblades, the Warglaive chain arm is tight enough to be pose-able and doesn't just flop down loose. All of this can be glued later if I find issues develop with loosing joints that prevent reasonable posing. The magnets in the waist hold well and the top half sits pretty tightly without spinning this way and that as easily as my freeblades do.
All that was left was to put the parts back in the spray booth and lay down a solid coat of varnish using the tried and true Model Masters Lusterless Flat Lacquer. I may add some weathering powders or other finishing touches at some point once more of the House is complete top this standard. I would prefer to weather everything in one batch to be sure I get consistent results. As it stands, there is nothing with this model to embarrass me so I can call it quits with a much satisfaction. I'm proud to give it a big seal of DONE to this model so I can move on to the next.
I am also pleased to hear the codex updated the rules for this model, decreasing its cost among other things, so that it will be more playable in 8th edition vs other similar models. I could see a pair of these, or the Helverins, adding some punch to my Deathwatch, for example.
I'll close with a photo shoot in the light box.
Cheers and Happy Gaming!


No comments:
Post a Comment