Monday, October 29, 2018

On the Workbench [October] - Titanicus Part 2

Titanicus Reavers WIP Legio Tempestus

As October comes to a close, I found time to put together the second Reaver Titan for my Legio Tempestus Axiom Maniple. I was really leaning toward the power claw, but in the end I decided to stick with the ranged weapon arms.  I'm hoping for some additional weapon options in the near future!  And, if I end up regretting the choice, it's a good excuse to build another Reaver! Regardless, I really see my Reavers and Warlords standing back to blast the enemy while the Warhounds and Knight banners get up close and personal with any enemy engines looking for a melee fight.

I magnetized this Reaver in the same manner as the first so it will be ready for any future weapon options.  This also gives me some flexibility if I want to try giving each Reaver the same weapons as well.

Titanicus Reavers WIP Legio Tempestus magnetizing the arms
magnets attached

The upper arms are the easiest to magnetize by simply trimming off the locator nub and gluing an appropriately sized magnet in place, carefully centered on the arm. These magnets will socket into the weapons when they are attached as shown below.

Titanicus Reavers WIP Legio Tempestus magnetizing the weapons
holes drilled

Next comes the relatively easy, but scary, task of boring a magnet sized hole into each weapon body. The weapon was then packed with green stuff in sufficient quantity to allow me to firmly seat a magnet so it is recessed by the thickness of an arm magnet.  This approach forms the socket used to attach the weapon to the upper arm.

Titanicus Reavers WIP Legio Tempestus magnitizing the weapons
magnets in place while the green stuff cures

Make triple sure to manage you magnet polarities carefully!  For this project I made sure both Reavers use the same polarity so all of the weapons are fully interchangeable between them. The Apocalypse Missile Launcher was also magnetized.  This is a simple process since sockets are  provided for this purpose in the mold.

Titanicus Reavers WIP Legio Tempestus
All parts attached
While the green stuff and glue cured, I took some time to apply Vallejo Black Lava to the Titan's base.  I left the base flat for the second Reaver so there would be some variation between the two engines. I also hope this will help the dramatic pose of the first Reaver stand out more when they are displayed together.

Titanicus Reavers WIP Legio Tempestus preparing the base
ground cover applied to the base
As you can see in the title picture for this post, the two Reavers now walk and are ready for painting.  They look a bit sparse without their armor plates attached. I expect to base coat and complete painting the skeletons before attaching the armor plates. Look for a future post on painting these engines where I attempt to recreate the blue-grey camo pattern of the Legio Tempestus.

Cheers and Happy Gaming!

Friday, October 26, 2018

WIP: Adeptus Mechanicus Kill Team - Part 1

Adeptus Mechanicus (AdMech) Kill Team WIP

Kill Team Zhu-1/5 has hit the painting table this month.  I am playing this kill team in a campaign currently and have been trying to get them painted up for the events.  For the campaign opener last week, they looked like this, but with red robes.  Somehow I missed taking a picture of that...

Adeptus Mechanicus Kill Team WIP

They were recognizable in red, but not at all up to a good standard.  This week I cleaned up the robes and set to work on the wood and leather details leaving the kill team looking like this for the game this week.

Adeptus Mechanicus Kill Team WIP

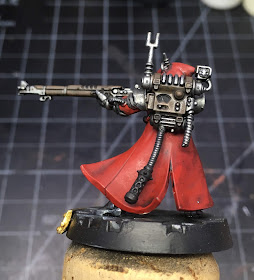
Then I took the current Leader, Zhu-1/5, and used him as a test model to work out the rest of the paint scheme.  I have not worked on Adeptus Mechanicus models before so I needed to get my recipe and approach down.  I'm using the basic Mars scheme, which makes things easy, however I'm not using all GW paints.  I'll be adding a recipe tab to the blog as I nail things down.

Adeptus Mechanicus Kill Team WIP

GW Nuln Oil was used to shade the metals and equipment, while GW Agrax Earthshade was used on the robes. I chose Vallejo Oily Steel for all of the silver bits at this point.  I think the incense burner will be brass/gold.  I'm still thinking about what I want to do with the backpack details.

Adeptus Mechanicus Kill Team WIP

I went with blue lenses, choosing a base coat of GW  Lothern and a dot of GW Baharroth Blue in the center.  Thinned down Nuln Oil was shaded over this to add some definition around the edges of the lenses.  I'll come back in with a final spot of White or Baharroth Blue during the highlighting, I think.

Adeptus Mechanicus Kill Team WIP

Now that's looking a lot better.  At least my leader will be at a better standard for the campaign this week.  Next up will be finishing any missed details and adding the highlights.  Then some more work on the base.  I have already painted in some of the details, but neglected to take and shots of that work. And of course, I have painted the very cool name plates from Versatile Terrain.

Next week, I hope to have the whole team to this standard.  I also need to add in the four additional team members that wait in the wings to fill in for casualties and such during the campaign. I need to order their nameplates so they are still waiting in the wings.

Cheers and Happy Gaming!

Wednesday, October 24, 2018

DreadTober 2018 - TO DONE


The Legio Custodes Contemptor-Achillus is complete.  The paint brushes are down, the Model Masters Lusterless Flat seal coat is dry.  As I was re-working on the shoulder scroll, I realized that I would likely come to a point where I wanted to name this dread rather than simply using an action word on the scroll.  So I left it blank for now.  Otherwise, there has been no change to the dread since last week.

Another fun DreadTober is in the books for me.  I am already looking forward to DreadTober next year, as well as Squaduary!!  I will even try to get it together for Monster March if that is a thing still....and what about Army April? Maniple May? Justicar June? Juve July? Armiger August?!  Okay, okay.  I'll stop.  But you might admit, it'll be coool...

Here are some gallery shots of the finished project:

Legio Custodes Contemptor-Achillus Dreadnought

Legio Custodes Contemptor-Achillus Dreadnought

Legio Custodes Contemptor-Achillus Dreadnought

Legio Custodes Contemptor-Achillus Dreadnought

Legio Custodes Contemptor-Achillus Dreadnought

Legio Custodes Contemptor-Achillus Dreadnought
Posing with a Shield Captain for Scale
Another great blog project completed.  He is DONE.

Hobby Season 2018/19 To-Do List Stamp


And now I'm off to complete my Adeptus Mechanicus Kill Team...and put some work into my new Titanicus Axiom Maniple...and make more progress on my House Taranis Project...and...and...

Best of luck with your own DreadTober project.

Cheers and Happy Gaming!!

Thursday, October 18, 2018

DreadTober 2018 - Week 3


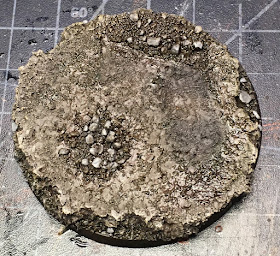
During week three, I began with work on the base.  As a reminder, the base looked like this after modelling.

Legio Custodes Contemptor-Achillus Dreadnought WIP custom base

This initial stage was then airbrushed with various Vallejo browns to lay down the initial base coat.

Legio Custodes Contemptor-Achillus Dreadnought WIP custom base

Next I applied washes of GW Agrax Earthshade and Athonian Camoshade.  While the washes were still drying, I dabbed some Vallejo grey on the larger rocks allowing the paint to blend a bit with the wash.

Legio Custodes Contemptor-Achillus Dreadnought WIP custom base


Once the wash dried, I dry brushed the whole thing and then mounted the dreadnought to the base using the same pin that had previously stuck it to the Bourbon cork I used while painting. Somewhat arbitrarily, I chose some 5-minute epoxy to glue the feet down this time instead of my usual super glue.   Here's how things look not that the dread is mounted to its base.

Legio Custodes Contemptor-Achillus Dreadnought WIP

Legio Custodes Contemptor-Achillus Dreadnought WIP

Next, Some additional dry brushing was done on the base followed by some experimentation with Forge World weathering powders, and pigment fixer.  I used a dark brown and a lighter brown dabbed on the base and brushed over the feet carefully to add dust and weather without obscuring the paint job too much.

Legio Custodes Contemptor-Achillus Dreadnought WIP

Looks like pretty convincing splotchy blasted ground I guess! :)  I have not had the pleasure of exploring any war-torn alien worlds lately! The base came out a bit more yellow in spots than I set out for, but I think in the end it goes well with the paint work.

Legio Custodes Contemptor-Achillus Dreadnought WIP

Seen above, I added a decal to the otherwise plain left shoulder pad from the Forge World Legio Custodes decal sheet.  This contemptor is an ancient relic worthy of millennia old iconography, I figure. Here's a close up of the decal work.

Legio Custodes Contemptor-Achillus Dreadnought WIP left shoulder decal

It's got a simple layer of GW Lahmian Medium over it in this picture and will look more blended with the model's paint work once the flat coat gets sprayed over all.  I also added some freehand lettering to the scroll on the right shoulder.

Legio Custodes Contemptor-Achillus Dreadnought WIP right should scroll

I will apologize to any of my UK readers who may find offense here, but "ira" is "wrath" in Latin (if my research was accurate).  So I intend no other reference here than that. Even using fine markers, my freehand lettering is pretty abysmal.  It'll stand for now.

Legio Custodes Contemptor-Achillus Dreadnought WIP


Following this, the model got a solid coat of varnish using Model Masters Lusterless Flat Coat. And that wrapped up progress for week three and the model for that matter.   I'm calling it here.  For week four, I will post up some gallery pics of the finished product.  I'm pleased to finish early and very happy with how this latest edition to my growing Adeptus Custodes force has come out.

I hope you projects are coming allow well too.

Cheers and Happy Gaming!

Tuesday, October 16, 2018

On the Workbench [October] - Titanicus

Titanicus WIP Reaver and Knights

With my DreadTober project going well and way ahead of schedule, I took some time out for a pet project that has captured my imagination...Titans for the new boxed game Titanicus!  I picked up a warlord, a Reaver, and a box of knights to start.  I plan to fill out a maniple with 1 Warlord, 2 Reavers, and 2 Warhounds to start, accompanied by a banner or two of Knights.  My maniple will be part of Legio Tempestus, and the knights will be heresy era House Taranis knights.

These are very detailed kits and pretty straight forward to assemble, with a few fiddly bits caused mostly by my big ol' fingers. :) I magnetized the Reaver weapons, and chose to go without the claw arm on the first Reaver. I'm thinking that the second will sport one arm weapon, and the claw for fun.

Titanicus WIP Reaver Titan Legs
 

I posed this first Reaver advancing over uneven terrain with the left leg raised.  The cork in this picture is just a place holder so I could get the pose right.  The legs are quite posable.

Titanicus WIP Reaver Titan Carapace Magnets

The carapace is molded with socket for a magnet, as is the carapace missile launcher. This made the first bit of magnetizing quite simple.

Titanicus WIP Reaver Titan Missile Launcher Magnets

The arms requiring some drilling.  And then some filling with Green stuff in order to support the magnet.

Titanicus WIP Reaver Titan Weapon Magnets

I used .25" magnets (roughly) and a .25" drill bit to carefully bore into the arm weapons. To make things easier and provide a secure socket, I then pushed greenstuff into the hole to fill the inside of the weapons and accept the magnets.  I pressed the magnets into the greesntuff enough to provide a slightly recessed socket. Then I simply glued the opposite magnets to the arms.  The weapons easily click into place now.

Titanicus WIP Reaver Titan Arm Magnets

Here is a shot of the assembled model.  The waist is held together with poster-tac at this point.  It could be easily magnetized, but I'm planning to simply glue mine down once I get the painting done.  The model is small enough to store without having to separate at the waist.

Titanicus WIP Reaver Titan

I then put some work into the base and glued the legs down.

Titanicus WIP Reaver Titan Base

Next I assembled a box of knights.

Titanicus WIP Imperial Knights

Here are close ups of each model.

Titanicus WIP Imperial Knight Warden
Knight Warden
 The Knight Warden gets a meltagun to give it a little close range punch.

Titanicus WIP Imperial Knight Paladin
Knight Paladin
 The Paladin is built stock with a heavy-stubber.

Titanicus WIP Imperial Knight Errant
Knight Errant
The Knight Errant is built stock as well.  I'm not planning to geek out on Titanicus and will likely play very few games.  You could buy several kits of the knights and got to town with the weapon options, magnetizing things and what not.  As a final step I put down some Vallejo Black Lava on the bases so they'd match the Reaver base.  I chose not to raise them on cork.

Titanicus WIP Imperial Knight bases

The knights then got mounted to Bourbon corks for painting and were sprayed with an undercoat of Vallejo Surface Primer Black.

Titanicus WIP Imperial Knights

And that is as far as I could get for now with this project before turning my attention once again to DreadTober. I'm excited to paint up some titans!  They are not of the grand scale of 40K, yet they will still be a pleasure to paint up and display.  With all luck, they will even take part in a battle or two before long.  I will be picking up a box of Warhounds this week, and probably the second box of knights.  Then I just need the final Reaver for the initial project.  This will be a fun side project to provide some variety to my ongoing 40K projects.

Cheers and Happy Gaming!
Thursday, October 11, 2018

DreadTober 2018 - Week 2


This week I did more work on the highlights.  First I applied Vallejo Steel over the storm bolters and the connection rods at the knuckles of the hands.

Legio Custodes Contemptor-Achillus Dreadnought WIP

Legio Custodes Contemptor-Achillus Dreadnought WIP

Legio Custodes Contemptor-Achillus Dreadnought WIP

Some Vallejo Silver was painted on the gems followed by some GW Soulstone Blue technical paint to stay consistent with the rest of the Custodes I have painted so far.  Not sure I love the look, but it does ad some pop and I've come this far with it so might as well continue.

I added edge highlights of Vallejo Old Gold to the armor, followed by Vallejo steel for some of the high points.  I think this largely washes out in the photos, but you get a peek of the silver highlights on the gold here and there.  I want it to be subtle, yet still effective to brighten the look of the model.

Vallejo Grey Blue (70.943) was used as an edge highlight for the black on the halberd barrel, the hands, and some of the joints where there were edges to highlight. Some Vallejo Gunmetal was painted on the gears in the joints and highlighted with Vallejo Steel.

Legio Custodes Contemptor-Achillus Dreadnought WIP

Legio Custodes Contemptor-Achillus Dreadnought WIP

Next I set to work on the gold, using Vallejo Chrome as an edge highlight.


Legio Custodes Contemptor-Achillus Dreadnought WIP

Legio Custodes Contemptor-Achillus Dreadnought WIP

Then I took a break and painted up the halberd blade according to my Adeptus Custodes paint recipe as taken from Duncan's youtube video on painting Adeptus Custodes (~10:15). I continue to shy away from painting in the crackling energy, as my attempts thus far have looked like some sea-based life forms clinging to the weapons.  Here's where I got to on the Dreadnought.


Legio Custodes Contemptor-Achillus Dreadnought WIP power blade

Legio Custodes Contemptor-Achillus Dreadnought WIP power blade

Here's the result at a distance.

Legio Custodes Contemptor-Achillus Dreadnought WIP

After this break, it was time for more highlights and cleanup.  The black joints and hands got more highlights, as did various portions of the gold.  I'm coming to a stopping point now where I will step away and complete the base, I think.  Then there will be plenty of time to come back and look things over for during a final pass.

Legio Custodes Contemptor-Achillus Dreadnought WIP

Legio Custodes Contemptor-Achillus Dreadnought WIP

Looking good.  My best wishes go out the all of the other challengers and their projects.

Cheers and Happy Gaming!