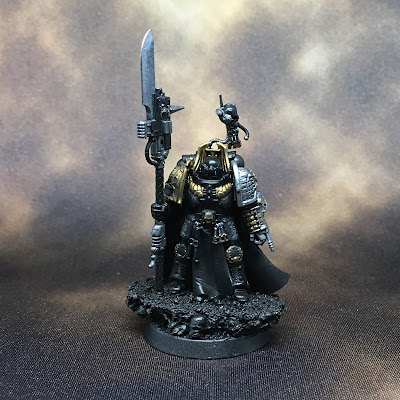
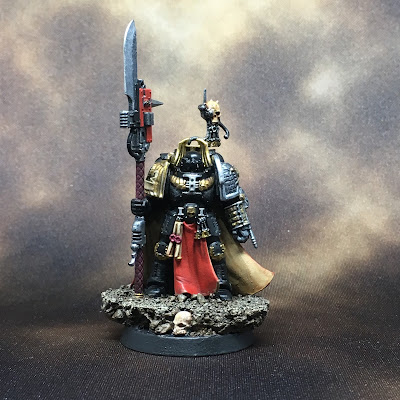
I decided to kick off the hobby season with a Deathwatch character, the Watch Master. I enjoy the detail on this model and he certainly seems to hold up on the battle field.
I started out with the stock build on a home-made cork base to give the model some extra height and presence on the battlefield.
Pretty straight forward so far, no magic yet. He is based with Vallejo black surface primer using an airbrush. I am just loving the airbrush for that purpose. I can base any time of year on any day without driving the family out with the fumes. In my basement hobby room, I have a near constant, comfortable temp and the air is relatively dry thanks to the judicial use of a couple dehumidifiers when needed. Perfect primer coats every time! No rattle-can-dust-disasters here.
My choice of colors is pretty stock here as well. I made some subtle choices here and there in the details that depart from the official GW pics...but nothing to crow about, just personal preference. In the first session, I got to work roughing out the armor, nailing down the silver arm and filling in the obvious details.
For the metallic colors, I am using Vallejo exclusively...Oily Steel and Gold here define the areas nicely.
I just love a nicely painted Deathwatch silver arm. On the watch master, I started with a Nuln Oil wash to define the details. I'll come back some blue later to brighten things up after some highlighting over the Nuln Oil wash. This session is all about blocking in the colors and getting the feel of the armor going.
During the second session, it was tie to get the tabard and cape colored in along with some other details that use the same colors. Man did I mess up not starting with at least the inside of the cap and tabard. I was in full despair as I watched many of the first session work botched by brush mistakes as I did my best to get to the inside around the legs without ruining everything. But with some studious and careful cleanup, you wouldn't know from the pics. All is well in the end here.
The cloak is done in GW colors, with a dark foundation base coat and and a brighter scarlet on top. I finished things off with a GW Agrax Earthshade wash for this session. More shading and highlighting to come. The bone also started with a darker base over painted with a lighter parchment color to avoid being muddy over the black primer. A GW Reikland Fleshshade wash went over the bone colors.
Session three brought more time and attention to the details. All of the primer is covered now...the base is well in hand, the halberd looking trim...and by the end a face emerges!
Since the model is posed at rest, I am opting to avoid painting a power weapon glow on the blade. It clearly isn't energized as he stands coolly by surveying a scene. That said, I did still want to put some work in so it looked sharp and oft-used. :) With at least one more session to go, I don't consider this done, but the halberd is respectable at this point in any event. I should note that I have studiously avoided much of my highlighting and final shading to this point. Still just blocking in the colors and ht overall basic look of the materials and surfaces.
Still loving the silver arm work! Some verdigris goes in the funky arm weapon to give it a decent sense of age and uniqueness.
Added a couple different color green spot washes to add a less blasted/wasted look to the terrain and to add a contrast to the red. I think it works...if I'm wrong, sing out in the comments! I expect to pick out a few stones and add some other highlights to the base...maybe in a spot of turf if I get to it. The model is looking "correct" to me at this point with all the colors blocked in with a basic shading and some simple highlights here and there.
And here we are at the end of the third painting session (each being only a couple hours a piece) with a close up. I was really liking the head by the end of things and put more work in there than on any other area to this point (though the hem of the cloak is at a close second!). The light box is washing some out, but I like the colors and contrast in there. So far, I'm opting for a grey eye area to give the impression on the eye while avoiding the "bright over staring eye syndrome" I typically end up with trying to get a realistic eyeball in there.
For the next session, details like lenses have to go in...and yes, I have to get the the highlighting...especially the edge highlighting I love so much with the Deathwatch. You would be right if you believe I have procrastinated on that to this point. I'm also still deciding on his original chapter so I can put something appropriate on the right pauldron. I'd like to put some text on the scroll, and a suitable chapter icon on the circle plate left for the device.
I'm well on the way to completing my first Deathwatch character. I'll wrap him up and then get on to the watch captains I have prepared. Then librarians and chaplains I expect. Miked in, I'll have to start in on the Grey Knights as well. Should be a fun fall.
Cheers and Happy Gaming!


Awesome work! Need to get him on the table soon, a great addition to any Deathwatch army.
ReplyDelete